Scalar Quantization and Product Quantization
A hands-on dive into scalar quantization (integer quantization) and product quantization with Python.
Read the entire series
- Introduction to Unstructured Data
- What is a Vector Database and how does it work: Implementation, Optimization & Scaling for Production Applications
- Understanding Vector Databases: Compare Vector Databases, Vector Search Libraries, and Vector Search Plugins
- Introduction to Milvus Vector Database
- Milvus Quickstart: Install Milvus Vector Database in 5 Minutes
- Introduction to Vector Similarity Search
- Everything You Need to Know about Vector Index Basics
- Scalar Quantization and Product Quantization
- Hierarchical Navigable Small Worlds (HNSW)
- Approximate Nearest Neighbors Oh Yeah (Annoy)
- Choosing the Right Vector Index for Your Project
- DiskANN and the Vamana Algorithm
- Safeguard Data Integrity: Backup and Recovery in Vector Databases
- Dense Vectors in AI: Maximizing Data Potential in Machine Learning
- Integrating Vector Databases with Cloud Computing: A Strategic Solution to Modern Data Challenges
- A Beginner's Guide to Implementing Vector Databases
- Maintaining Data Integrity in Vector Databases
- From Rows and Columns to Vectors: The Evolutionary Journey of Database Technologies
- Decoding Softmax Activation Function
- Harnessing Product Quantization for Memory Efficiency in Vector Databases
- How to Spot Search Performance Bottleneck in Vector Databases
- Ensuring High Availability of Vector Databases
- Mastering Locality Sensitive Hashing: A Comprehensive Tutorial and Use Cases
- Vector Library vs Vector Database: Which One is Right for You?
- Maximizing GPT 4.x's Potential Through Fine-Tuning Techniques
- Deploying Vector Databases in Multi-Cloud Environments
- An Introduction to Vector Embeddings: What They Are and How to Use Them
In the previous tutorial, we took a look at two of the most fundamental indexing algorithms - flat indexing and inverted file (IVF). Flat indexing is the simplest and most naive vector search strategy, but can surprisingly work quite well when the total dataset size is small (a couple thousand vectors) and/or if you're using a GPU for querying. IVF, on the other hand, is highly extensible to be highly extensible while working well with other indexing strategies too.
In this tutorial, we'll build on top of that knowledge by diving deeper into quantization techniques - specifically scalar quantization (also called integer quantization) and product quantization. We'll implement our own scalar and product quantization algorithms in Python.
Quantization vs. Dimensionality Reduction
As mentioned in a previous tutorial on vector similarity search, quantization is a technique for reducing the total size of the database by reducing the overall precision of the vectors. Note that this is very different from dimensionality reduction (PCA, LDA, etc), which attempts to reduce the length of the vectors:
>>> vector.size  # length of our original vector
128
>>> quantized_vector.size  # length of our quantized vector
128
>>> reduced_vector.size  # length of our reduced vector
16
Dimensionality reduction methods such as PCA use linear algebra to project the input data into a lower dimensional space. Without getting too deep into the math here, just know that these methods generally aren't used as the primary indexing strategy because they tend to have limitations on the distribution of the data. PCA, for example, works best on data that can be separated into independent, Gaussian distributed components.
Quantization, on the other hand, makes no assumption about the distribution of the data - rather, it looks at each dimension (or group of dimensions) separately and attempts to "bin" each value into one of many discrete buckets. Instead of performing a flat search over all of the original vectors, we can instead perform flat search over the quantized vectors - this can result in reduced memory consumption as well as significant speedup.
Scalar quantization
Scalar quantization is an important data compression technique that turns floating point values into low-dimensional integers. Let's take a look at an example:
>>> vector.dtype  # data type of our original vector
dtype('float64')
>>> quantized_vector.dtype
dtype('int8')
>>> reduced_vector.dtype
dtype('float64')
From the above example, we can see that scalar quantization has reduced the total size of our vectors (and vector database) by a whopping 8x. Nice.
How does scalar quantization work?
How exactly does scalar quantization work? Let's first take a look at the indexing process, i.e. turning floating point vectors into integer vectors. For each vector dimension, scalar quantization takes the maximum and minimum value of that particular dimension as seen across the entire database, and uniformly splits that dimension into bins across its entire range.
Let's try writing that in code. We'll first generate a dataset of a thousand 128D floating point vectors sampled from a multivariate distribution. Since this is a toy example, I'll be sampling from a Gaussian distribution; in practice, actual embeddings are rarely Gaussian distributed unless added as a constraint when training the model (such as in variational autoencoders):
>>> import numpy as np
>>> dataset = np.random.normal(size=(1000, 128))
This dataset serves as our dummy data for use in this scalar quantization implementation. Now, let's determine the maximum and minimum values of each dimension of the vector and store it in a matrix called ranges:
>>> ranges = np.vstack((np.min(dataset, axis=0), np.max(dataset, axis=0)))
You'll notice that the mins and maxes here are fairly uniform across all dimensions for the this toy example since the input data was sampled from zero-mean unit-variance Gaussians - don't worry about that for now, as all the code here translates to real data as well. We now have the minimum and maximum value of each vector dimension in the entire dataset. With this, we can now determine the start value and step size for each dimension. The start value is simply the minimum value, and the step size is determined by the number of discrete bins in the integer type that we'll be using. In this case, we'll be using 8-bit unsigned integers uint8_t for a total of 256 bins:
>>> starts = ranges[0,:]
>>> steps = (ranges[1,:] - ranges[0,:]) / 255
That's all the setup that's needed. The actual quantization is then done by subtracting all starting values for each dimension (starts) and dividing the resulting value by the step size (steps):
>>> dataset_quantized = np.uint8((dataset - starts) / steps)
>>> dataset_quantized
array([[136,  58, 156, ..., 153, 182,  30],
       [210,  66, 175, ...,  68, 146,  33],
       [100, 136, 148, ..., 142,  86, 108],
       ...,
       [133, 146, 146, ..., 137, 209, 144],
       [ 63, 131,  96, ..., 174, 174, 105],
       [159,  78, 204, ...,  95,  87, 146]], dtype=uint8)
We can also check the mins and maxes of the quantized dataset:
>>> np.min(dataset_quantized, axis=0)
array([0, 0, 0, 0, 0, 0, 0, 0, 0, 0, 0, 0, 0, 0, 0, 0, 0, 0, 0, 0, 0, 0,
       0, 0, 0, 0, 0, 0, 0, 0, 0, 0, 0, 0, 0, 0, 0, 0, 0, 0, 0, 0, 0, 0,
       0, 0, 0, 0, 0, 0, 0, 0, 0, 0, 0, 0, 0, 0, 0, 0, 0, 0, 0, 0, 0, 0,
       0, 0, 0, 0, 0, 0, 0, 0, 0, 0, 0, 0, 0, 0, 0, 0, 0, 0, 0, 0, 0, 0,
       0, 0, 0, 0, 0, 0, 0, 0, 0, 0, 0, 0, 0, 0, 0, 0, 0, 0, 0, 0, 0, 0,
       0, 0, 0, 0, 0, 0, 0, 0, 0, 0, 0, 0, 0, 0, 0, 0, 0, 0], dtype=uint8)
>>> np.max(dataset_quantized, axis=1)
array([255, 255, 255, 255, 255, 255, 255, 255, 255, 255, 254, 254, 255,
       255, 255, 255, 255, 255, 255, 255, 255, 255, 255, 255, 255, 255,
       255, 255, 255, 255, 254, 255, 255, 255, 255, 254, 255, 255, 254,
       254, 255, 255, 254, 255, 255, 255, 254, 255, 255, 255, 255, 255,
       255, 255, 255, 255, 254, 255, 255, 255, 255, 255, 254, 255, 255,
       255, 254, 255, 255, 255, 255, 255, 254, 254, 255, 255, 255, 255,
       255, 255, 255, 254, 255, 255, 255, 255, 254, 255, 255, 255, 255,
       255, 255, 255, 255, 255, 255, 255, 255, 255, 255, 255, 255, 255,
       255, 255, 255, 255, 255, 255, 255, 255, 255, 255, 255, 255, 255,
       255, 255, 255, 255, 255, 255, 255, 255, 255, 255, 255], dtype=uint8)
Note how we've used the full uint8_t range of [0,255] for each dimension (some of the maximum values are 254 instead of 255 due to floating point imprecisions).
Now let's put it all together in a ScalarQuantizer class:
import numpy as np


class ScalarQuantizer:

    def __init__(self):
        self._dataset = None

    def create(self):
        """Calculates and stores SQ parameters based on the input dataset."""
        self._dtype = dataset.dtype  # original dtype
        self._starts = np.min(dataset, axis=1)
        self._steps = (np.max(dataset, axis=1) - self._starts) / 255

        # the internal dataset uses `uint8_t` quantization
        self._dataset = np.uint8((dataset - self._starts) / self._steps)

    def quantize(self, vector):
        """Quantizes the input vector based on SQ parameters"""
        return np.uint8((vector - self._starts) / self._steps)

    def restore(self, vector):
        """Restores the original vector using SQ parameters."""
        return (vector * self._steps) + self._starts

    @property
    def dataset(self):
        if self._dataset:
            return self._dataset
        raise ValueError("Call ScalarQuantizer.create() first")


>>> dataset = np.random.normal(size=(1000, 128))
>>> quantizer = ScalarQuantizer(dataset)
And that's it for scalar quantization! The conversion function for scalar quantization can be changed to a quadratic or exponential function instead of a linear function as we have in the example above, but the general idea remains the same - split the entire space of each dimension into discrete bins in order to reduce the overall memory footprint of the vector data.
Product quantization
Product quantization (PQ) is another data compression technique that is much more powerful and flexible to quantize vectors when compared with scalar quantization. A major disadvantage of scalar quantization is that it does not take into consideration the distribution of values in each dimension. For example, imagine we have a dataset with the following 2-dimensional vectors:
array([[ 9.19,  1.55],
       [ 0.12,  1.55],
       [ 0.40,  0.78],
       [-0.04,  0.31],
       [ 0.81, -2.07],
       [ 0.29,  0.82],
       [ 0.05,  0.96],
       [ 0.12, -1.10]])
If we decide to quantize these vectors in to 3-bit integers (range [0,7]), 6 of the bins for the 0th dimension will be completely unused! Clearly, there must be a better way to perform quantization, especially if any of the dimensions have a non-uniform distribution. That's where product quantization can come to the rescure.
How does product quantization work?
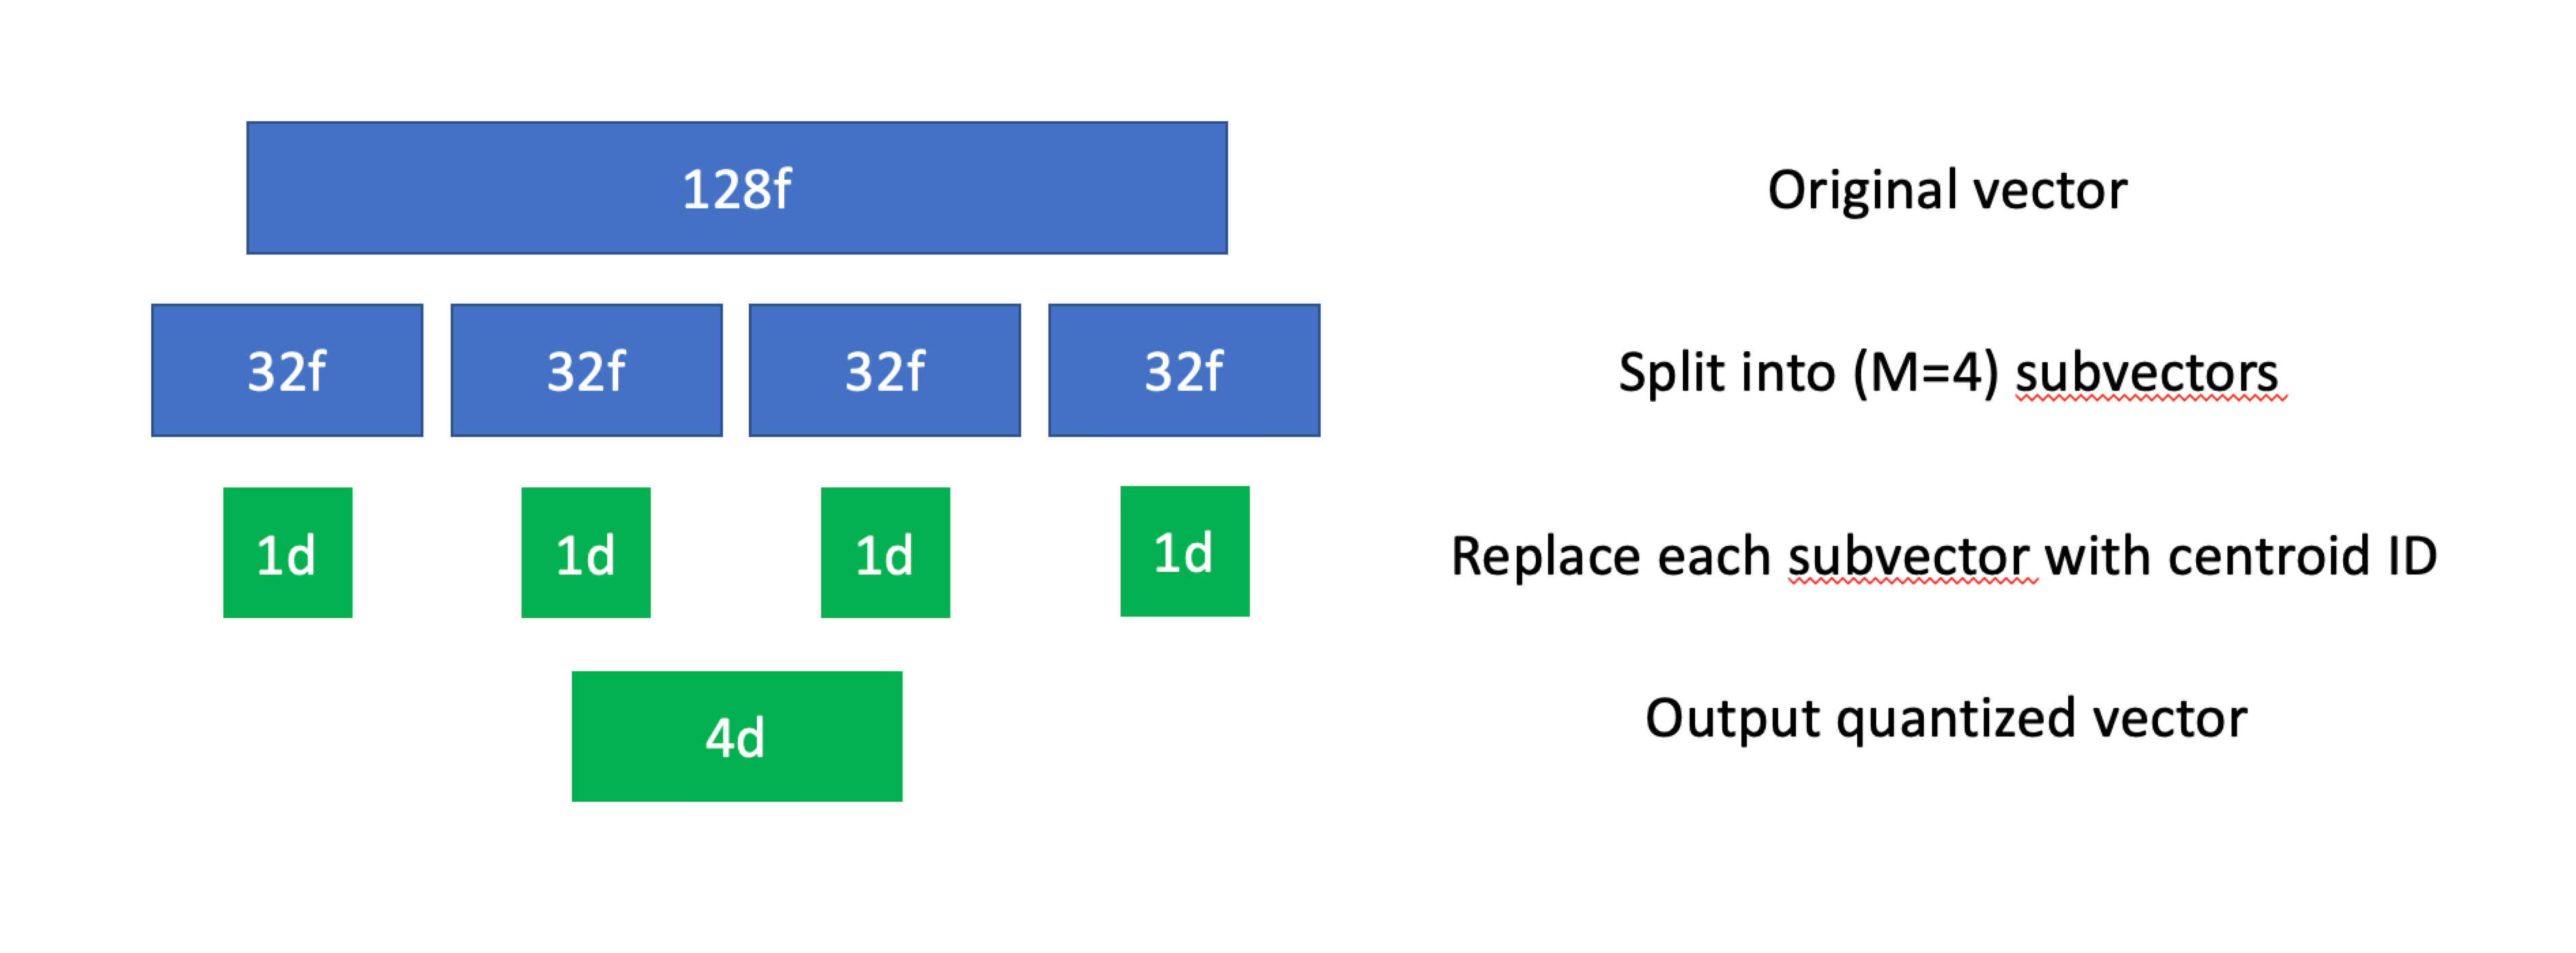
The primary idea behind product quantization is to algorithmically split a high-dimensional vector into a lower dimensional subspace, with dimension of the subspace corresponding to multiple dimensions in the original high-dimensional vector. This reduction process is typically done using a special algorithm called the Lloyd's algorithm, a quantizer which is effectively equivalent to k-means clustering. Like scalar quantization, each original vector results in a vector of integers post-quantization, and each integer corresponds with a particular centroid.
This might sound complex, but it becomes much easier to understand if we break it down from an algorithmic perspective. Let's first go over indexing:
- Given a dataset of
Ntotal vectors, we'll first divide each vector intoMsubvectors (also known as a subspace). These subvectors don't necessarily have to be the same length, but in practice they almost always are. - We'll then use k-means (or some other clustering algorithm) for all subvectors in the dataset. This will give us a collection of
Kcentroids for each subspace, each of which will be assigned its own unique ID. - With all centroids computed, we'll replace all subvectors in the original dataset with the ID of its closest centroid.
 Product quantization, visualized.
PQ can both reduce memory usage and signficantly speed up nearest neighbor search speeds at the cost of a bit of accuracy. The trade-off is dependent on the parameters used - using more centroids and subvectors will improve search accuracy but will not result in as much compression nor speedup.
Let's work through a very simple PQ implementation. As with the previous scalar quantization example, we'll be reducing the vectors into 8-bit unsigned integers (uint8_t) using M = 16 and K = 256, i.e. each 128D vector will be split into 16 subvectors of size 8, with each subvector then being quantized into one of 256 buckets.
>>> (M, K) = (16, 256)
We'll start with generating a toy dataset, as we did for the scalar quantization example:
>>> import numpy as np
>>> dataset = np.random.normal(size=(1000, 128))
With the dataset in hand, let's split off the first set of subvectors:
>>> sublen = dataset.shape[1] // M
>>> subspace = dataset[:,0:sublen]  # this is the 0th subspace
>>> subspace.shape
(1000, 8)
As with IVF, we'll use scipy's kmeans2 implementation to determine centroids:
>>> from scipy.cluster.vq import kmeans2
>>> (centroids, assignments) = kmeans2(subspace, K, iter=32)
The scipy k-means implementation returns the centroid indices in int32_t format, so we'll do a quick conversion to uint8_t to wrap things up:
>>> quantized = np.uint8(assignments)
This process gets repeated for each subspace until we've quantized all of the vectors.
As we've done for scalar quantization, let's also compile everything here into a class:
import numpy as np
from scipy.cluster.vq import kmeans2


class ProductQuantizer:

    def __init__(self, M=16, K=256):
        self.M = 16
        self.K = 256
        self._dataset = None

    def create(self, dataset):
        """Fits PQ model based on the input dataset."""
        sublen = dataset.shape[1] // self.M
        self._centroids = np.empty((self.M, self.K, sublen), dtype=np.float64)
        self._dataset = np.empty((dataset.shape[0], self.M), dtype=np.uint8)
        for m in range(self.M):
            subspace = dataset[:,m*sublen:(m+1)*sublen]
            (centroids, assignments) = kmeans2(subspace, self.K, iter=32)
            self._centroids[m,:,:] = centroids
            self._dataset[:,m] = np.uint8(assignments)

    def quantize(self, vector):
        """Quantizes the input vector based on PQ parameters"""
        quantized = np.empty((self.M,), dtype=np.uint8)
        for m in range(self.M):
            centroids = self._centroids[m,:,:]
            distances = np.linalg.norm(vector - centroids, axis=1)
            quantized[m] = np.argmin(distances)
        return quantized

    def restore(self, vector):
        """Restores the original vector using PQ parameters."""
        return np.hstack([self._centroids[m,vector[m],:] for m in range(M)])

    @property
    def dataset(self):
        if self._dataset:
            return self._dataset
        raise ValueError("Call ProductQuantizer.create() first")


>>> dataset = np.random.normal(size=(1000, 128))
>>> quantizer = ProductQuantizer()
>>> quantizer.create(dataset)
And that's it for product quantization! To really speed things up during the search process, we can expend a bit of extra memory to compute distance tables for all centroids in each subspace, but I'll leave that as a exercise for you.
Wrapping up
In this tutorial, we did a deep dive into scalar quantization and product quantization, creating our own simple implementations along the way. Scalar quantization is a good tool, but product quantization is much more powerful and can be used regardless of the distribution of our vector data. Please keep in mind that, while PQ can help significantly speed up query times while also reducing memory footprint, it is generally not that great for recall. We'll benchmark PQ along with several other indexing strategies in a future tutorial.
In the next tutorial, we'll continue our deep dive into indexing strategies with Hierarchical Navigable Small Worlds (HNSW) - a graph-based indexing algorithm that is arguably the most popular way to index vectors today (although it does come with its own downsides as well). See you in the next tutorial!
All code for this tutorial is freely available on Github: https://github.com/fzliu/vector-search.
Take another look at the Vector Database 101 courses
- Introduction to Unstructured Data
- What is a Vector Database?
- Comparing Vector Databases, Vector Search Libraries, and Vector Search Plugins
- Introduction to Milvus
- Milvus Quickstart
- Introduction to Vector Similarity Search
- Vector Index Basics and the Inverted File Index
- Scalar Quantization and Product Quantization
- Hierarchical Navigable Small Worlds (HNSW)
- Approximate Nearest Neighbors Oh Yeah (ANNOY)
- Choosing the Right Vector Index for Your Project
- DiskANN and the Vamana Algorithm
- Quantization vs. Dimensionality Reduction
- Scalar quantization
- Product quantization
- Wrapping up
- Take another look at the Vector Database 101 courses
Content
Start Free, Scale Easily
Try the fully-managed vector database built for your GenAI applications.
Try Zilliz Cloud for FreeKeep Reading

Milvus Quickstart: Install Milvus Vector Database in 5 Minutes
Milvus vector database supports two modes of deployments: standalone and cluster.

Integrating Vector Databases with Cloud Computing: A Strategic Solution to Modern Data Challenges
Integrating vector databases and cloud computing creates a powerful infrastructure that significantly enhances the management of large-scale, complex data in AI and machine learning.

How to Spot Search Performance Bottleneck in Vector Databases
Learn how to monitor search performance, spot bottlenecks, and optimize the performance in a vector database like Milvus.
