Transforming PDFs into Insights: Vectorizing and Ingesting with Zilliz Cloud Pipelines
You will learn how Zilliz Cloud Pipeline transforms PDF data into a format ready for LLMs to use in semantic search tasks. Finally, we will conduct data retrieval using vector search.
Read the entire series
- Image-based Trademark Similarity Search System: A Smarter Solution to IP Protection
- HM-ANN Efficient Billion-Point Nearest Neighbor Search on Heterogeneous Memory
- How to Make Your Wardrobe Sustainable with Vector Similarity Search
- Proximity Graph-based Approximate Nearest Neighbor Search
- How to Make Online Shopping More Intelligent with Image Similarity Search?
- An Intelligent Similarity Search System for Graphical Designers
- How to Best Fit Filtering into Vector Similarity Search?
- Building an Intelligent Video Deduplication System Powered by Vector Similarity Search
- Powering Semantic Similarity Search in Computer Vision with State of the Art Embeddings
- Supercharged Semantic Similarity Search in Production
- Accelerating Similarity Search on Really Big Data with Vector Indexing (Part II)
- Understanding Neural Network Embeddings
- Making Machine Learning More Accessible for Application Developers
- Building Interactive AI Chatbots with Vector Databases
- The 2024 Playbook: Top Use Cases for Vector Search
- Leveraging Vector Databases for Enhanced Competitive Intelligence
- Revolutionizing IoT Analytics and Device Data with Vector Databases
- Everything You Need to Know About Recommendation Systems and Using Them with Vector Database Technology
- Building Scalable AI with Vector Databases: A 2024 Strategy
- Enhancing App Functionality: Optimizing Search with Vector Databases
- Applying Vector Databases in Finance for Risk and Fraud Analysis
- Enhancing Customer Experience with Vector Databases: A Strategic Approach
- Transforming PDFs into Insights: Vectorizing and Ingesting with Zilliz Cloud Pipelines
- Safeguarding Data: Security and Privacy in Vector Database Systems
- Integrating Vector Databases with Existing IT Infrastructure
- Transforming Healthcare: The Role of Vector Databases in Patient Care
- Creating Personalized User Experiences through Vector Databases
- The Role of Vector Databases in Predictive Analytics
- Unlocking Content Discovery Potential with Vector Databases
- Leveraging Vector Databases for Next-Level E-Commerce Personalization
- Mastering Text Similarity Search with Vectors in Zilliz Cloud
- Enhancing Customer Experience with Vector Databases: A Strategic Approach
Introduction
Proper handling of data sources is essential for effectively utilizing large language models (LLMs) for natural language tasks. This is because the data might come in various formats, such as PDF, CSV, HTML, Markdown, Docs, etc. The problem is that transforming those data into the format expected by deep learning models can be tedious and cumbersome.
Furthermore, state-of-the-art methods to enhance the response accuracy of LLMs, such as RAG, rely on a proper advanced data processing workflow for input data, starting from raw text into searchable vectors. Each processing step requires deep expertise and specialized engineering.
This article will demonstrate leveraging Zilliz cloud pipeline to address those challenges. Specifically, you will learn how our pipeline transforms PDF data into a format ready for LLMs to use in semantic search tasks. Finally, we will conduct data retrieval using vector search.
From Raw Data to Searchable Vectors
Performing vector search in an RAG implementation requires the inputs to be vector embedding. However, transforming unstructured data like text documents into a searchable vector is not straightforward and involves several steps.
The first step is reading the data. If we have a document in PDF format, it likely spans multiple pages, resulting in a very long text. This lengthy text can pose challenges during the vector search task. One of the challenges of the lengthy text arises from the context length limitations of deep learning models responsible for transforming our text data into embeddings. For instance, BERT has a maximum token limit of 512 (for simplicity, you can think of a token as an equivalent of a word). If our text exceeds this limit, it will be truncated, potentially leading to significant inaccuracies in vector search results.
The second issue stems from the nature of the vector search task itself. The embedding generated by a deep learning model encapsulates the context of the entire text. Consequently, if we have an exceedingly long text, the embedding will represent a wide range of information and topics, making extracting relevant context from the text practically impossible.
To solve these problems, a lengthy document's processing workflow typically starts with the so-called chunking method.
PDF Chunking
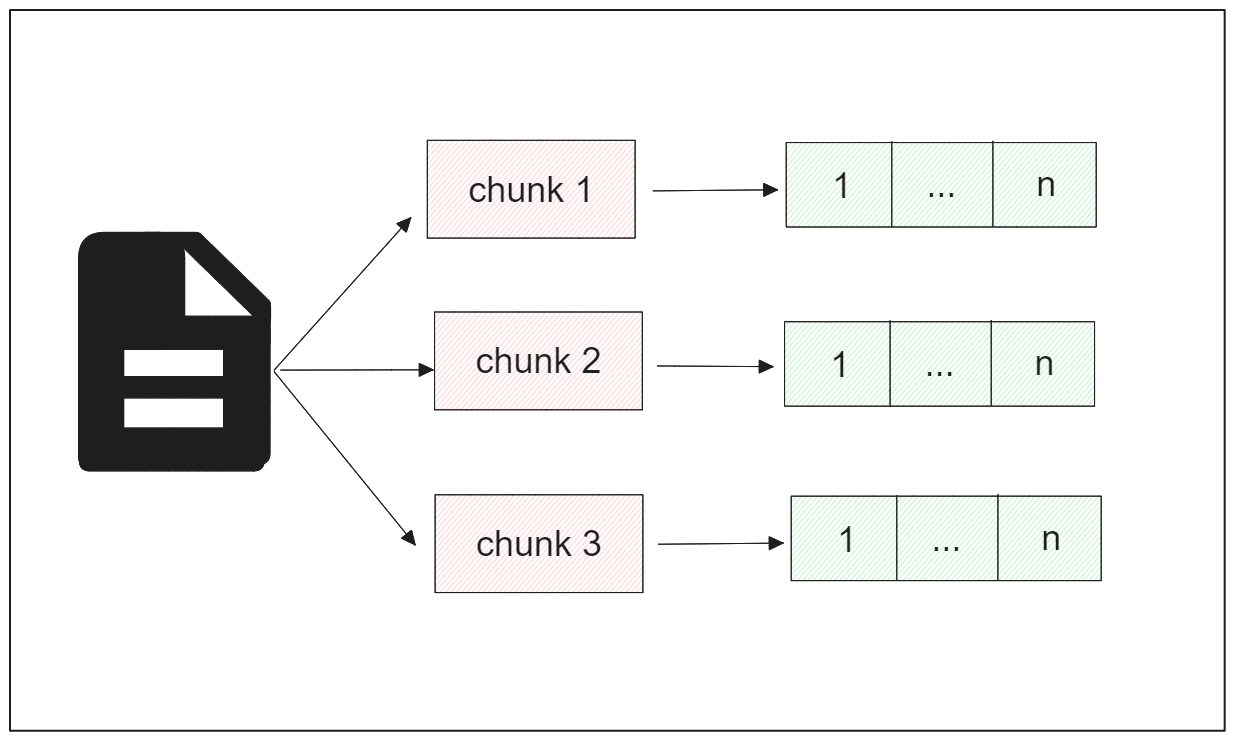
Chunking is a popular method used to address the challenge of dealing with overly long text. It involves breaking down a lengthy text into smaller segments. There are many approaches to text chunking but today let’s focus on two: fixed-size chunking and content-aware chunking.

Fixed-size chunking involves dividing a text into chunks of equal, predetermined sizes. Each chunk thus has the same size.
On the other hand, content-aware chunking treats the chunk size more as an outcome than an input. For example, we can segment a text based on specific markers such as whitespace, punctuation, paragraph breaks, headings, subheadings, etc. Alternatively, we can segment the text based on the requirements of the model we intend to use. For example, if we plan to utilize BERT with a context size of 512 tokens, each chunk would contain no more than 512 tokens.
However, before performing text chunking, we must address the issue of determining the appropriate chunk size:
- A smaller chunk size provides more granular information from each segment but risks of losing meaningful context.
- Conversely, a larger chunk size offers more elaborated information but may result in less precise search outcomes due to the broader content in each segment.
Thus, understanding the nature of the data and the desired search outcomes is crucial. Additionally, we must consider the context limitations of the chosen model.
PDF Vectorization
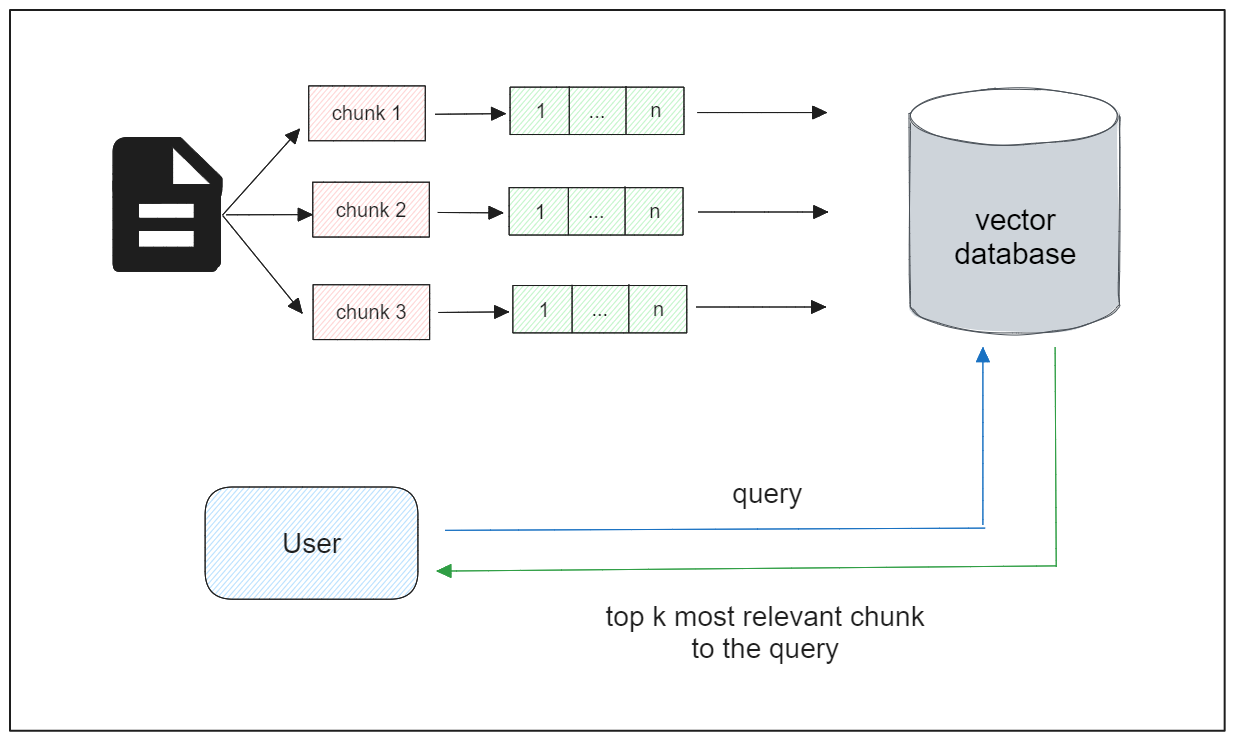
Following the transformation of text data into chunks, the next step involves converting these chunks into embeddings. Embeddings are numerical vector representations of entities, such as words, sentences, paragraphs, or chunks of text. There are two main types of embeddings: dense embeddings and sparse embeddings.

Dense embedding provides a compact numerical representation of an entity, where the vector's dimensionality aligns with the specifics of the deep learning model being used. This type of embedding contains rich information about the represented entity.
On the other hand, sparse embedding has higher dimensionality compared to dense embedding, but the majority of its values are zero, hence the term 'sparse'.
Both types of embeddings can be utilized for document analysis tasks, and it's also possible to combine them via hybrid search. However, for the implementation in the following sections, we'll focus on dense embeddings. Several deep learning models can be employed to transform each chunk into a dense embedding, which we'll explore in the next section.
Vector Database Integration
In situations where we have a limited number of chunk embeddings, we can proceed directly with semantic similarity tasks. However, real-world applications often involve large collections of lengthy documents, each containing a lot of chunks.
The complexity of handling and storing embeddings grows as the number of documents increases. Moreover, with more data, the latency of vector search also tends to slow down. Therefore, we need a robust technology capable of managing large collections of embeddings efficiently, and this is where a vector database comes into play.
A vector database can effectively store a vast collection of vector embeddings and employs advanced indexing strategies to optimize the searching process during vector search. Once we've stored the embeddings within a vector database, we can proceed with vector search. That is, given a query of a user, we want the vector database to return text chunks that are most relevant to that query.

Zilliz Cloud Data Ingestion Pipeline
As you can see from the previous section, the process of transforming raw PDF texts into a collection of searchable vectors involves several crucial steps, each demanding careful consideration.
For example, during the chunking process, two key factors must be addressed: the size of each chunk and the choice of deep learning model. Incompatibility between these factors can potentially lead to problems downstream, resulting in inaccurate results.
Similarly, when integrating a vector database into our application, several considerations come into play.
Let’s say we want to store additional fields alongside the vector embeddings of each chunk, such as chunk ID, chunk text, doc ID, and publishing year of the document. In such cases, it becomes necessary to assign specific data types to each field to ensure accurate representation of the data.
Furthermore, before storing vector embeddings in the vector database, we must define the index type for the vectors. Each index type comes with its own set of parameters, and fine-tuning these parameters to achieve the optimal configuration for our specific use case is essential. However, this process demands domain knowledge and can be quite cumbersome.

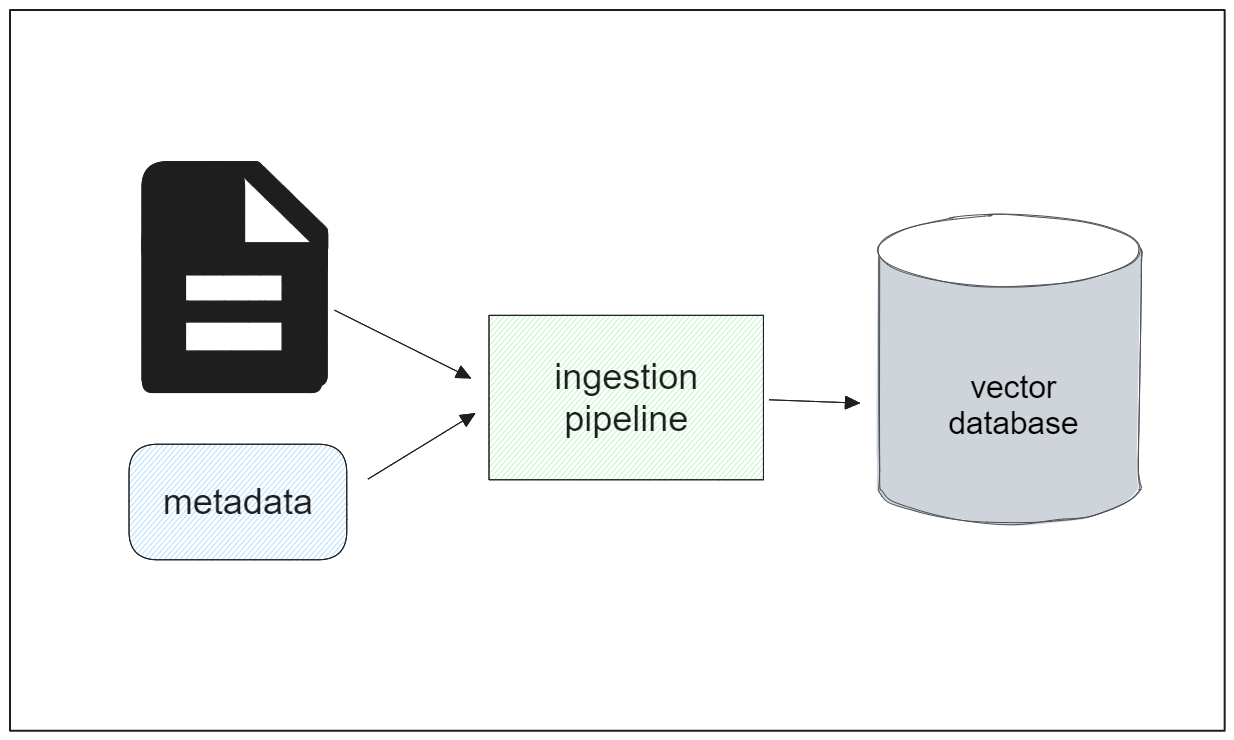
The Zilliz Cloud Pipeline is a data ingestion pipeline that serves as a comprehensive solution to the challenges discussed above. With this pipeline, the entire process of transforming raw PDF text from a source location into searchable vectors can be automated seamlessly with a simple configuration.
In general, the workflow of the Zilliz Cloud Pipelines can be outlined as follows:
Set the name of the cluster and collection where the data will be stored.
Define the ingestion pipeline, specifying parameters such as the embedding models to be used, the language of the input, the chunk size, and the separator to chunk each text.
Attach or specify the path of the input document, along with any metadata if necessary.
The pipeline will then proceed to split the input document into chunks, transform each chunk into embeddings, and store them within the designated collection.
We will delve into the step-by-step implementation of this pipeline in the following section.
Implementation of the Zilliz Cloud Data Ingestion Pipeline
In this section, we will guide you through the step-by-step implementation of leveraging the Zilliz Cloud Pipelines to transform your input document into searchable vectors.
For this demonstration, we will utilize one of the PDF files available from the Library of Congress, an open-source government dataset. You can download the entire dataset from the government website, or you can follow along by downloading a specific PDF file that we'll use for this implementation using the public link provided later inside of the code. Refer to this notebook for the complete code implementation.
Before proceeding with the data ingestion pipeline implementation, ensure that you have created a serverless cluster. It's a straightforward process and free of charge. You can create one by following this create-cluster documentation page.

Once you’ve set up your serverless cluster, you’ll get several credentials that you can use to create and run data ingestion pipeline, such as Cluster ID, Cloud region, API Key, and Project ID. Next, we can just copy each of the credentials into the following code:
import os

CLOUD_REGION = 'gcp-us-west1'
CLUSTER_ID = 'your CLUSTER_ID'
API_KEY = 'your API_KEY'
PROJECT_ID = 'your PROJECT_ID'
With the credentials defined above, now we can put them in the appropriate place to define our data ingestion pipeline. In the following code snippet, a collection called “ingestion_demo” will be created inside of our cluster.
import requests

headers= {
    "Content-Type": "application/json",
    "Accept": "application/json",
    "Authorization": f"Bearer {API_KEY}"
}

create_pipeline_url= f"https://controller.api.{CLOUD_REGION}.zillizcloud.com/v1/pipelines"

collection_name= 'ingestion_demo'

data = {
    "projectId": PROJECT_ID,
    "name": "my_ingestion_pipeline",
    "description": "A pipeline that splits a text file into chunks and generates embeddings. It also stores the doc version with each chunk.",
    "type": "INGESTION",

    "clusterId": f"{CLUSTER_ID}",
    "newCollectionName": f"{collection_name}"
}
Now let’s create the data to be put inside of our newly created collection.
With the Zilliz Cloud Pipelines, we specify the type of data that we want to store inside the collection within the so-called functions key. There are two different functions available: INDEX_DOC and PRESERVE.
INDEX_DOC function is the core input data of the pipeline. This means that it expects a document as an input with extensions like txt, pdf, doc, docx, csv, xlsx, pptx, etc. This function will then split the document into chunks and transform them into embeddings. This function maps an input field (the path to our input document) to four output fields (doc_name, chunk_id, chunk_text, and embedding).
PRESERVE function is an optional function in data ingestion pipeline. It stores additional user-defined metadata that describe the input document, such as the publishing year, the author, the category of the document, etc.
In one data ingestion pipeline, you’re allowed to have one INDEX_DOC function and up to five PRESERVE functions.
The following code snippet shows you how you can create an INDEX_DOC function.
data = {
    ....
    "functions": [
        {
            "name": "index_my_doc",
            "action": "INDEX_DOC",
            "inputField": "doc_url",
            "language": "ENGLISH",
            "chunkSize": 100,
            "embedding": "zilliz/bge-base-en-v1.5",
            "splitBy": ["\\n\\n", "\\n", " ", ""]
        },
}
There are several fields that we need to cover inside of the function:
name: the name of the function and it should contain a string of 3-64 characters. The string can contain only alphanumeric letters and underscores.action: the type of the function, and there are only two options for this field: INDEX_DOC or PRESERVE.inputField: if the type of our function is INDEX_DOC, then theinputFieldshould always be set to doc_url. Meanwhile, if the type of function is PRESERVE, then we can customize the name according to the metadata that we want to add. However the name should be identical tooutputField, which we’ll see once we define the PRESERVE function shortly.language: the language of your input document.chunkSize: the size of each chunk. You can customize it according to the embedding model that you use.embedding: the model that you want to use to transform chunks into embeddings.splitBy: the separator you would like to implement for the chunking process.
The chunkSize field should be customized according to a specific embedding model that we want to use inside the embedding field. Zilliz supports several state-of-the-art embedding models that you can implement straight away. Below is the list of the supported embedding models as well as the chunk size range of each model.
| Model | Chunk Size Range (tokens) | Model Info |
| zilliz/bge-base-en-v1.5 | 20-500 | https://huggingface.co/BAAI/bge-base-en-v1.5 |
| zilliz/bge-base-zh-v1.5 | 20-500 | https://huggingface.co/BAAI/bge-base-zh-v1.5 |
| voyageai/voyage-2 | 20-3,000 | https://docs.voyageai.com/docs/embeddings |
| voyageai/voyage-code-2 | 20-12,000 | https://blog.voyageai.com/2024/01/23/voyage-code-2-elevate-your-code-retrieval/ |
| voyageai/voyage-large-2 | 20-12,000 | https://docs.voyageai.com/docs/embeddings |
| openai/text-embedding-3-small | 250-8,191 | https://platform.openai.com/docs/guides/embeddings/embedding-models |
| openai/text-embedding-3-large | 250-8,191 | https://platform.openai.com/docs/guides/embeddings/embedding-models |
You can also customize the splitting method of the chunk. The recursive splitting method is implemented by default via ["nn", "n", " ", ""] . However, you can also split the text such that each chunk represents a sentence, a paragraph, or a whole section. As examples, you can separate the text by sentences (".", ""), paragraphs ("nn", ""), lines ("n", ""), or even customized strings.
So far, we have defined our INDEX_DOC function. Let’s say that now we want to include the publishing year as a metadata of our input document. We can do so by implementing a PRESERVE function.
{
      "name": "keep_doc_info",
      "action": "INDEX_DOC",
      "inputField": "publishing_year",
      "outputField": "publishing_year",
      "fieldType": "Int32"

  }
When we implement a PRESERVE function, we can customize the name of the input field. However, one important thing to remember is that the inputField and outputField should be identical. We should also define the data type of the field. The possible options for data type include Bool, Int8, Int16, Int32, Int64, Float, Double, and VarChar . Since our metadata is a publishing year, let’s use Int16 as the data type.
And that’s basically it. Below is the complete list of what we should include inside of the data variable after implementing INDEX_DOC and PRESERVE functions.
data = {
    "projectId": PROJECT_ID,
    "name": "my_ingestion_pipeline",
    "description": "A pipeline that splits a text file into chunks and generates embeddings. It also stores the doc version with each chunk.",
    "type": "INGESTION",

    "clusterId": f"{CLUSTER_ID}",
    "newCollectionName": f"{collection_name}",
    "functions": [
        {
            "name": "index_my_doc",
            "action": "INDEX_DOC",
            "inputField": "doc_url",
            "language": "ENGLISH",
            "chunkSize": 100,
            "embedding": "zilliz/bge-base-en-v1.5",
            "splitBy": ["\\n\\n", "\\n", " ", ""]
        },
        {
                  "name": "keep_doc_info",
                  "action": "PRESERVE",
                  "inputField": "publishing_year",
                  "outputField": "publishing_year",
                  "fieldType": "Int16"

              }
            ]
}
Next, we can create the ingestion pipeline with the following code.
response = requests.post(create_pipeline_url, headers=headers, json=data)
print(response.json())
ingestion_pipe_id = response.json()["data"]["pipelineId"]

"""
Output:
{'code': 200, 'data': {'pipelineId': 'pipe-7636f4340ec77ab1886816', 'name': 'my_ingestion_pipeline', 'type': 'INGESTION', 'description': 'A pipeline that splits a text file into chunks and generates embeddings. It also stores the doc version with each chunk.', 'status': 'SERVING', 'functions': [{'action': 'INDEX_DOC', 'name': 'index_my_doc', 'inputField': 'doc_url', 'language': 'ENGLISH', 'chunkSize': 100, 'splitBy': ['\\n\\n', '\\n', ' ', ''], 'embedding': 'zilliz/bge-base-en-v1.5'}, {'action': 'PRESERVE', 'name': 'keep_doc_info', 'inputField': 'publishing_year', 'outputField': 'publishing_year', 'fieldType': 'Int16'}], 'clusterId': 'in03-6e1134e6a5a7d33', 'newCollectionName': 'ingestion_demo', 'totalTokenUsage': 0}}
"""
If the creation of the pipeline has been successful, then you’ll see a status code of 200 as the JSON response, along with the pipeline ID. Now that we have created the pipeline, we can run it by attaching our input data document. Then, the pipeline will ingest the data and transform it into searchable vectors inside our collection.
You can provide the path to your input document in two different ways: one is via cloud storage systems such as AWS S3 or Google Cloud Storage (GCS), and the other is via your local computer. In the following example, we’ll get the PDF file from a public GCS link.
input_doc_path= 'https://storage.googleapis.com/ingestion_demo_zilliz/pdf_data.pdf'

run_pipeline_url = f"https://controller.api.{CLOUD_REGION}.zillizcloud.com/v1/pipelines/{ingestion_pipe_id}/run"

data = {
    "data":
        {
            "doc_url": f"{input_doc_path}",
            "publishing_year": '2000'
        }
}

response = requests.post(run_pipeline_url, headers=headers, json=data)

print(response.json())
"""
Output:
{'code': 200, 'data': {'token_usage': 1510, 'doc_name': 'pdf_data.pdf', 'num_chunks': 19}}
"""
As you can see above, inside of the data field, we also need to provide information regarding the inputField we created with both INDEX_DOC and PRESERVE functions before. If the run has been successful, then you can see information such as doc_name and num_chunks.
If you take a look at what's inside of our collection, then we can see that we have six fields: id, doc_name, chunk_id, chunk_text, embedding, and publishing_year. The doc_name, chunk_id, chunk_text, and embedding are the fields that are automatically generated by the INDEX_DOC function.
Now let’s perform a vector search using the data ingested into our collection. There are several ways you can perform a vector search with Zilliz and Milvus, but since we’ve been talking about pipelines, let’s create a specific pipeline for vector search.
data = {
    "projectId": PROJECT_ID,
    "name": "search_pipeline",
    "description": "A pipeline that receives text and search for semantically similar doc chunks",
    "type": "SEARCH",
    "functions": [
        {
            "name": "search_chunk_text",
            "action": "SEARCH_DOC_CHUNK",
            "inputField": "query_text",
            "clusterId": f"{CLUSTER_ID}",
            "collectionName": f"{collection_name}"
        }
    ]
}

response = requests.post(create_pipeline_url, headers=headers, json=data)

print(response.json())
search_pipe_id = response.json()["data"]["pipelineId"]

"""
Output:
{'code': 200, 'data': {'pipelineId': 'pipe-ea047e284b82d13a7e1238', 'name': 'search_pipeline', 'type': 'SEARCH', 'description': 'A pipeline that receives text and search for semantically similar doc chunks', 'status': 'SERVING', 'functions': [{'action': 'SEARCH_DOC_CHUNK', 'name': 'search_chunk_text', 'inputField': 'query_text', 'clusterId': 'in03-6e1134e6a5a7d33', 'collectionName': 'ingestion_demo', 'embedding': 'zilliz/bge-base-en-v1.5'}], 'totalTokenUsage': 0}}
"""
The code structure above should be familiar to you by now, as it has a similar structure as the ingestion pipeline. We set the type to be SEARCH instead of INGEST and we set the name query_text as the inputField. Finally, we also need to specify the cluster ID and the collection name in which the data should be retrieved from. If the creation of the search pipeline above is successful, you’ll get a unique pipeline ID for that.
If we have a query, we can run the search pipeline to retrieve the most relevant chunk in our collection to the given query. As an example, let’s say we have a question: “What is the salary of broadcast technicians?”, we can run the search pipeline with the following code:
import pprint

def retrieval_with_pipeline(question, search_pipe_id, top_k=1, verbose=False):
    run_pipeline_url = f"https://controller.api.{CLOUD_REGION}.zillizcloud.com/v1/pipelines/{search_pipe_id}/run"

    data = {
        "data": {
            "query_text": question
        },
        "params": {
            "limit": top_k,
            "offset": 0,
            "outputFields": [
                "chunk_text",
            ],
        }
    }
    response = requests.post(run_pipeline_url, headers=headers, json=data)
    if verbose:
        pprint.pprint(response.json())
    results = response.json()["data"]["result"]
    retrieved_texts = [{'chunk_text': result['chunk_text']} for result in results]
    return retrieved_texts

query = 'What is the salary of broadcast technicians?'
result = retrieval_with_pipeline(query, search_pipe_id, top_k=1, verbose=True)
print(result)

"""
Output:
{'code': 200,
 'data': {'result': [{'chunk_text': 'Broadcast Technicians, page 3 of 3\\n'
                                    'Audiovisual Communications '
                                    'Technologies/Technicians, Other.  - Any '
                                    'instructional program in audiovisual\\n'
                                    'communications technologies not listed '
                                    'above.\\n'
                                    'Wages\\n'
                                    'In NY the average wage for this '
                                    'occupation was:\\n'
                                    '$33,030 for entry level workers, and '
                                    '$65,350 for experienced workers.\\n'
                                    'Job Outlook\\n'
                                    'Based on the total number of annual '
                                    'openings and its growth rate, the '
                                    'employment prospects for this occupation',
                      'distance': 0.7437874674797058,
                      'id': 448985674931815193}],
          'token_usage': 18}}
"""
And there we have it. As you can see, the response matches our query. You can try it out yourself by, for example, asking different queries, adding more documents to the collection, or experimenting with the chunk size strategy during the chunking process.
Conclusion
Several steps are involved in transforming an input document into a format that will be usable for LLMs. First, the input document needs to be split into chunks of a certain size. Then, each chunk should be transformed into an embedding using a deep learning model. Finally, we put the embeddings into a vector database for efficient storage and searching.
In this post, we have seen how Zilliz Cloud Pipelines simplifies the process of transforming raw documents into searchable vectors within a database. These vectors can then be used for semantic similarity tasks to improve the response accuracy of LLMs via the RAG method.
- Introduction
- From Raw Data to Searchable Vectors
- Zilliz Cloud Data Ingestion Pipeline
- Implementation of the Zilliz Cloud Data Ingestion Pipeline
- Conclusion
Content
Start Free, Scale Easily
Try the fully-managed vector database built for your GenAI applications.
Try Zilliz Cloud for FreeKeep Reading

Proximity Graph-based Approximate Nearest Neighbor Search
Learn what PG-based ANNS is and how to optimize the algorithm to achieve a trade-off between search accuracy and efficiency.

Enhancing Customer Experience with Vector Databases: A Strategic Approach
Understand how vector databases process data to enhance customer experience and drive business growth.

Safeguarding Data: Security and Privacy in Vector Database Systems
As our world becomes increasingly digital and shaped by ML and AI services, the role of vector databases like Milvus and managed services like Zilliz Cloud becomes ever more crucial. With data providing so much power, it is paramount to prioritize robust data security and privacy measures.
