Building RAG with Self-Deployed Milvus Vector Database and Snowpark Container Services
Jiang Chen, Head of Ecosystem & AI Platform at Zilliz, recently discussed how we can seamlessly integrate Milvus with Snowflake in a talk at the Unstructured Data Meetup. Specifically, he explored how to build a Retrieval Augmented Generation (RAG) system with the Milvus vector database and its integration with the Snowflake ecosystem using the Snowpark Container Service (SPCS).
< Watch Jiang Chen’s talk on Youtube >
This post will recap Jiang’s key points and cover three important topics.
First, we will discuss utilizing Milvus for vector search, an essential step for building a RAG system. Next, we’ll discuss how to integrate Milvus into Snowflake with SPCS. Finally, we’ll also discuss the future landscape of RAG. Before diving deep into the topics, let's explore how AI has transformed information retrieval.
How AI Revolutionizes the Information Retrieval Process
The advancement and popularity of AI have quickly changed the entire landscape of information retrieval. Before the rise of AI, information retrieval relied heavily on statistical models and keyword-matching methods like tagging. For example, an online shop owner would need to manually enter tags for each product into predefined categories. If they have a huge catalog of products, this process would not be practical.
Similarly, as customers, we would need to enter appropriate tags to get the exact product we want. The problem is, if we enter a tag that's not exact but has a similar meaning to the product we want, the information retrieval via the tagging method will fail to give us the appropriate products. In other words, the tagging method doesn't consider a query's semantic meaning.
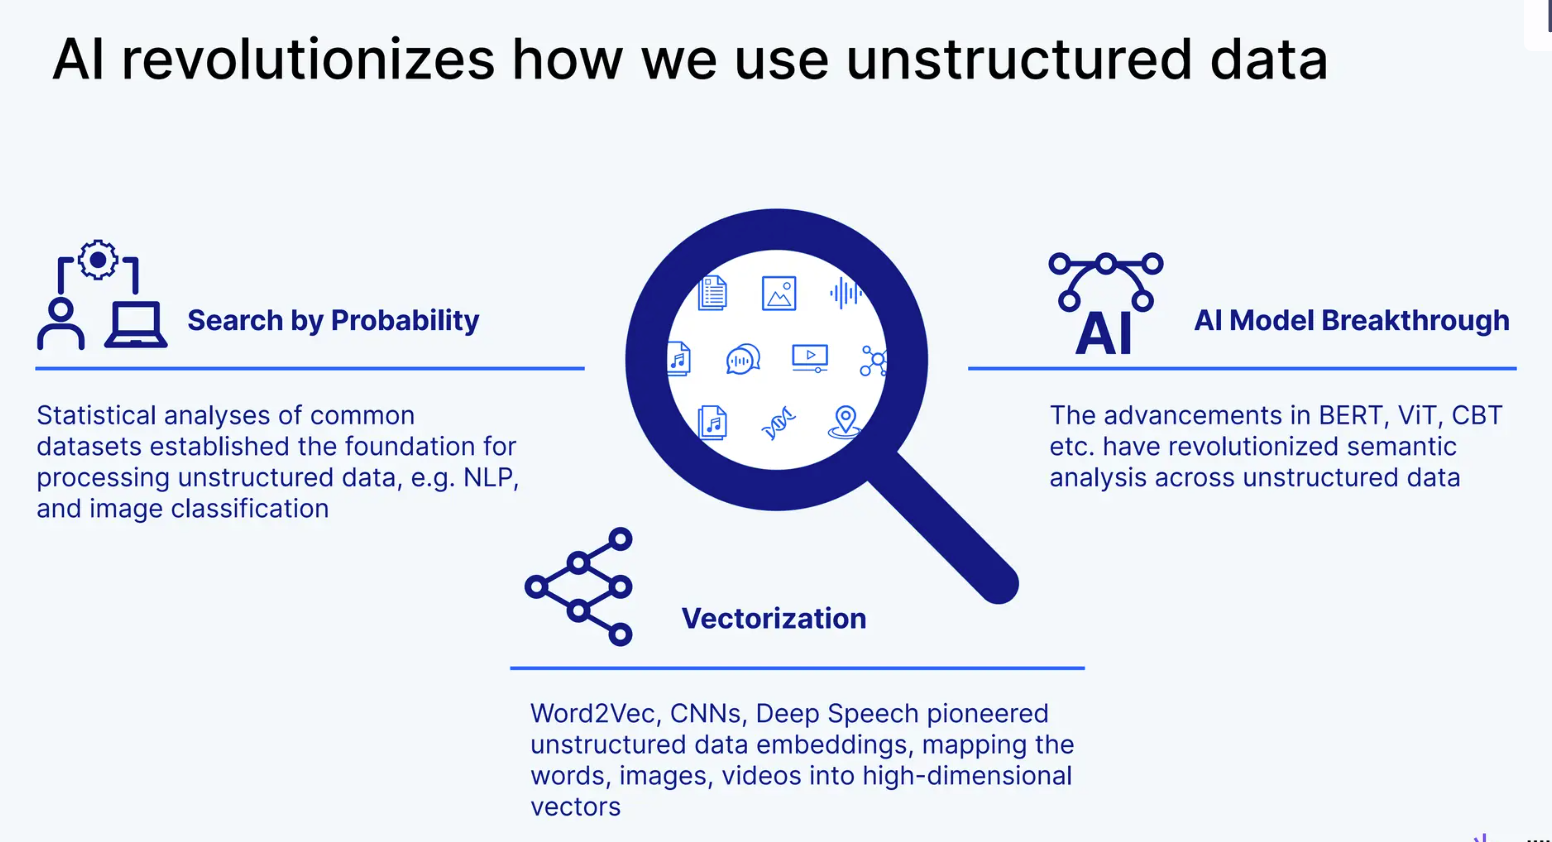 AI revolutionizes how we use unstructured data
AI revolutionizes how we use unstructured data
AI revolutionizes how we use unstructured data
The inception of embedding models has completely transformed how we retrieve information. Most embedding models use the famous Transformer architecture as their backbone. The Transformer model leverages several encoder-decoder blocks, each containing a specialized attention layer. This layer enables the model to sense the semantic meaning of each input token with respect to the whole input sequence, making embedding models able to infer the semantic meaning of input words.
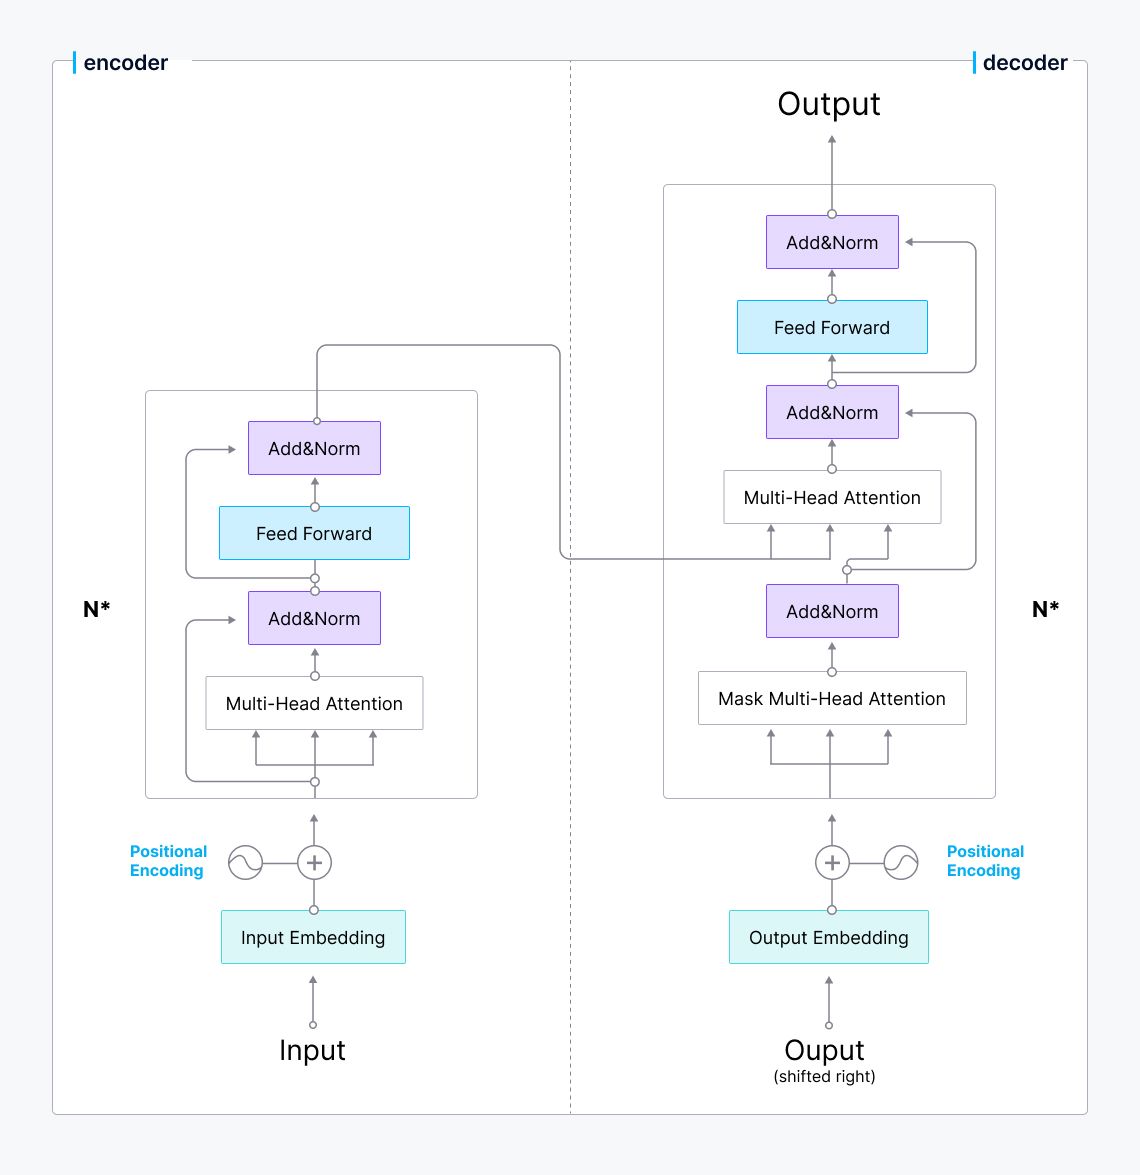 Transformer architecture
Transformer architecture
The embedding models will transform queries, images, or text descriptions into their numerical representations called vector embeddings. A vector embedding carries a semantic-rich meaning of the input it represents, and we can compare the similarity between two vector embeddings via cosine similarity or cosine distance. If the similarity is high, then two vector embeddings have similar meaning, and vice versa.
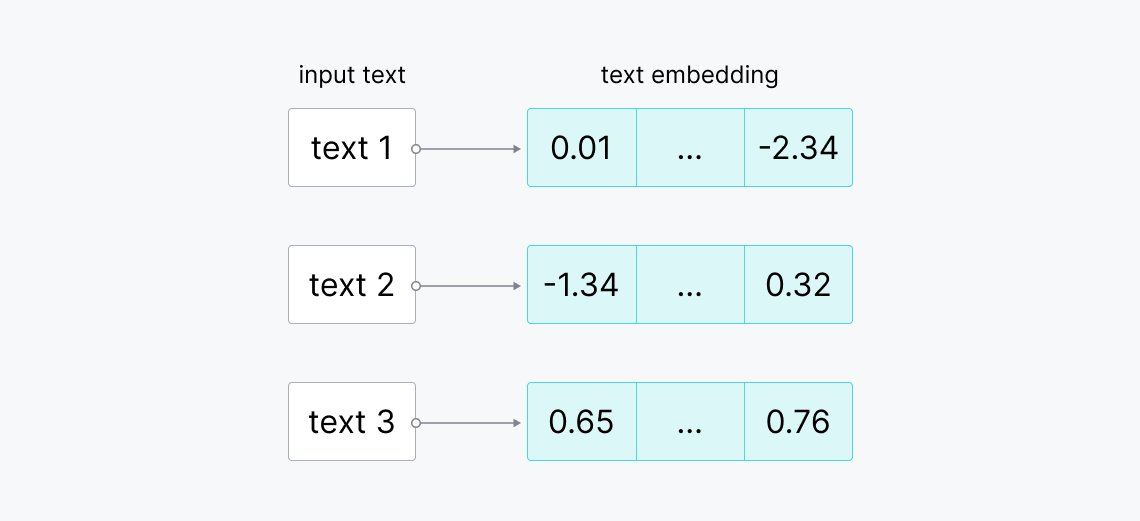 Raw texts to vector embeddings.png
Raw texts to vector embeddings
Due to these powerful traits, embedding models make implementing the information retrieval concept much easier and more flexible.
Retrieval Augmented Generation (RAG)
The rapid advancement of embedding models and the rise of large language models (LLMs) have led to the inception of RAG, a very sophisticated information retrieval method. RAG is designed to enhance an LLM's response quality by providing the LLM with relevant context from an internal knowledge base alongside the query. The LLM will then use the provided context to answer the query.
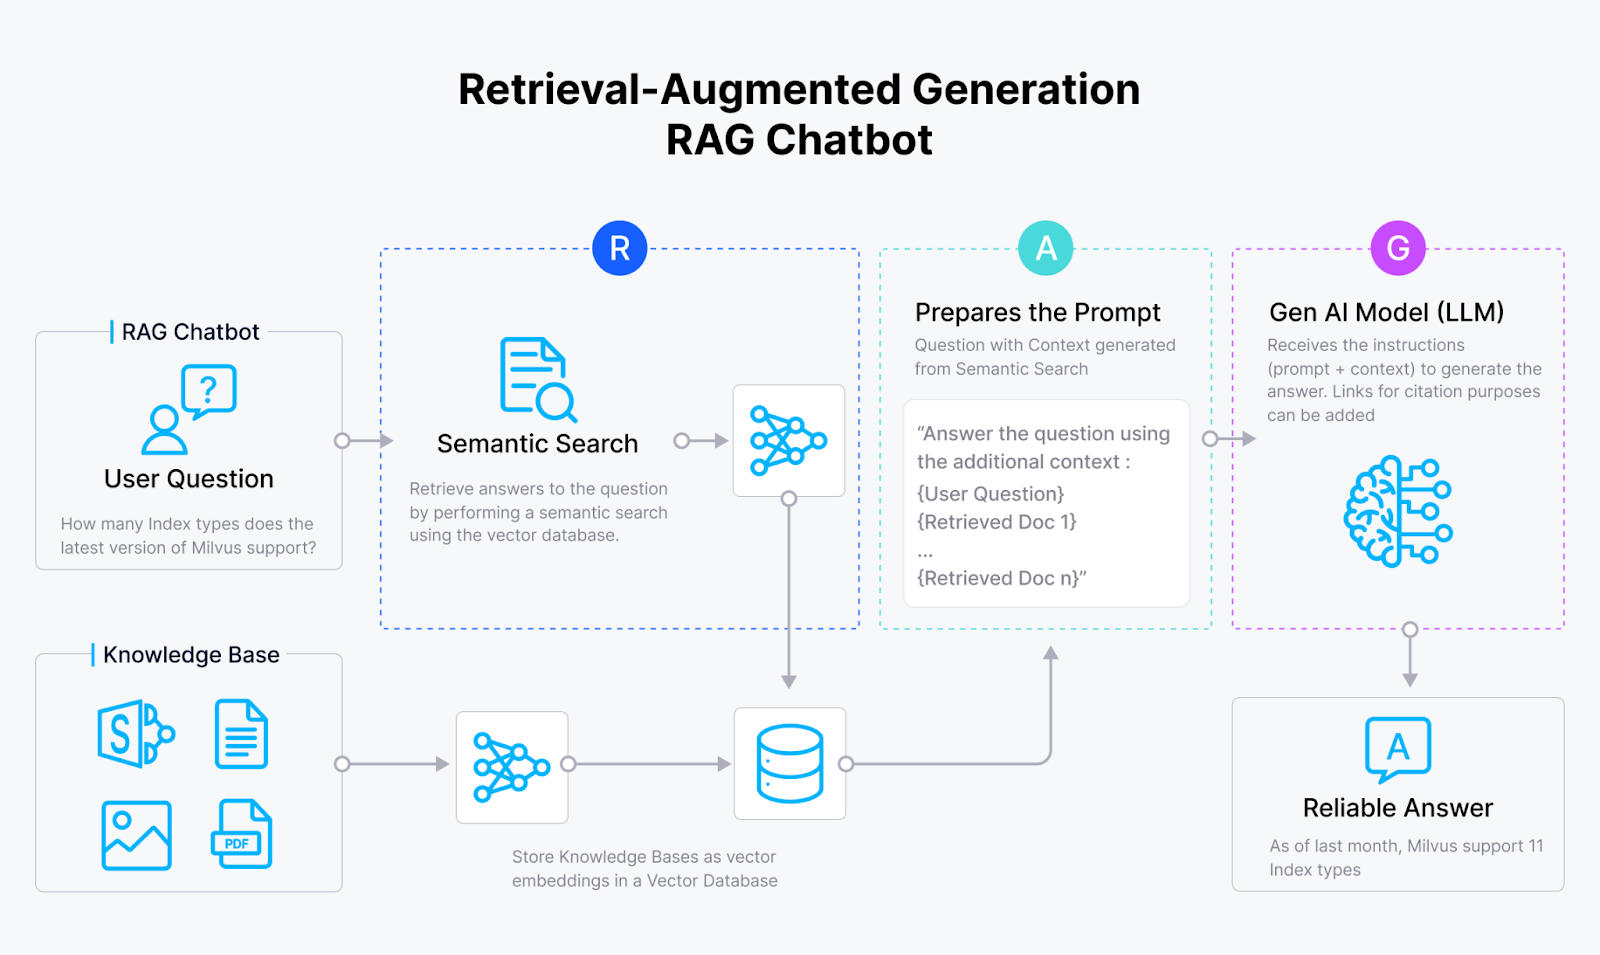 RAG architecture
RAG architecture
In a RAG application, we use our chosen embedding models to transform our data and input query into embeddings. Then, we compute the similarity between the embedding of our query and the embeddings of our own data. The data most similar to our query will then be passed into an LLM as context alongside our query. Ultimately, our LLM can generate an answer to the query based on the provided context. This way, we can enhance the response accuracy of an LLM without the need to fine-tune it.
Integrating Milvus Vector Database and Snowflake with Snowpark Container Service
Milvus is an open-source vector database that enables you to store a massive amount of vector embeddings useful for RAG applications and perform vector searches on them in a split second. There are several options to install and use Milvus:
- Milvus Lite: A lightweight version of Milvus that is suitable for quick prototyping. Milvus Lite does not require a server; you can run it on your own device. The installation process is as simple as using a pip install command.
!pip install "pymilvus>=2.4.2"
from pymilvus import MilvusClient
client = MilvusClient("milvus_demo.db")
- Milvus in Docker: If you want to use your Milvus vector database in production and only have a small amount of data, you can run it as a Docker container. The process is also straightforward, as you only need to run these commands in your command line:
# Download the installation script
$ curl -sfL <https://raw.githubusercontent.com/milvus-io/milvus/master/scripts/standalone_embed.sh> -o standalone_embed.sh

# Start the Docker container
$ bash standalone_embed.sh start

# In your Python IDE
from pymilvus import MilvusClient

client = MilvusClient(
uri="<http://milvus:19530>",
)
- Milvus in Kubernetes: This option is suitable if you have massive amounts of data or your RAG applications have a massive number of users. You can store up to 100 billion vectors with Kubernetes. The installation process with Kubernetes is a bit more complicated than that of Milvus Lite and Docker. Therefore, refer to the installation documentation for detailed information.
Milvus offers seamless integration with popular AI toolkits such as OpenAI, HuggingFace, Cohere, LangChain, LlamaIndex, and Snowflake. These integrations make it easy to build your own RAG systems or other GenAI applications. This section will show you how to run Milvus inside the Snowflake ecosystem.
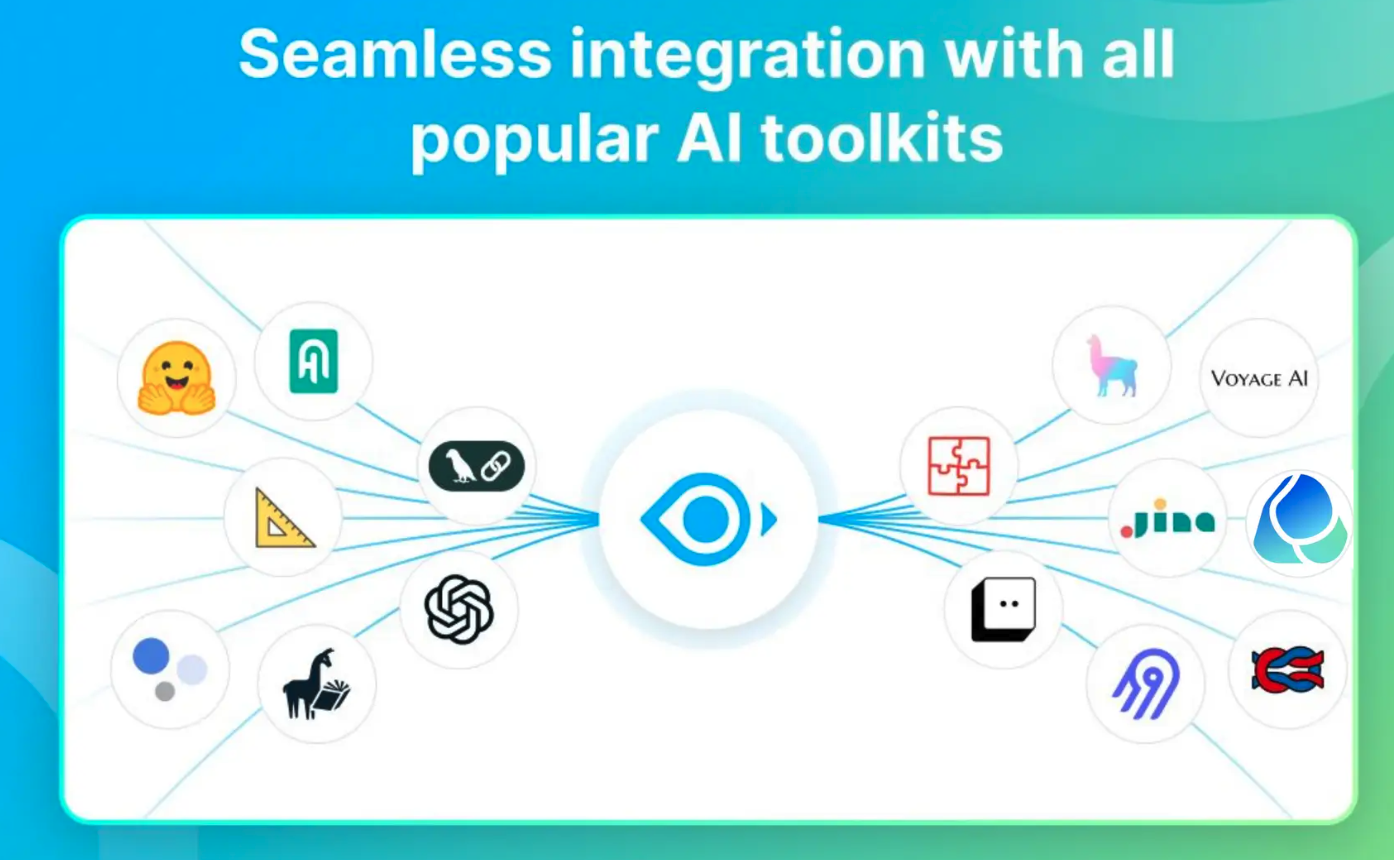 Milvus offers seamless integration with all popular AI toolkits
Milvus offers seamless integration with all popular AI toolkits
Snowflake is a data warehousing platform that enables you to store, process, and analyze data efficiently and reliably. With the introduction of Snowpark Container Service (SPCS), you can now run containerized applications inside the Snowflake environment. This way, your app can interact with the data stored inside Snowflake, allowing you to build a wide range of applications, including a RAG system.
In this section, we'll first build an app with Milvus that performs a vector search. Next, we'll containerize the application using Docker and run the container inside Snowflake with SPCS.
To get started, let's build a Milvus app to perform a vector search with Jupyter Notebook. If you'd like to follow along, refer to this repository for the complete notebook and the script to build the embedding model.
from pymilvus import MilvusClient
from pymilvus import DataType
import os
import mode

# init client
client = MilvusClient(
uri="<http://milvus:19530>",
)

# init model
model = model.Onnx()

# Create a collection in quick setup mode
client.create_collection(
collection_name="quick_demo",
dimension=model.dimension,
)

print("Collection Created!")
In the above code, we created a collection called “quick_demo” inside a Milvus vector database and loaded the model to transform texts into embeddings. We’ll use ALBERT as our embedding model, which maps an input text into a 768-dimensional vector embedding.
Next, insert some text data in our “quick_demo” collection.
# Data from which embeddings are to be generated
docs=[
"Artificial intelligence was founded as an academic discipline in 1956.",
"Alan Turing was the first person to conduct substantial research in AI.",
"Born in Maida Vale, London, Turing was raised in southern England.",
]

# Insert data into the collection
data=[]
for i in range(len(docs)):
data.append({
'id': i,
'vector': model.to_embeddings(docs[i]),
'doc_str': docs[i]
})

res = client.insert(
collection_name="quick_demo",
data=data
)
In the above code, we transform our input texts into embeddings with ALBERT and store them inside the collection with their IDs and raw texts.
Now, if we have a query such as “Who started AI research?” and we would like to get the relevant context that might contain the relevant answer to our query, we can perform a vector search easily with Milvus as follows:
# Search with a text query
query = "Who started AI research?"
query_embeddings = model.to_embeddings(query)

res = client.search(
collection_name="quick_demo",
data=[query_embeddings],
limit=1,
output_fields=["doc_str"],
)

print(res)
"""
Expected output:
"Alan Turing was the first person to conduct substantial research in AI."
"""
And that’s it for our Milvus app.
At this stage, we have a Jupyter Notebook to perform a vector search with Milvus. Let’s say we want to containerize this notebook to run it within the Snowflake ecosystem. The first thing we need to do is configure the role and privileges to create and run the service provided by Snowflake.
First, download SnowSQL by following the instructions on the Installing SnowSQL doc page. Next, run the following command in the terminal:
snowsql -a ${instance_name} -u ${user_name}
where the format of ${instance_name} is ${org_name}-${acct_name}, and you can find information about these two fields inside of your Snowflake account. Now we can configure the role and privileges with the following commands inside the SnowSQL shell:
USE ROLE ACCOUNTADMIN;
CREATE SECURITY INTEGRATION SNOWSERVICES_INGRESS_OAUTH
  TYPE=oauth
  OAUTH_CLIENT=snowservices_ingress
  ENABLED=true;

USE ROLE ACCOUNTADMIN;
GRANT BIND SERVICE ENDPOINT ON ACCOUNT TO ROLE SYSADMIN;

USE ROLE SECURITYADMIN;
CREATE ROLE MILVUS_ROLE;

USE ROLE USERADMIN;
CREATE USER milvus_user
  PASSWORD='milvususerok'
  DEFAULT_ROLE = MILVUS_ROLE
  DEFAULT_SECONDARY_ROLES = ('ALL')
  MUST_CHANGE_PASSWORD = FALSE;

USE ROLE SECURITYADMIN;
GRANT ROLE MILVUS_ROLE TO USER milvus_user;
Since Snowflake is a data warehousing platform, we interact with all of the objects inside Snowflake through an SQL query-like command, as you can see above. Next, we can create the data warehouse and database inside Snowflake with the following commands:
USE ROLE SYSADMIN;
CREATE OR REPLACE WAREHOUSE MILVUS_WAREHOUSE WITH
WAREHOUSE_SIZE='X-SMALL'
AUTO_SUSPEND = 180
AUTO_RESUME = true
INITIALLY_SUSPENDED=false;

USE ROLE SYSADMIN;
CREATE DATABASE IF NOT EXISTS MILVUS_DEMO;
USE DATABASE MILVUS_DEMO;
CREATE IMAGE REPOSITORY MILVUS_DEMO.PUBLIC.MILVUS_REPO;
CREATE OR REPLACE STAGE YAML_STAGE;
CREATE OR REPLACE STAGE DATA ENCRYPTION = (TYPE = 'SNOWFLAKE_SSE');
CREATE OR REPLACE STAGE FILES ENCRYPTION = (TYPE = 'SNOWFLAKE_SSE');

--GRANT ROLE PRIVILEGES--

USE ROLE SECURITYADMIN;
GRANT ALL PRIVILEGES ON DATABASE MILVUS_DEMO TO MILVUS_ROLE;
GRANT ALL PRIVILEGES ON SCHEMA MILVUS_DEMO.PUBLIC TO MILVUS_ROLE;
GRANT ALL PRIVILEGES ON WAREHOUSE MILVUS_WAREHOUSE TO MILVUS_ROLE;
GRANT ALL PRIVILEGES ON STAGE MILVUS_DEMO.PUBLIC.FILES TO MILVUS_ROLE;

--CONFIGURE ACL--

USE ROLE ACCOUNTADMIN;
USE DATABASE MILVUS_DEMO;
USE SCHEMA PUBLIC;
CREATE NETWORK RULE allow_all_rule
TYPE = 'HOST_PORT'
MODE= 'EGRESS'
VALUE_LIST = ('0.0.0.0:443','0.0.0.0:80');

CREATE EXTERNAL ACCESS INTEGRATION allow_all_eai
ALLOWED_NETWORK_RULES=(allow_all_rule)
ENABLED=TRUE;

GRANT USAGE ON INTEGRATION allow_all_eai TO ROLE SYSADMIN;
To run a containerized app inside Snowflake, we need to build the Docker image of our app on our local machine. In this project, we need to build two different Docker images: one to instantiate the Milvus vector database and one to run the notebook file we created above.
However, we need a Dockerfile to build a Docker image. To make things easier, clone the following repo. You'll find all the necessary files to build the two images we need in this repo. After cloning the repo, you can build the two Docker images with the following commands in your local terminal:
cd ${repo_git_root_path}
docker build --rm --no-cache --platform linux/amd64 -t milvus ./images/milvus
docker build --rm --no-cache --platform linux/amd64 -t jupyter ./images/jupyter
Then, we can add appropriate tags to the two newly built images with the following commands:
docker login ${instance_name}.registry.snowflakecomputing.com -u ${user_name}

docker tag milvus ${instance_name}.registry.snowflakecomputing.com/milvus_demo/public/milvus_repo/milvus
docker tag jupyter ${instance_name}.registry.snowflakecomputing.com/milvus_demo/public/milvus_repo/jupyter
Finally, we can push the images to SPCS with the following commands:
docker push ${instance_name}.registry.snowflakecomputing.com/milvus_demo/public/milvus_repo/milvus
docker push ${instance_name}.registry.snowflakecomputing.com/milvus_demo/public/milvus_repo/jupyter
Now that we have pushed the images to SPCS, the only thing we need to do is create two computing services, one for each image, as you can see in the following commands inside the SnowSQL shell:
USE ROLE SYSADMIN;
CREATE COMPUTE POOL IF NOT EXISTS MILVUS_COMPUTE_POOL
  MIN_NODES = 1
  MAX_NODES = 1
  INSTANCE_FAMILY = CPU_X64_S
  AUTO_RESUME = true;
CREATE COMPUTE POOL IF NOT EXISTS JUPYTER_COMPUTE_POOL
  MIN_NODES = 1
  MAX_NODES = 1
  INSTANCE_FAMILY = CPU_X64_S
  AUTO_RESUME = true;
Inside the repo that we cloned before is a folder called “specs.” Inside that folder are two YAML files, one for each image. Open each YAML file, and change ${org_name}-${acct_name} in the image field according to your own Snowflake account.
Next, using SnowSQL, upload the modified YAML files with the following commands:
PUT file://${path/to/jupyter.yaml} @yaml_stage overwrite=true auto_compress=false;
PUT file://${path/to/milvus.yaml} @yaml_stage overwrite=true auto_compress=false;
And finally, we can create the services for both images as follows:
USE ROLE SYSADMIN;
USE DATABASE MILVUS_DEMO;
USE SCHEMA PUBLIC;

CREATE SERVICE MILVUS
  IN COMPUTE POOL MILVUS_COMPUTE_POOL
  FROM @YAML_STAGE
  SPEC='milvus.yaml'
  MIN_INSTANCES=1
  MAX_INSTANCES=1;

CREATE SERVICE JUPYTER
  IN COMPUTE POOL JUPYTER_COMPUTE_POOL
  FROM @YAML_STAGE
  SPEC='jupyter.yaml'
  MIN_INSTANCES=1
  MAX_INSTANCES=1;
Now if you type SHOW SERVICE command, you should see the following output:
SHOW SERVICES;

+---------+---------------+-------------+----------+----------------------+--------------------------------------------------------+-----------------
| name    | database_name | schema_name | owner    | compute_pool         | dns_name                                               | ......
|---------+---------------+-------------+----------+----------------------+--------------------------------------------------------+-----------------
| JUPYTER | MILVUS_DEMO   | PUBLIC      | SYSADMIN | JUPYTER_COMPUTE_POOL | jupyter.public.milvus-demo.snowflakecomputing.internal | ......
| MILVUS  | MILVUS_DEMO   | PUBLIC      | SYSADMIN | MILVUS_COMPUTE_POOL  | milvus.public.milvus-demo.snowflakecomputing.internal  | ......
+---------+---------------+-------------+----------+----------------------+--------------------------------------------------------+-----------------
Now, we’re ready to run the Milvus vector database and test our notebook inside Snowflake. First, grant permission to the role we created before to access the containerized app.
USE ROLE SECURITYADMIN;
GRANT USAGE ON SERVICE MILVUS_DEMO.PUBLIC.JUPYTER TO ROLE MILVUS_ROLE;
Next, check the endpoint of our notebook container inside Snowflake with the following command:
USE ROLE SYSADMIN;
SHOW ENDPOINTS IN SERVICE MILVUS_DEMO.PUBLIC.JUPYTER;
 Jupyter endpoint, as shown in ingress_url
Jupyter endpoint, as shown in ingress_url
If everything runs smoothly, you can see a column called “ingress_url” as an output. Open your browser, copy-paste that “ingress_url,” and you should see a Jupyter spin-up. You can then open the notebook file inside the container and run each cell in the notebook normally.
The Future Landscape of RAG
RAG is a highly popular technique nowadays. However, its current application is far from perfect. According to Jiang Chen, here are several predictions regarding the future usage and improvement of RAG applications.
Continuous Evaluation and Observability
Building RAG has become easier with the availability of various platforms or libraries that simplify and abstract the RAG development process. For example, we can build a RAG prototype in minutes with the help of three different platforms: Milvus, LangChain, and OpenAI.
However, we often face challenges when moving a RAG-powered application from prototype to production. In production, our RAG systems need to handle millions or even billions of documents, making it crucial to continuously monitor the response quality generated by our LLM
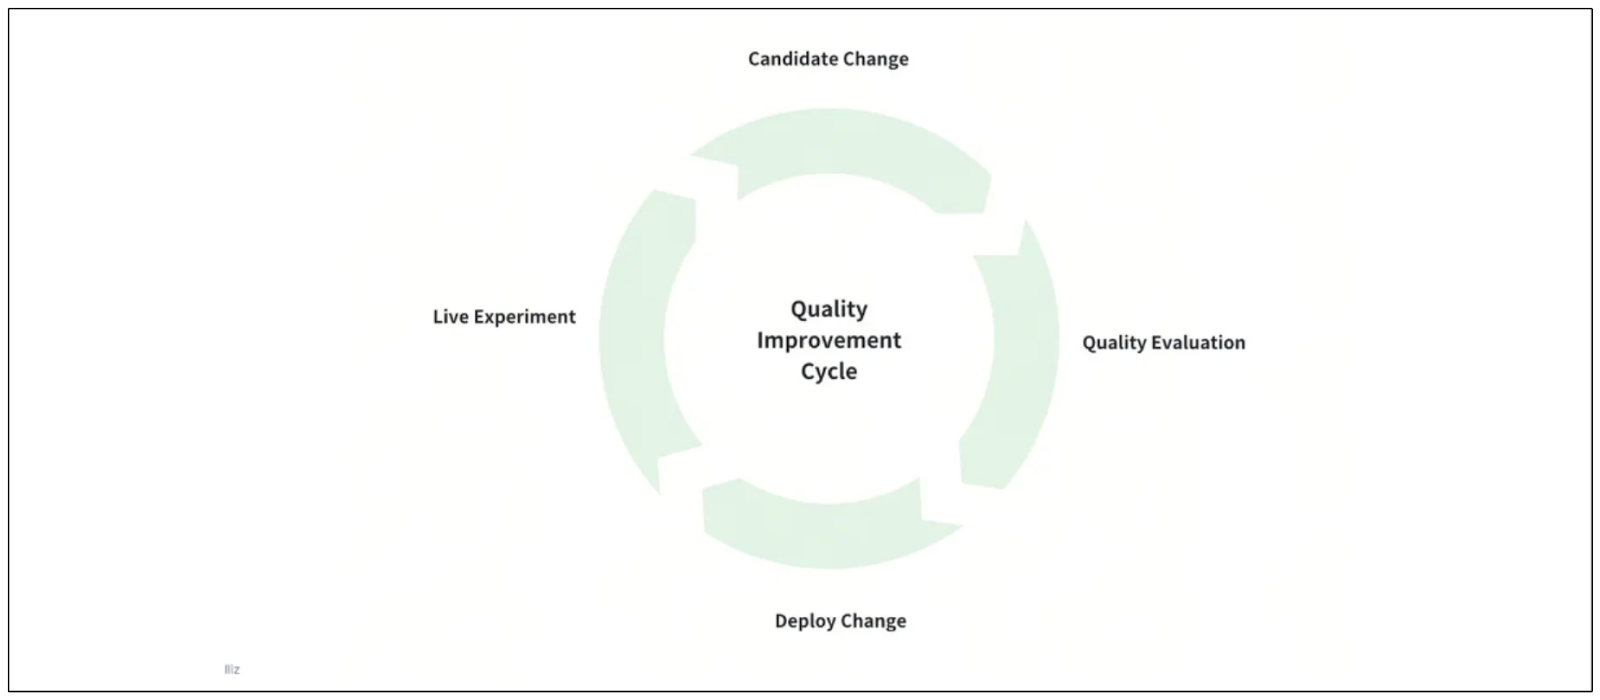 Continuous evaluation of the RAG system
Continuous evaluation of the RAG system
Before implementing improvements to enhance the quality of our RAG, it's important to establish a systematic approach to continuously evaluating and improving it.
Some key elements of this systematic approach include:
Building a dedicated improvement infrastructure: In this infrastructure, we can implement various methods to improve RAG's quality and then compare their responses via A/B testing.
Planning a release cycle: Once we find an approach that improves RAG's quality according to our use case, we need to plan how to release and integrate it into our system to replace the old one without interrupting the user experience.
Implementing an observability system: We also need to build a system to observe the performance of our RAG in production and determine its effectiveness. If the performance is unsatisfactory, we can explore and implement improvements through the dedicated improvement infrastructure.
Multi-modal RAG
Until now, we have primarily utilized RAG in natural language processing. This means that we use text as the prompt or query, and our LLM's responses are also in the form of text.
However, the RAG landscape might change in the future with the introduction of multi-modal RAG. Multi-modal RAG is possible due to the rise of multi-modal embedding models in recent years. Over the past few years, research has concluded that Transformers can process natural language as inputs and other modalities, such as images and sounds.
Vision Transformers (ViT) and DETR models have demonstrated that Transformers can be used as powerful image classification and object detection models. Building upon ViT, OpenAI introduced a multi-modal model called CLIP, which can calculate the similarity between two inputs from different modalities: text and image.
The multimodal capabilities shown by these Transformer-based models can serve as the foundation for future multimodal RAG applications. In this system, we can use a combination of text and image as a query, and the LLM will generate an image based on our multimodal queries.
As an example, let's say we want our LLM to generate an image that closely resembles a provided query image. We can enrich our query image with a text description to further fine-tune the kind of images we want our LLM to generate, as you can see in the visualization below:
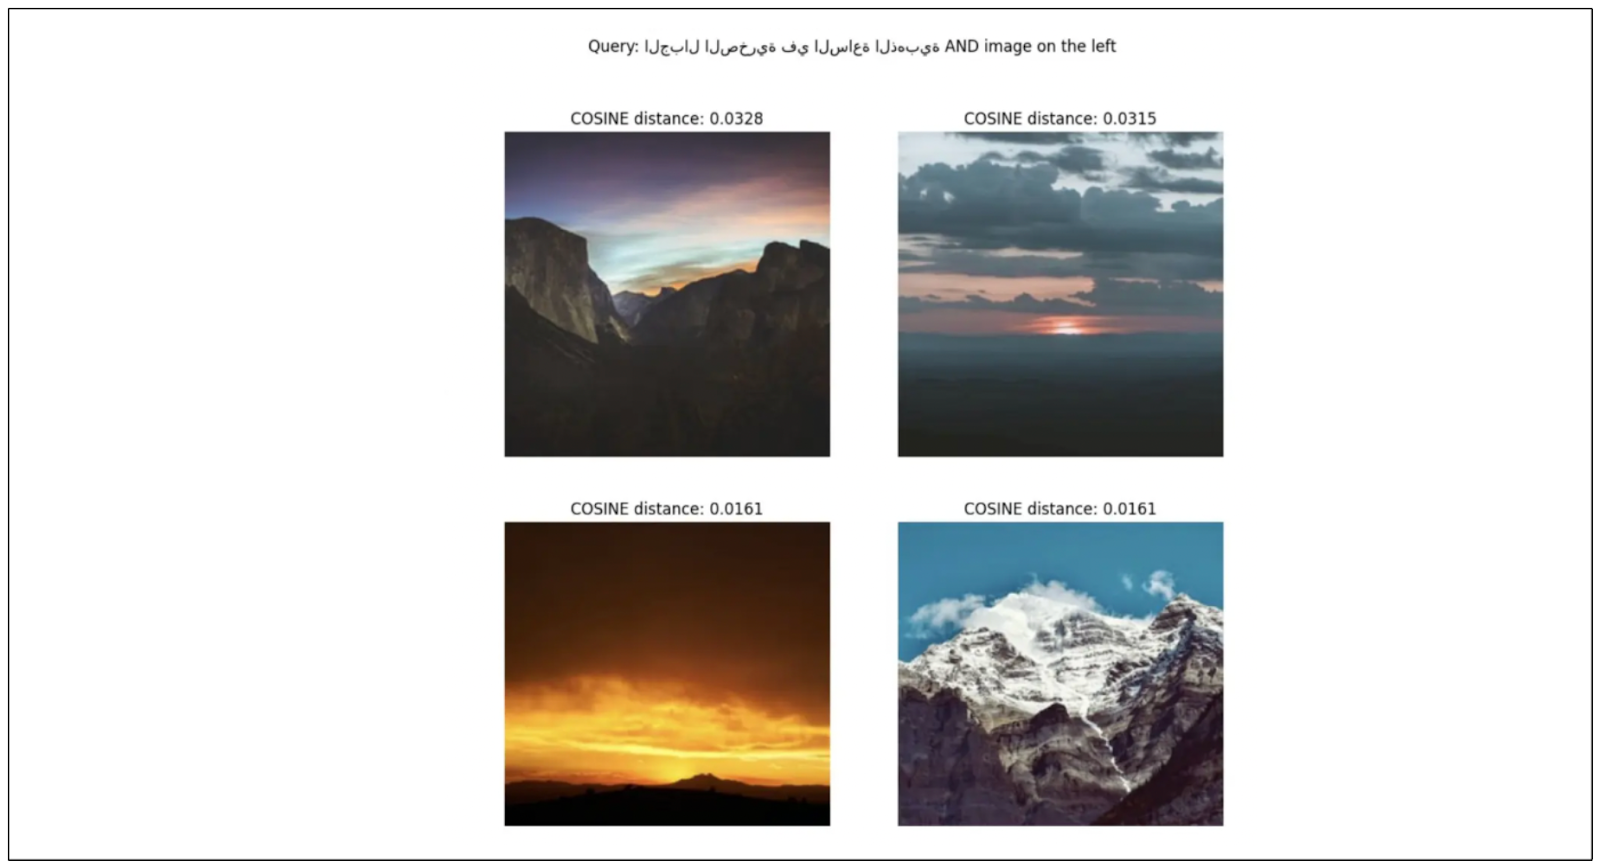 Multi-modal RAG application, combination of text and image queries
Multi-modal RAG application, combination of text and image queries
In the above visualization, we asked our embedding models to return images resembling the image on the top left, and we added a text prompt, such as "a picture of a mountain during the golden hour," alongside the top-left image. The results are the other three images generated based on the multi-modal query.
This multi-modal approach to RAG opens up new possibilities for more intuitive and expressive information retrieval and generation, blending the strengths of both text and visual modalities.
Good RAG Comes from Good Data
The quality of our RAG system is heavily reliant on the data quality we have in our database. Therefore, when the response generated by our RAG is not optimal, we should not rush to the conclusion that the model needs to be improved. First, we need to always check the quality of our data.
As you may already know, the response quality of RAG depends on the contexts passed alongside the query. If our LLM cannot find appropriate answers to the query from the provided contexts, then it's not surprising that the response quality generated by our RAG system will be poor.
Therefore, before opting to improve the embedding models and LLM in our RAG system, we should always ask the following questions:
Do we have the right data in our database?
Have we collected all the available data from the data sources into our database?
Have we implemented the right data-cleaning process before passing the data to the embedding models?
Have we implemented the appropriate chunking approach to our data?
Have we implemented the correct data preprocessing methods (e.g., PDF parsing, OCR parsing) to our data?
Addressing data-related issues is a crucial first step in optimizing the performance of a RAG-powered application. Only after verifying the data quality should we consider refining the embedding models, LLM, or other components of the RAG system.
Agents: Query Routing with Subqueries
Currently, a common RAG system retrieves relevant contexts for a given query from texts and embeddings saved inside an internal database. However, this approach might evolve, as the context could be retrieved from internal databases and external sources, such as web searches.
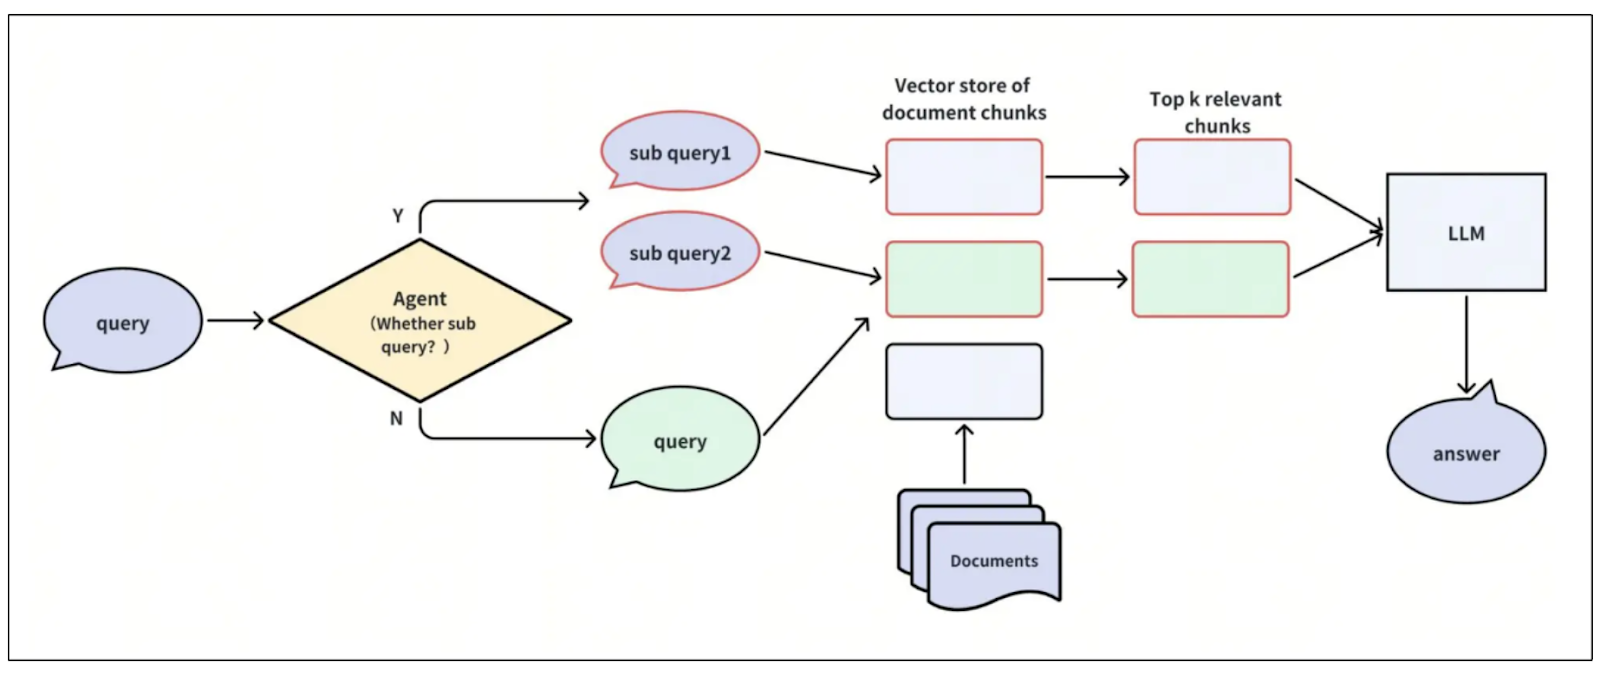 Visualization of agents for query routing
Visualization of agents for query routing
The research in this area is still ongoing, but adding a so-called "agent" within a RAG system might help determine the appropriate source of context for a given query.
For example, given a query like "Who started AI research?" the agent can decide whether or not RAG is needed to answer that question. If not, the system can let the LLM directly generate a response to the query without any additional context.
If RAG is deemed necessary, the agent should determine the source for the context, whether it's an internal database or an external source. Another approach is for the agent to aggregate information from various sources into a single, summarized context that can be used by the LLM to generate an appropriate answer.
Conclusion
The powerful performance of LLMs in generating human-like text responses has changed the entire landscape of information retrieval. The introduction of RAG is designed to enhance LLMs' response accuracy by providing them with relevant contexts for a given query. These contexts are typically stored as embeddings, which must be stored in a vector database like Milvus.
As an open-source vector database with advanced vector search capabilities, Milvus offers seamless integration with popular AI toolkits, such as Snowflake. With Snowflake's Snowpark Container Service (SPCS), users can now run Milvus within the Snowflake ecosystem, allowing them to easily interact with Milvus using data stored in Snowflake.
- How AI Revolutionizes the Information Retrieval Process
- Retrieval Augmented Generation (RAG)
- Integrating Milvus Vector Database and Snowflake with Snowpark Container Service
- The Future Landscape of RAG
- Conclusion
Content
Start Free, Scale Easily
Try the fully-managed vector database built for your GenAI applications.
Try Zilliz Cloud for FreeKeep Reading
How to Install and Run OpenClaw (Previously Clawdbot/Moltbot) on Mac
Turn your Mac into an AI gateway for WhatsApp, Telegram, Discord, iMessage, and more — in under 5 minutes.
Selecting the Right ETL Tools for Unstructured Data to Prepare for AI
Learn the right ETL tools for unstructured data to power AI. Explore key challenges, tool comparisons, and integrations with Milvus for vector search.
Top 5 AI Search Engines to Know in 2025
Discover the top AI-powered search engines of 2025, including OpenAI, Google AI, Bing, Perplexity, and Arc Search. Compare features, strengths, and limitations.
