Building an Open Source Chatbot Using LangChain and Milvus in Under 5 Minutes

In my previous blog, we walked through how to get started with a Milvus connection in a few minutes. This post will use a completely open-source RAG (Retrieval Augmented Generation) stack with LangChain to answer questions about Milvus using our product documentation web pages.
Using open-source Q&A with retrieval saves money since we make free calls to our data almost all the time - retrieval, evaluation, and development iterations. We only make a paid call to OpenAI once for the final chat generation step.
For those interested in delving into the technical aspects, the source code for a live ChatBot is available on our GitHub. The complete code for this notebook is in our bootcamp Git Hub.
RAG (Retrieval Augmented Generation) is used to ground Generative AI text (basing the generated text on factual, custom data to reduce hallucinations). Text from your custom data, which you believe to be true, such as product documentation, is retrieved from a vector database to answer a question. Then, you insert the accurate text answers “context” along with the “question” into the “prompt,” which you feed into an LLM such as OpenAI’s ChatGPT. The LLM generates a human-like chat answer that is grounded.
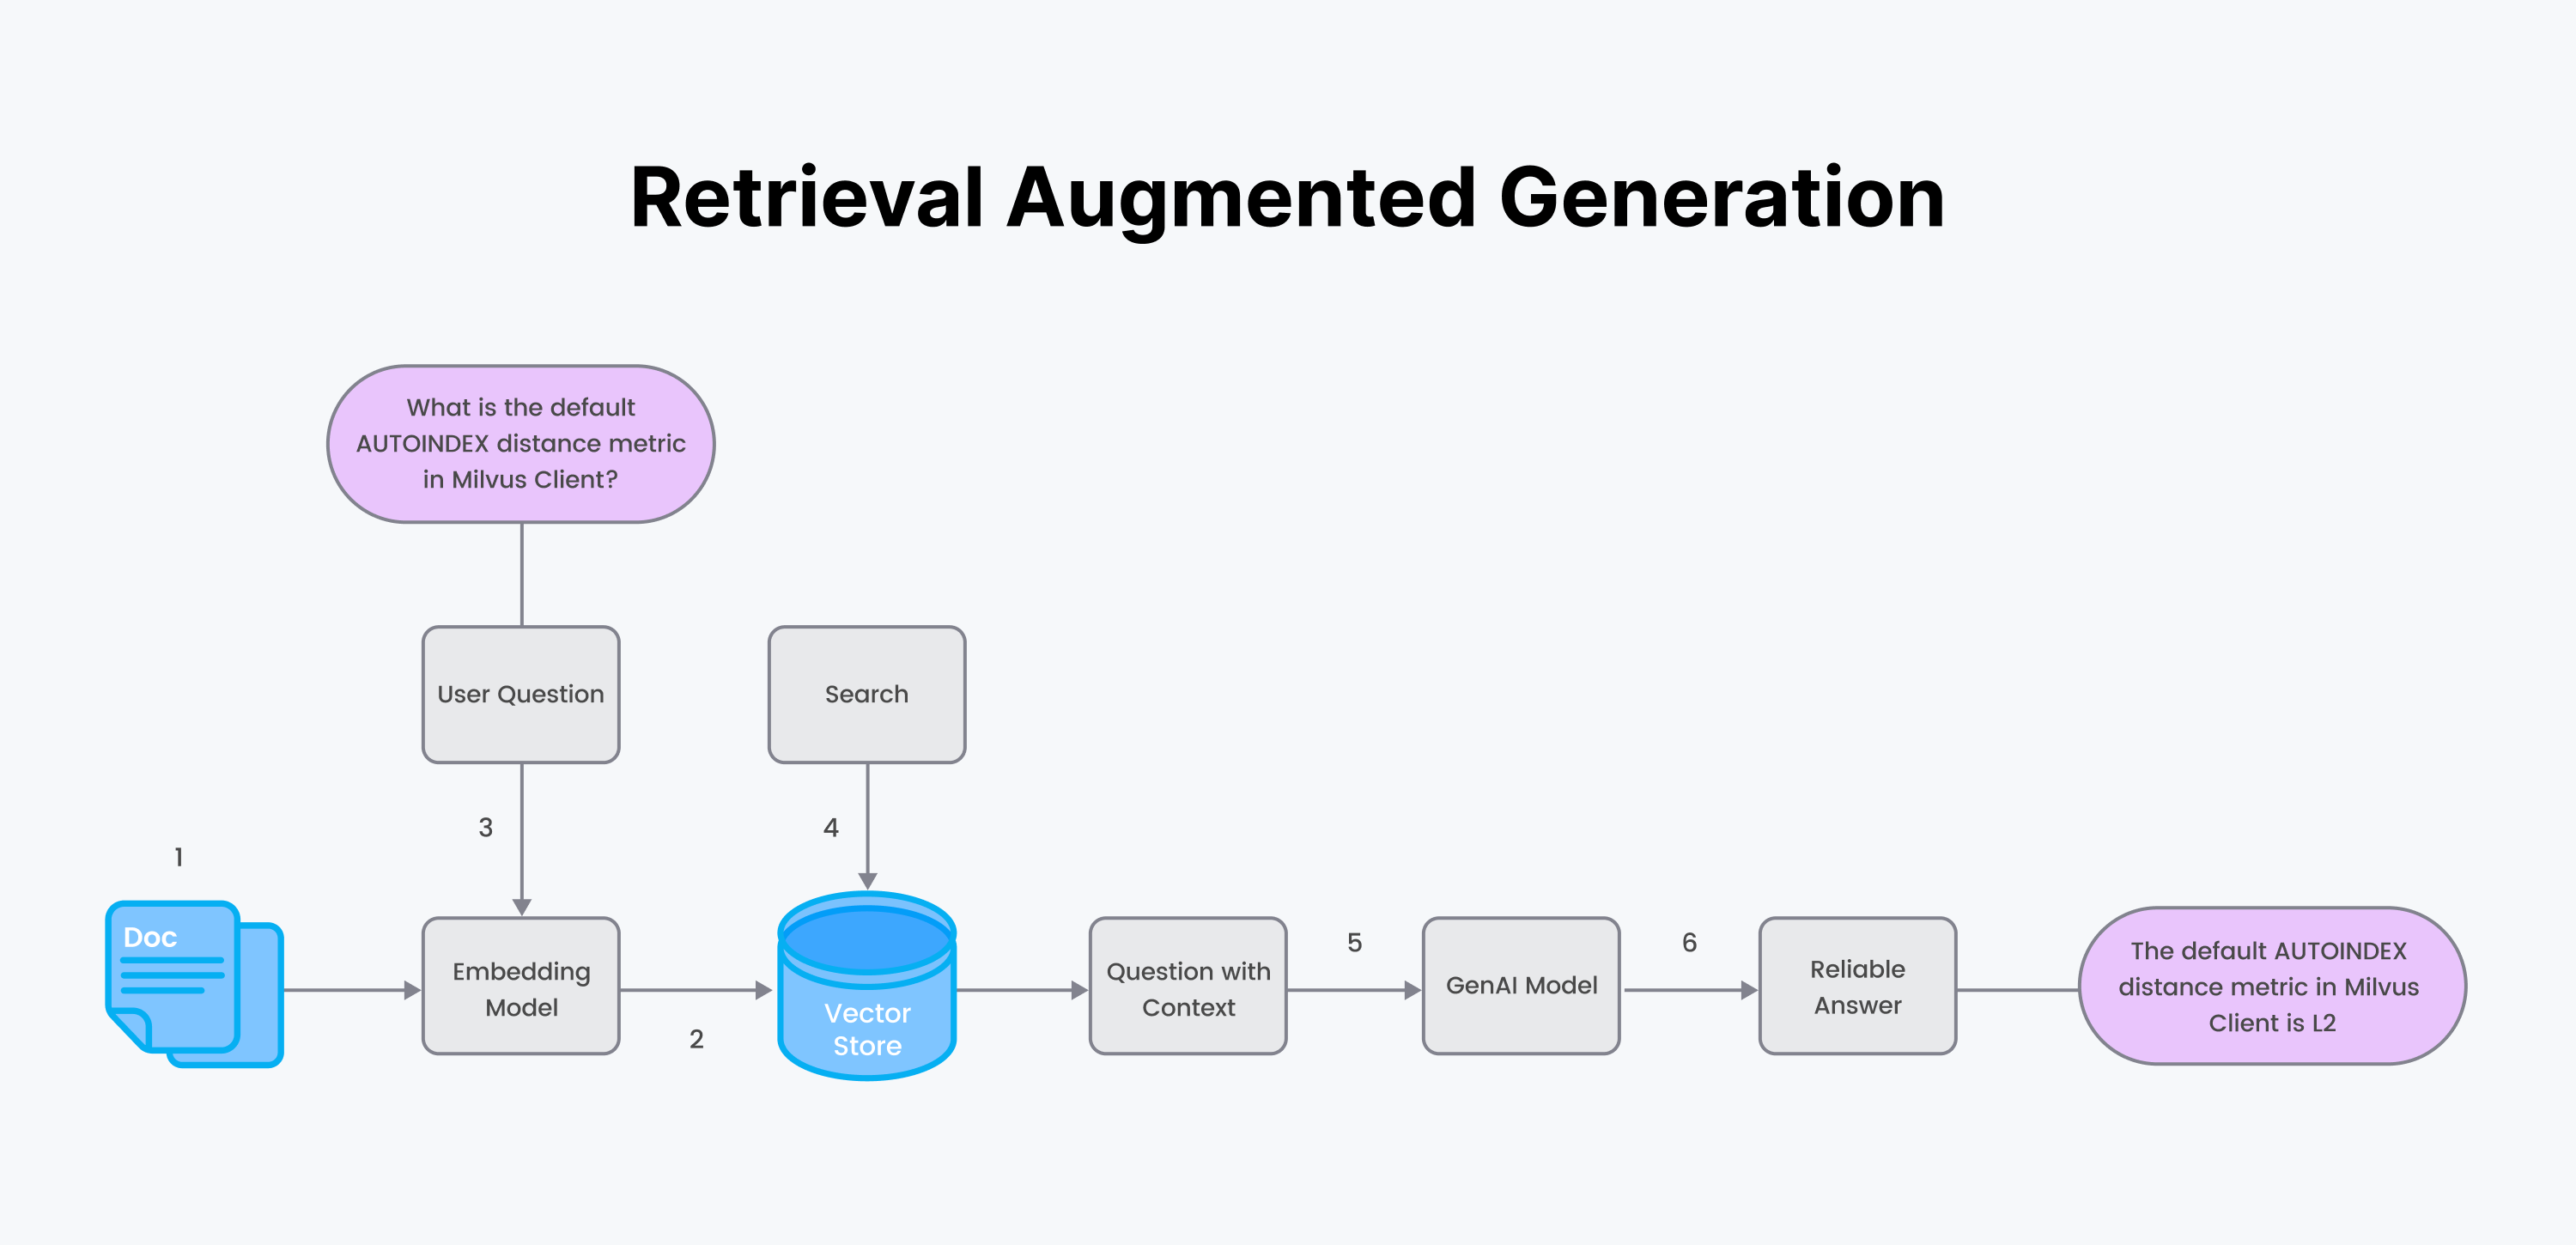
RAG processes:
Start with your custom data, which you believe to be true, and an embedding model for the encoder.
Chunk and generate embeddings of your data using the encoder. Save the data and metadata in a vector database.
The user asks a question. Generate embeddings of the question using the same encoder from step 1.
Retrieve answers to your question by performing a semantic search using the vector database.
Stuff the answer chunks of text from your custom documents into a “Context.” Stuff the question and context into a prompt. Send the prompt to a generating LLM.
Get back a reliable answer from the generating LLM.
Step 1: Ingest the data
Milvus is a high-performance vector database that simplifies custom unstructured data ingestion and embedding creation. Milvus is optimized for fast storage, indexing, and searching of embeddings (or vectors).
OpenAI is an organization that develops and provides AI models and tools. It is known for its cutting-edge language models like the GPT (Generative Pre-trained Transformer) series.
LangChain is a library of tools and wrappers that helps developers bridge the gap between traditional software and LLMs.
The data we’ll use is our product documentation web pages. ReadTheDocs is an open-source, free software documentation hosting platform where documentation is written with the Sphinx document generator.
Let’s get started.
# Download readthedocs pages locally.
DOCS_PAGE="https://pymilvus.readthedocs.io/en/latest/"
wget -r -A.html -P rtdocs --header="Accept-Charset: UTF-8" $DOCS_PAGE
The above code downloads the web pages into a local directory called rtdocs. Next, we’ll read the docs into LangChain.
#!pip install langchain
from langchain.document_loaders import ReadTheDocsLoader

loader = ReadTheDocsLoader(
  "rtdocs/pymilvus.readthedocs.io/en/latest/",
  features="html.parser")
docs = loader.load()
Step 2: Chunk the data using HTML hierarchies
Before embedding, it is necessary to decide your chunk strategy, chunk size, and chunk overlap. In this demo, I will use:
Strategy = Use markdown header hierarchies. Keep markdown sections together unless they are too long.
Chunk size = Use the embedding model's parameter
MAX_SEQ_LENGTHOverlap = Rule-of-thumb 10-15%
Functions =
Langchain's HTMLHeaderTextSplitter to split markdown sections.
Langchain's RecursiveCharacterTextSplitter to split up long reviews recursively.
from langchain.text_splitter import HTMLHeaderTextSplitter, RecursiveCharacterTextSplitter

# Define the headers to split on for the HTMLHeaderTextSplitter
headers_to_split_on = [
    ("h1", "Header 1"),
    ("h2", "Header 2"),]
# Create an instance of the HTMLHeaderTextSplitter
html_splitter = HTMLHeaderTextSplitter(headers_to_split_on=headers_to_split_on)

# Use the embedding model parameters.
chunk_size = MAX_SEQ_LENGTH - HF_EOS_TOKEN_LENGTH
chunk_overlap = np.round(chunk_size * 0.10, 0)

# Create an instance of the RecursiveCharacterTextSplitter
child_splitter = RecursiveCharacterTextSplitter(
    chunk_size = chunk_size,
    chunk_overlap = chunk_overlap,
    length_function = len,)

# Split the HTML text using the HTMLHeaderTextSplitter.
html_header_splits = []
for doc in docs:
    splits = html_splitter.split_text(doc.page_content)
    for split in splits:
        # Add the source URL and header values to the metadata
        metadata = {}
        new_text = split.page_content
        for header_name, metadata_header_name in headers_to_split_on:
            header_value = new_text.split("¶ ")[0].strip()
            metadata[header_name] = header_value
            try:
                new_text = new_text.split("¶ ")[1].strip()
            except:
                break
        split.metadata = {
            **metadata,
            "source": doc.metadata["source"]}
        # Add the header to the text
        split.page_content = split.page_content
    html_header_splits.extend(splits)

# Split the documents further into smaller, recursive chunks.
chunks = child_splitter.split_documents(html_header_splits)

end_time = time.time()
print(f"chunking time: {end_time - start_time}")
print(f"docs: {len(docs)}, split into: {len(html_header_splits)}")
print(f"split into chunks: {len(chunks)}, type: list of {type(chunks[0])}")
# Inspect a chunk.
print()
print("Looking at a sample chunk...")
print(chunks[1].page_content[:100])
print(chunks[1].metadata)

Notice above that each chunk is grounded with the document source. In addition, header titles are kept together with the chunk of markdown text. These headers can later be used to retrieve a whole header section.
Step 3: Generate embeddings
Most demos now use OpenAI Embeddings APIs. Since this is your own custom data, why not use open-source embedding models and free-tier Zilliz Cloud to search your own data as much as you want for free?
Open-source embedding/retrieval models are just as good as OpenAI Embeddings (ada-002), according to the latest MTEB benchmark results. Below, we can see the smallest highest-ranking model is bge-large-en-v1.5. We will use that model in this blog.
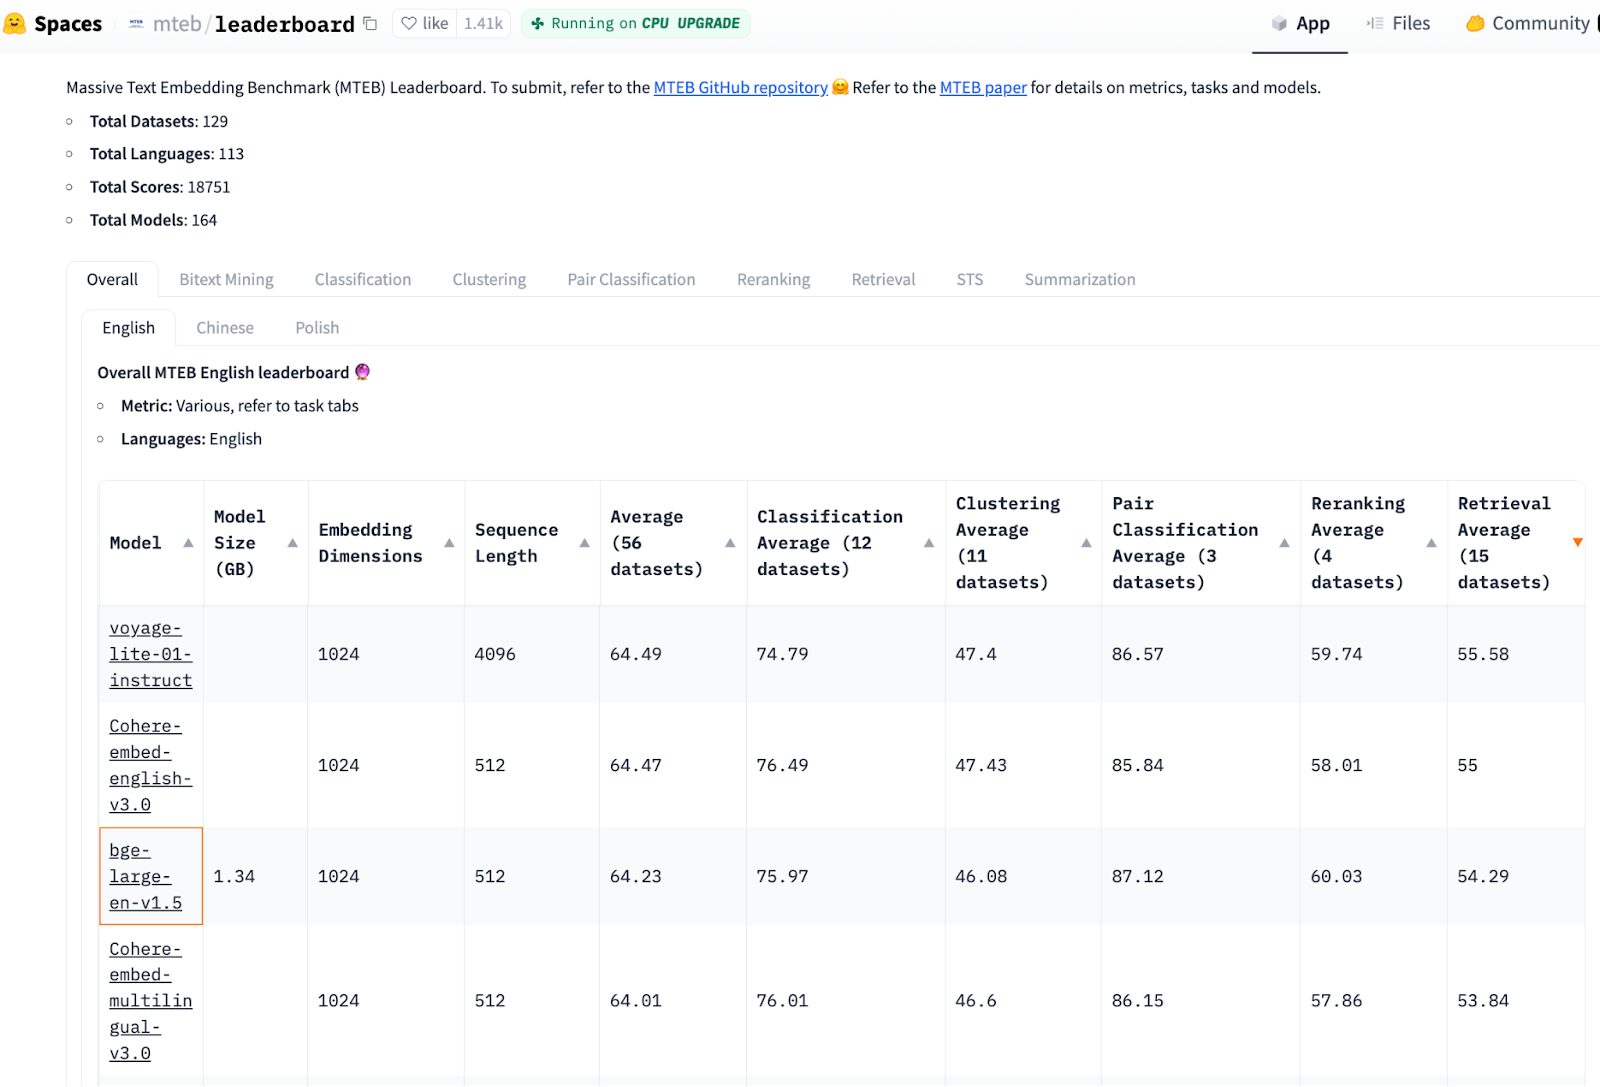
Image source: https://huggingface.co/spaces/mteb/leaderboard, sorted by column, Retrieval Average (15 datasets), printed on Nov 24, 2023.
The image above shows the embedding models leaderboard, with top rank voyage-lite-01-instruct (size 4.2 GB, and third rank bge-base-en-v1.5 (size 1.5 GB). OpenAIEmbedding text-embeddings-ada-002 is ranked 22 (not shown too far down the list).
Below, we initialize an encoder using the chosen embedding model checkpoint.
#pip install torch, sentence-transformers
import torch
from sentence_transformers import SentenceTransformer


# Initialize torch settings
DEVICE = torch.device('cuda:3'
   if torch.cuda.is_available()
   else 'cpu')
# Load the encoder model from huggingface model hub.
model_name = "BAAI/bge-base-en-v1.5"
encoder = SentenceTransformer(model_name, device=DEVICE)


# Get the model parameters and save for later.
MAX_SEQ_LENGTH = encoder.get_max_seq_length()
EMBEDDING_LENGTH = encoder.get_sentence_embedding_dimension()
Now, generate embeddings using the encoder we initialized from a HuggingFace checkpoint. Assemble all the data together into a list of dictionaries.
chunk_list = []
for chunk in chunks:
    # Generate embeddings using encoder from HuggingFace.
    embeddings = torch.tensor(encoder.encode([chunk.page_content]))
    embeddings = F.normalize(embeddings, p=2, dim=1)
    converted_values = list(map(np.float32, embeddings))[0]
    # Assemble embedding vector, original text chunk, metadata.
    chunk_dict = {
        'vector': converted_values,
        'text': chunk.page_content,
        'source': chunk.metadata['source'],
        'h1': chunk.metadata['h1'][:50],
        'h2': chunk.metadata['h1'][:50],}
    chunk_list.append(chunk_dict)
Step 4: Create Milvus index and insert data
In this step, we'll write the quadruplet (vector, text, source, h1, h2) into the database for each original text chunk.
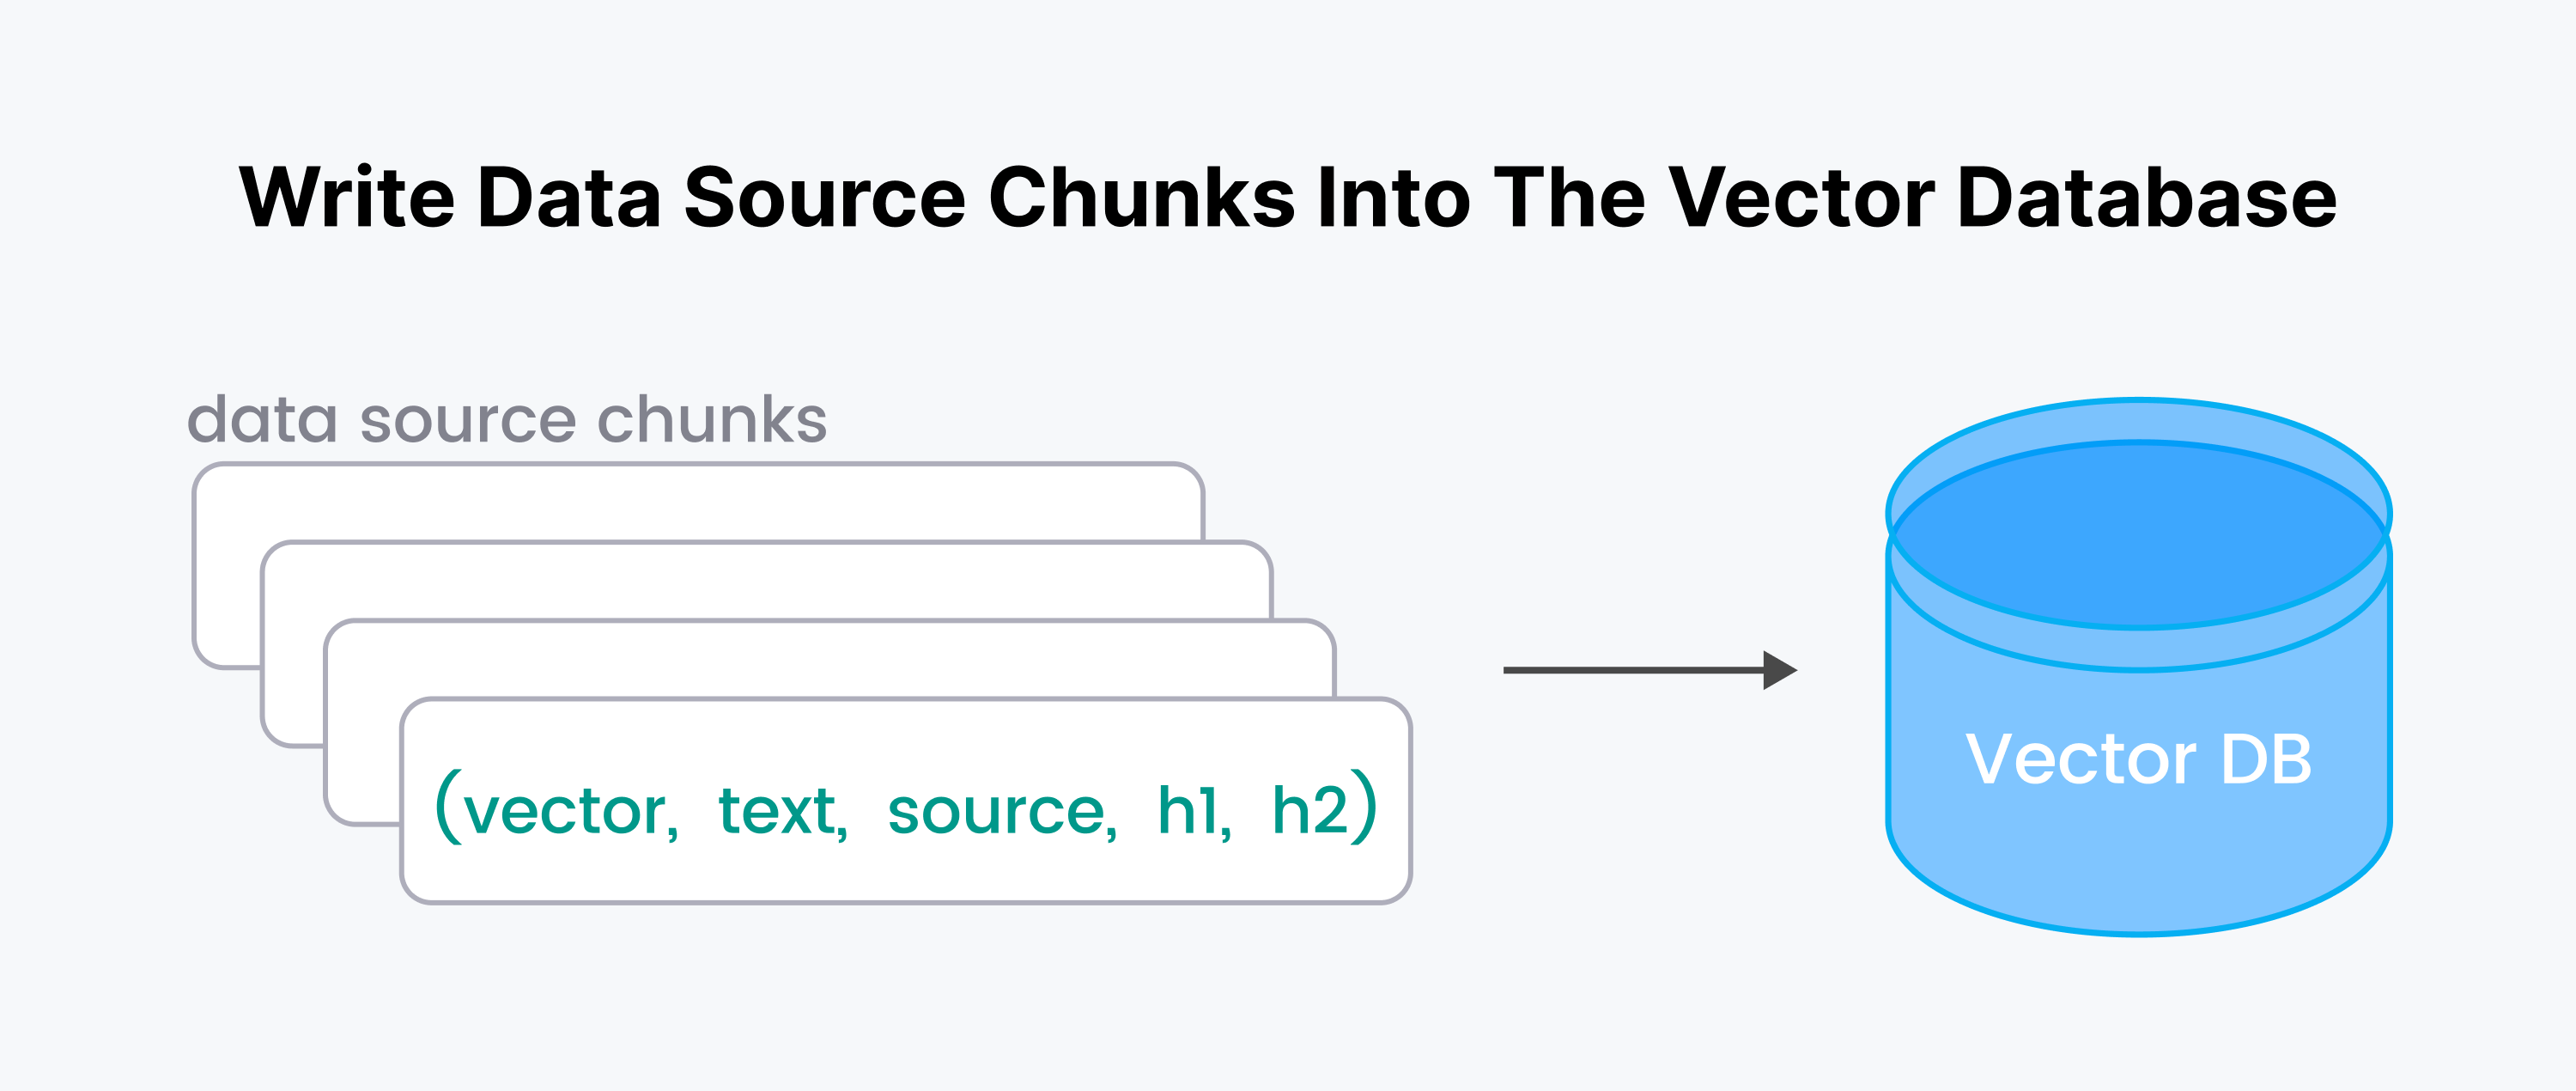
Let’s start our Milvus server and connect to it. To use serverless cloud-hosted Milvus, you will need a ZILLIZ_API_KEY. In my previous blog, Connecting to Milvus, I showed instructions on connecting to Zilliz.
#pip install pymilvus
from pymilvus import connections

ENDPOINT=”https://xxxx.api.region.zillizcloud.com:443”
connections.connect(
  uri=ENDPOINT,
  token=TOKEN)
Create a Milvus collection (think of it like a database table) called MilvusDocs. The collection takes a schema and an index. The schema uses the encoder model’s embedding length.
from pymilvus import (
   FieldSchema, DataType,
   CollectionSchema, Collection)

# 1. Define a minimum expandable schema.
fields = [
   FieldSchema(“pk”, DataType.INT64, is_primary=True, auto_id=True),
   FieldSchema(“vector”, DataType.FLOAT_VECTOR, dim=768),]
schema = CollectionSchema(
   fields,
   enable_dynamic_field=True,)

# 2. Create the collection.
mc = Collection(“MilvusDocs”, schema)

# 3. Index the collection.
mc.create_index(
   field_name=”vector”,
   index_params={
       “index_type”: “AUTOINDEX”,
       “metric_type”: “COSINE”,}
Unlike Pinecone, inserting all the data and populating an index of embeddings in Milvus/Zilliz is fast!
# Insert data into the Milvus collection.
insert_result = mc.insert(chunk_list)

# After final entity is inserted, call flush
# to stop growing segments left in memory.
mc.flush()
print(mc.partitions)

Step 5: Ask questions about your documents
Now we are ready to ask questions about our custom docs using the power of Semantic search. Semantic search uses a nearest neighbors technique in vector space to find the closest matching documents that answer the user’s question. Semantic search aims to understand the meaning behind questions and documents rather than just matching keywords. During retrieval, Milvus can also utilize metadata to enhance the search experience (using boolean expressions in the Milvus API option expr=).
# Define a sample question about your data.
QUESTION = "what is the default distance metric used in AUTOINDEX?"
QUERY = [question]

# Before conducting a search, load the data into memory.
mc.load()

# Embed the question using the same encoder.
embedded_question = torch.tensor(encoder.encode([QUESTION]))
# Normalize embeddings to unit length.
embedded_question = F.normalize(embedded_question, p=2, dim=1)
# Convert the embeddings to list of list of np.float32.
embedded_question = list(map(np.float32, embedded_question))

# Return top k results with AUTOINDEX.
TOP_K = 5

# Run semantic vector search using your query and the vector database.
start_time = time.time()
results = mc.search(
    data=embedded_question,
    anns_field="vector",
    # No params for AUTOINDEX
    param={},
    # Boolean expression if any
    expr="",
    output_fields=["h1", "h2", "text", "source"],
    limit=TOP_K,
    consistency_level="Eventually")

elapsed_time = time.time() - start_time
print(f"Milvus search time: {elapsed_time} sec")

Below, we take a quick look at what was retrieved. Then we stuff all the texts into a context field.
for n, hits in enumerate(results):
    print(f"{n}th query result")
    for hit in hits:
        print(hit)

# Assemble the context as a stuffed string.
context = ""
for r in results[0]:
   text = r.entity.text
   context += f"{text} "

# Also save the context metadata to retrieve along with the answer.
context_metadata = {
   "h1": results[0][0].entity.h1,
   "h2": results[0][0].entity.h2,
   "source": results[0][0].entity.source,}

Above, we can see that indeed, 5 chunks of text were retrieved. In particular, the first chunk contains the answer to the question about the default metric. Because we retrieved using the Milvus API option output_fields=, sources and citations metadata are retrieved along with the chunk.
id: 445766022949255988, distance: 0.708217978477478, entity: {
  'chunk': "...# Optional, default MetricType.L2 } timeout (float) –
           An optional duration of time in seconds to allow for the
           RPC. …",
  'source': 'https://pymilvus.readthedocs.io/en/latest/api.html',
  'h1': 'API reference',
  'h2': 'Client'}
Step 6: Use an LLM to generate a chat response to the user’s question using the retrieved context
We’ll use an open, very tiny generative AI model, or LLM, available on HuggingFace.
#pip install transformers
from transformers import AutoTokenizer, pipeline

tiny_llm = "deepset/tinyroberta-squad2"
tokenizer = AutoTokenizer.from_pretrained(tiny_llm)

# context cannot be empty so just put random text in it.
QA_input = {
   'question': question,
   'context': 'The quick brown fox jumped over the lazy dog'}

nlp = pipeline('question-answering',
              model=tiny_llm,
              tokenizer=tokenizer)
result = nlp(QA_input)

print(f"Question: {question}")
print(f"Answer: {result['answer']}")

The answer was not very helpful! Now, ask the same question using the retrieved context.
QA_input = {
    'question': question,
    'context': context,}
nlp = pipeline('question-answering',
               model=tiny_llm,
               tokenizer=tokenizer)
result = nlp(QA_input)

# Print the question, answer, grounding sources and citations.
Answer = assemble_grounding_sources(result[‘answer’], context_metadata)
print(f"Question: {question}")
print(answer)

That answer looks a little better! We’ve practiced retrieval for free on our own data using open-source LLMs. Now let’s make a paid call to OpenAI GPT. We expect the same answer as the simple open-source LLM but more human-like.
def prepare_response(response):
    return response["choices"][-1]["message"]["content"]

def generate_response(
    llm,
    temperature=0.0, #0 for reproducible experiments
    grounding_sources=None,
    system_content="", assistant_content="", user_content=""):

    response = openai.ChatCompletion.create(
        model=llm,
        temperature=temperature,
        api_key=openai.api_key,
        messages=[
            {"role": "system", "content": system_content},
            {"role": "assistant", "content": assistant_content},
            {"role": "user", "content": user_content}, ])
        answer = prepare_response(response=response)

        # Add the grounding sources and citations.
        answer = assemble_grounding_sources(answer, grounding_sources)
        return answer

# Generate response
response = generate_response(
    llm="gpt-3.5-turbo-1106",
    temperature=0.0,
    grounding_sources=context_metadata,
    system_content="Answer the question using the context provided. Be succinct.",
    user_content=f"question: {QUESTION}, context: {context}")

# Print the question, answer, grounding sources and citations.
print(f"Question: {QUESTION}")
print(response)

Summary
We demonstrated a start-to-finish RAG retrieval and question-answering chatbot on custom documents. We saw how easy it is to iterate by retrieving and answering questions using your data for free. This was possible with LangChain, Milvus, and open-source LLMs for the encoder and chat generation. During retrieval, Milvus gave sources and citations (just add those fields in the metadata during data load and use ‘output_fields=’ in the API retrieval call). Finally, we saw that this approach saves money since we make free calls to our data almost all the time - retrieval, evaluation, and development iterations. We only make a paid call to OpenAI once for the final chat generation step.
More resources to get started with Milvus and Zilliz
- Step 1: Ingest the data
- Step 2: Chunk the data using HTML hierarchies
- Step 3: Generate embeddings
- Step 4: Create Milvus index and insert data
- Step 5: Ask questions about your documents
- Step 6: Use an LLM to generate a chat response to the user’s question using the retrieved context
- Summary
- More resources to get started with Milvus and Zilliz
Content
Start Free, Scale Easily
Try the fully-managed vector database built for your GenAI applications.
Try Zilliz Cloud for FreeKeep Reading

Introducing Business Critical Plan: Enterprise-Grade Security and Compliance for Mission-Critical AI Applications
Discover Zilliz Cloud’s Business Critical Plan—offering advanced security, compliance, and uptime for mission-critical AI and vector database workloads.

Zilliz Named "Highest Performer" and "Easiest to Use" in G2's Summer 2025 Grid® Report for Vector Databases
This dual recognition shows that Zilliz solved a challenge that has long defined the database industry—delivering enterprise-grade performance without the complexity typically associated with it.
1 Table = 1000 Words? Foundation Models for Tabular Data
TableGPT2 automates tabular data insights, overcoming schema variability, while Milvus accelerates vector search for efficient, scalable decision-making.
