Build RAG with LangChainJS, Milvus, and Strapi
Providing accurate and relevant answers to user queries is crucial when building AI applications. While capable of natural conversation, traditional chatbots and AI models often lack access to specific, up-to-date information. Their responses come from training data that might be outdated or too generic for specialized needs.
Retrieval Augmented Generation (RAG) addresses this limitation by combining AI models’ generative capabilities with a custom knowledge base powered by a vector database like Milvus. Instead of relying solely on pre-trained knowledge, RAG actively searches your content to find relevant information before generating responses. This approach ensures answers are both accurate and contextually appropriate.
Understanding RAG and Vector Search
RAG bridges the gap between generic AI responses and specialized knowledge by integrating a retrieval mechanism with the generation process. Unlike traditional language models that rely solely on pre-trained knowledge, RAG first retrieves relevant information from a custom knowledge base to supplement the AI's responses.
For example, when an AI assistant is asked about a specific policy or procedure, it doesn't rely on memory alone; instead, it searches through relevant documents before providing an answer. This retrieval process is powered by embedding models and vector databases.
Now, let’s see how a standard RAG works.
Text Embeddings: Text is converted into numerical representations, or vectors, that capture its semantic meaning by an embedding model. For instance, the phrases How do I return an item? and What's the refund process? might use different words but share a similar meaning, reflected in their vector similarity.
Vector Search: When a user asks a question, the query is also transformed into a vector. This vector is then compared with others stored in a vector database, such as Milvus, to find the most semantically similar entries.
Answer Generation: The retrieved information, along with the user query, is passed to a large language model. The model generates a response grounded in the retrieved content, ensuring the answer is relevant and accurate.
This combination of retrieval and generation ensures that the AI's responses are contextually appropriate and grounded in the most relevant data from the knowledge base.
In the following sections, we'll create a RAG-powered FAQ system capable of answering questions about Milvus using a knowledge base managed in Strapi. This system will integrate Milvus for vector search, LangChain.js for workflow coordination, and OpenAI's language models to provide accurate and contextual responses. Content will be organized in Strapi, an open-source Node.js headless CMS, and queried in real-time to ground the AI’s answers in your custom data.
If you want to take a quick look, here is the full code and the Strapi backend.
Setting Up Your Development Environment
Before writing code, we need to set up the three key components we discussed above: Milvus for vector storage, Strapi for content management, and an OpenAI API key for generating embeddings and responses. Let's set up each one.
Installing Milvus
Let's start by setting up Milvus, our vector database. You can download the pre-configured Docker Compose file either manually or using wget. In your terminal, run:
wget https://github.com/milvus-io/milvus/releases/download/v2.0.2/milvus-standalone-docker-compose.yml -O docker-compose.yml
With the configuration file in place, start Milvus using Docker:
sudo docker-compose up -d
If you're using Docker Compose V2 rather than V1, use docker compose instead of docker-compose. You can check your version by running docker compose version.
Installing Strapi
Now let's set up Strapi to manage our knowledge base content. Create a new Strapi project using the following command:
npx create-strapi-app@latest my-project
Choose SQLite as your database when prompted. After installation, Strapi will open in your browser where you'll create your admin account.
In the Strapi admin panel, create a new collection type named MILVUS-KNOWLEDGEBASE. Add two essential fields: a Title field using the Text type and a Content field using the Rich text type.
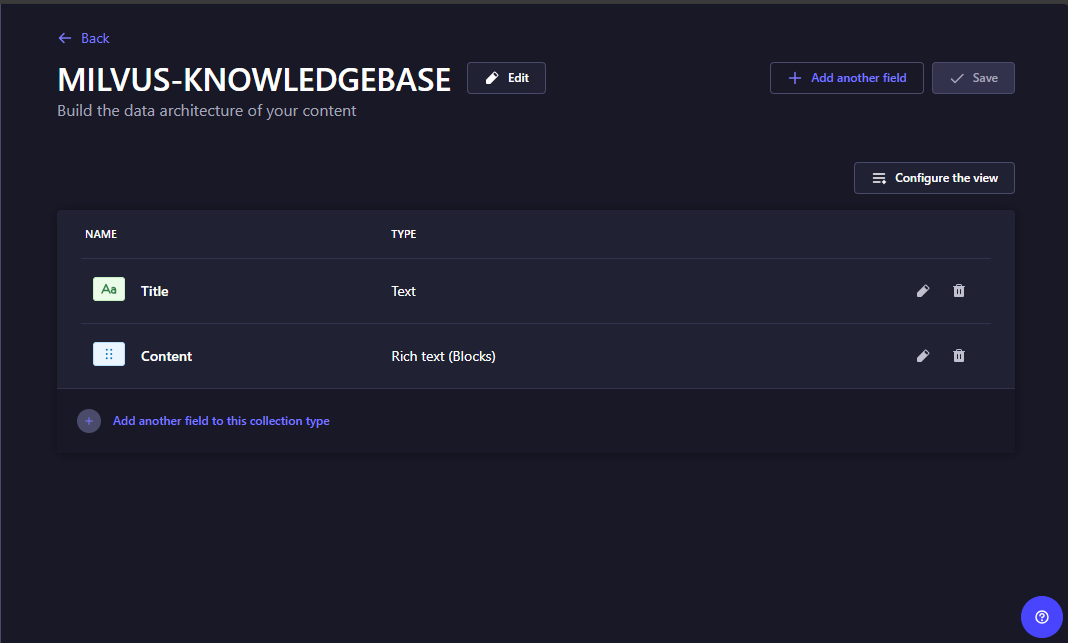 Figure- Adding fields to a Strapi collection
Figure: Adding fields to a Strapi collection
This structure will help us organize our knowledge base entries effectively.
Once your collection is set up, head to Content Manager to add some sample content.
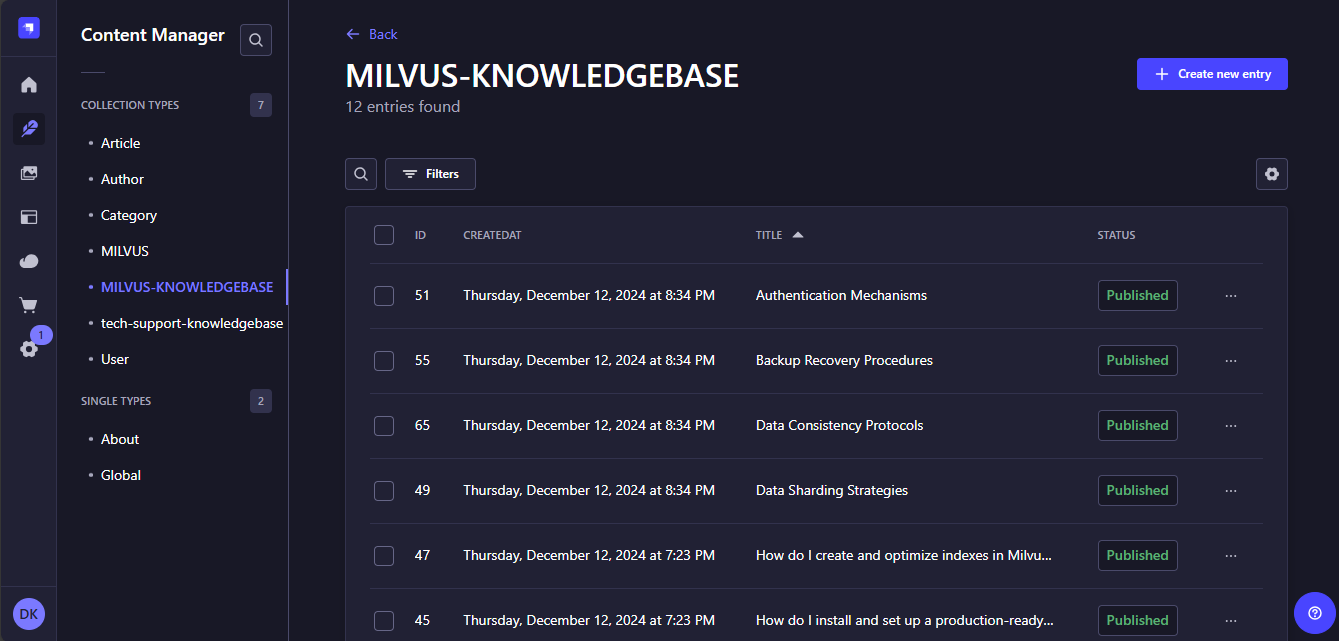 Figure- Strapi collection populated with data
Figure: Strapi collection populated with data
Make sure you publish your entries after creating them, unpublished entries won't be accessible to our application.
After publishing the entries, we need to make the content available to the RAG system by configuring permissions. Go to Settings, then Roles, and select the Public role. Find your MILVUS-KNOWLEDGEBASE collection and enable the find and findOne permissions.
Getting Your OpenAI API Key
The last piece we need is an OpenAI API key to generate embeddings and responses. Visit the OpenAI platform and sign up or log in. Navigate to the API keys section and create a new secret key. Copy and save the key in a safe place as we will need it later and you can only view it once.
Creating the React Application
With our core services ready, let's set up the React application that will host our RAG system. We will use the create-react-app tool to create a new React project and install the necessary dependencies.
First, create a new React application:
npx create-react-app rag-app
cd rag-app
This command sets up a complete React project with all the necessary build tools and configuration. Next, install the packages needed for our RAG system:
npm install @langchain/community @langchain/openai @zilliz/milvus2-sdk-node axios cors express langchain react-markdown
Here is what each package will do in our application:
@langchain/community: Provides access to integrations with various tools and services. We'll use it for the Milvus vector store integration.@langchain/openai: Handles interactions with OpenAI's models. We'll use it to create embeddings and generate responses using GPT-3.5.@zilliz/milvus2-sdk-node: The official Milvus SDK for Node.js. This lets us communicate directly with our Milvus instance for vector operations.axios: This is a HTTP client. We'll use it to fetch content from our Strapi API and make requests between our frontend and backend.cors: Middleware for Express that enables Cross-Origin Resource Sharing. This allows our frontend to communicate with our backend server securely.express: A web framework for Node.js. We'll use it to build our backend API that coordinates between our frontend, Milvus, and OpenAI.langchain: The core LangChain library that helps orchestrate our RAG workflow, managing the flow between retrieving content and generating responses.react-markdown: Renders Markdown content in our React components. We'll use it to display formatted responses from our AI assistant.
Building the Backend Server
Now that we have completed setting up our development environment, let's start building the server that will power our RAG system. The server will handle several key tasks: fetching content from Strapi, converting text into vector embeddings, storing these in Milvus, and coordinating the RAG workflow to generate responses.
Create a file named server.mjs and another one named .env in your project root. In the .env file, paste your OpenAI key as follows:
OPENAI_API_KEY= your-api-key
This is the file we will use to store our sensitive information. Now open the server file, and let’s start coding.
1. Setting Up the Server and Environment
Start by importing the necessary libraries and configuring environment variables to ensure the system runs securely.
import express from "express";
import axios from "axios";
import dotenv from "dotenv";
import cors from "cors";
import { ChatOpenAI } from "@langchain/openai";
import { createStuffDocumentsChain } from "langchain/chains/combine_documents";
import { ChatPromptTemplate } from "@langchain/core/prompts";
import { RecursiveCharacterTextSplitter } from "langchain/text_splitter";
import { OpenAIEmbeddings } from "@langchain/openai";
import { Milvus } from "@langchain/community/vectorstores/milvus";
import { Document } from "langchain/document";
import { HumanMessage, AIMessage } from "@langchain/core/messages";
dotenv.config();
Importing the libraries we installed in our environment to our code ensures we can call and use their functions and methods in our codes. The dotenv.config() function loads our API key, ensuring it is accessible throughout the application without exposing it directly in the code.
2. Configuring the Application
Next, centralize the settings of your application using a configuration object. This step helps keep all the key parameters in one place, making them easier to manage and adjust as needed.
const CONFIG = {
    PORT: parseInt(process.env.PORT || "30080", 10),
    STRAPI: {
        URL: "http://localhost:1337/api/milvus-knowledgebases",
        TIMEOUT: 5000
    },
    MILVUS: {
        URL: "localhost:19530",
        COLLECTION: "rag_collection",
        PRIMARY_FIELD: "pk",
        VECTOR_FIELD: "vector",
        TEXT_FIELD: "text",
        TEXT_MAX_LENGTH: 4096,
        SEARCH_PARAMS: {
            nprobe: 16,
            offset: 0
        },
        BATCH_SIZE: 100
    },
    CHUNKING: {
        SIZE: 2000,
        OVERLAP: 200
    },
    TOP_K: 3
};
This configuration object defines critical parameters for our application. The PORT setting determines which port the server listens on. The STRAPI section contains the URL for the content management system and a timeout value to avoid long waits when fetching data.
The MILVUS section configures the vector database, specifying details such as the collection name, text length limits, and search parameters. nprobe controls the precision of vector searches by adjusting how many clusters Milvus examines. Finally, the CHUNKING section outlines how documents are split into smaller parts, including the chunk size and overlap, ensuring that no context is lost during processing.
3. Initializing the Server and AI Services
With the configuration in place, the next step is to initialize the Express server and set up the AI services. These include the large language model for generating responses and the embedding service for converting text into vectors.
const app = express();
app.use(express.json({ limit: '1mb' }));
app.use(cors());

const model = new ChatOpenAI({
    modelName: "gpt-3.5-turbo",
    temperature: 0.7,
    openAIApiKey: process.env.OPENAI_API_KEY,
    maxRetries: 3,
    timeout: 30000,
});

const embeddings = new OpenAIEmbeddings({
    openAIApiKey: process.env.OPENAI_API_KEY,
    maxRetries: 3,
});

const splitter = new RecursiveCharacterTextSplitter({
    chunkSize: CONFIG.CHUNKING.SIZE,
    chunkOverlap: CONFIG.CHUNKING.OVERLAP,
    separators: ["\n\n", "\n", " ", ""]
});
The app object is created using Express, with middleware added to parse incoming JSON requests and handle cross-origin requests using CORS. This ensures that the server can accept payloads from different domains, which is essential for frontend communication.
Next, we create a ChatOpenAI instance which we will use to connect the system to OpenAI's GPT-3.5 model for generating responses. The temperature parameter controls the creativity of the responses with lower values producing more predictable outputs and higher values generating more varied and creative ones.. The OpenAIEmbeddings instance will convert text into vectors, enabling semantic searches. Finally, the RecursiveCharacterTextSplitter instance will divide the text into chunks based on the size and overlap defined in the configuration.
4. Preparing Documents for Processing
Before we can store or search through documents using Milvus, we need to clean and structure the raw content into a consistent format. This ensures the data is ready for embedding and efficient retrieval later in the workflow.
let milvusStore = null;
let lastDataHash = null;

const processDocument = (content) => {
    if (!content?.Content || !content.Title) return null;

    const processedContent = content.Content
        .map(section => {
            if (section.type === 'paragraph' && section.children) {
                return section.children
                    .map(child => child.text)
                    .join(' ')
                    .trim();
            }
            return null;
        })
        .filter(Boolean)
        .join('\n\n');

    return processedContent ? new Document({
        pageContent: processedContent,
        metadata: {
            source: 'milvus_content',
            id: content.id,
            title: content.Title,
            documentId: content.documentId
        }
    }) : null;
};
In the above code, the let milvusStore and let lastDataHash variables act as global references. milvusStore holds the initialized connection to the Milvus collection, and lastDataHash tracks whether the underlying document data has changed since the last update.
The processDocument function will help us take raw data from Strapi and format it into a structured Document object. First, it checks if the content and title fields are present. If valid, it maps through the content’s sections, extracting text from paragraphs and cleaning it by trimming unnecessary spaces. These sections are joined into a cohesive block of text. The function then returns the processed text wrapped in a Document object, including metadata such as the document’s title, ID, and source. This format ensures compatibility with Milvus and LangChain for further processing.
5. Connecting to or Initializing Milvus
Now that the documents are ready, the next step is to integrate them with Milvus. We will establish a connection to an existing Milvus collection, or if it doesn’t exist, create one and populate it with the prepared documents.
async function getMilvusStore() {
    if (milvusStore) {
        return milvusStore;
    }

    try {
        // First try to connect to existing collection
        try {
            console.log('Attempting to connect to existing collection');
            milvusStore = await Milvus.fromExistingCollection(
                embeddings,
                {
                    url: CONFIG.MILVUS.URL,
                    collectionName: CONFIG.MILVUS.COLLECTION,
                    primaryField: CONFIG.MILVUS.PRIMARY_FIELD,
                    vectorField: CONFIG.MILVUS.VECTOR_FIELD,
                    textField: CONFIG.MILVUS.TEXT_FIELD,
                    textFieldMaxLength: CONFIG.MILVUS.TEXT_MAX_LENGTH,
                }
            );
            return milvusStore;
        } catch (error) {
            console.log('Collection does not exist, will create new one');
            // If collection doesn't exist, fetch data and create it
            const response = await axios.get(CONFIG.STRAPI.URL, {
                timeout: CONFIG.STRAPI.TIMEOUT
            });

            const processPromises = response.data.data.map(processDocument);
            const processedDocs = await Promise.all(processPromises);

            const uniqueDocs = new Map();
            processedDocs
                .filter(Boolean)
                .forEach(doc => uniqueDocs.set(doc.metadata.documentId, doc));

            const docs = Array.from(uniqueDocs.values());

            // Split documents
            const splitPromises = docs.map(doc => splitter.splitDocuments([doc]));
            const splitDocs = await Promise.all(splitPromises);
            const allSplitDocs = splitDocs.flat();

            console.log(`Creating new collection with ${allSplitDocs.length} documents`);

            milvusStore = await Milvus.fromDocuments(
                allSplitDocs,
                embeddings,
                {
                    url: CONFIG.MILVUS.URL,
                    collectionName: CONFIG.MILVUS.COLLECTION,
                    primaryField: CONFIG.MILVUS.PRIMARY_FIELD,
                    vectorField: CONFIG.MILVUS.VECTOR_FIELD,
                    textField: CONFIG.MILVUS.TEXT_FIELD,
                    textFieldMaxLength: CONFIG.MILVUS.TEXT_MAX_LENGTH,
                }
            );

            lastDataHash = Buffer.from(JSON.stringify(response.data)).toString('base64');
            return milvusStore;
        }
    } catch (error) {
        console.error('Failed to initialize Milvus:', error);
        throw error;
    }
}`
This function manages the connection to the Milvus collection. If the milvusStore variable already holds an active connection, the function immediately returns it to avoid unnecessary operations. Otherwise, it attempts to connect to an existing collection in Milvus using the fromExistingCollection method. If the collection doesn’t exist, the function proceeds to create a new one. First, it fetches data from Strapi, processes the documents using the processDocument function, and ensures each document is unique by using the documentId as a key in a Map. Then, the documents are split into smaller chunks using the splitter, which ensures that the documents are not too large for embedding or indexing in Milvus. The processed chunks are then stored in the Milvus collection using the fromDocuments method. The lastDataHash is updated to reflect the current state of the Strapi data, ensuring changes are tracked.
6. Keeping Milvus Up-to-Date
Milvus must stay synchronized with Strapi to ensure the vector database contains the most recent data. Let’s implement a process that detects changes in Strapi's content, identifies updated or new documents, and updates the Milvus collection accordingly.
// Update Milvus data if needed
async function updateMilvusData() {
    try {
        const response = await axios.get(CONFIG.STRAPI.URL, {
            timeout: CONFIG.STRAPI.TIMEOUT
        });

        const currentHash = Buffer.from(JSON.stringify(response.data)).toString('base64');
        if (currentHash === lastDataHash) {
            console.log('Data unchanged, skipping update');
            return false;
        }

        console.log('Content changed, updating Milvus collection');

        const processPromises = response.data.data.map(processDocument);
        const processedDocs = await Promise.all(processPromises);

        const uniqueDocs = new Map();
        processedDocs
            .filter(Boolean)
            .forEach(doc => uniqueDocs.set(doc.metadata.documentId, doc));

        const docs = Array.from(uniqueDocs.values());

        // Split documents
        const splitPromises = docs.map(doc => splitter.splitDocuments([doc]));
        const splitDocs = await Promise.all(splitPromises);
        const allSplitDocs = splitDocs.flat();

        // Delete all existing documents before adding new ones
        await milvusStore.delete({});

        // Add new documents in batches
        for (let i = 0; i < allSplitDocs.length; i += CONFIG.MILVUS.BATCH_SIZE) {
            const batch = allSplitDocs.slice(i, i + CONFIG.MILVUS.BATCH_SIZE);
            await milvusStore.addDocuments(batch);
            console.log(`Added batch ${Math.floor(i / CONFIG.MILVUS.BATCH_SIZE) + 1} of ${Math.ceil(allSplitDocs.length / CONFIG.MILVUS.BATCH_SIZE)}`);
        }

        lastDataHash = currentHash;
        console.log(`Updated Milvus with ${allSplitDocs.length} documents`);
        return true;
    } catch (error) {
        console.error("Error updating Milvus data:", error);
        throw error;
    }
}
This function begins by fetching the latest data from Strapi and computing its hash. If the hash matches the lastDataHash, the data hasn’t changed, and no update is needed. Otherwise, the function processes the updated documents and clears the existing collection in Milvus using the delete method. The new document chunks are then added in batches, ensuring efficient storage while maintaining logging for progress tracking. Finally, it updates the lastDataHash, to ensure that future checks accurately detect changes in the data.
7. Handling User Queries
After populating Milvus with our data, the next step is to handle user queries. The system will retrieve the most relevant documents from Milvus based on semantic similarity to the user's query. These documents will then be used to generate context-aware responses using OpenAI’s GPT-3.5 large language model.
async function handleQuery(chatHistory, input) {
    const store = await getMilvusStore();

    try {
        await updateMilvusData();
    } catch (error) {
        console.warn("Failed to check for updates:", error);
    }

    const results = await store.similaritySearchWithScore(
        input,
        CONFIG.TOP_K
    );

    console.log('\n=== Retrieved Documents from Milvus ===');
    results.forEach(([doc, score], index) => {
        console.log(`\nDocument ${index + 1} (score: ${score}):`);
        console.log('Title:', doc.metadata.title);
        console.log('Content:', doc.pageContent.substring(0, 150) + '...');
    });

    const chain = await createStuffDocumentsChain({
        llm: model,
        prompt: ChatPromptTemplate.fromMessages([
            [
                "system",
                `You are an AI assistant specializing in Milvus and Zilliz, vector database technologies. Your goal is to provide accurate and helpful answers based on the provided context.

    **Guidelines:**
    1. **Milvus/Zilliz-Related Queries:**
       - If the query is about Milvus or Zilliz and the context includes relevant information, provide a detailed and structured response.
       - Use proper Markdown formatting:
         - \`\`\` for code blocks
         - **Bold** for emphasis
         - Bullet points for lists
         - ### Headings for sections
       - If no relevant information exists in the context, respond with: *"I don't have that information yet."*

    2. **Unrelated Queries:**
       - If the query is not about Milvus or Zilliz, respond with:
         *"This topic is outside my expertise. I specialize in Milvus and Zilliz. Please ask questions related to these technologies."*

    **Context:**
    {context}

    **User Query:**
    {input}`
            ],
            ...chatHistory,
            ["user", "{input}"]
        ]),
        documentPrompt: ChatPromptTemplate.fromTemplate("Content: {page_content}\n\n")
    });


    const response = await chain.invoke({
        input,
        context: results.map(([doc]) => doc)
    });

    return {
        answer: response,
        context: results.map(([doc]) => ({
            content: doc.pageContent,
            title: doc.metadata.title,
            id: doc.metadata.id,
            documentId: doc.metadata.documentId
        }))
    };
}
This function begins by ensuring that the Milvus vector store is up-to-date. The updateMilvusData function is called within a try-catch block to handle potential errors without interrupting the query process. The query is then passed to Milvus’s similaritySearchWithScore method, which retrieves the top k most similar documents from the database. The retrieved documents are logged. Each document includes metadata such as the title and ID, as well as a truncated preview of its content. This will help us know whether our RAG pipeline is retrieving the correct documents.
Next, the documents are fed into a LangChain createStuffDocumentsChain using a prompt that instructs the model to answer based solely on the provided context. This ensures that OpenAI’s GPT-3.5 generates a response grounded in the retrieved content, without relying on external knowledge, maintaining accuracy and relevance. Finally, the function returns both the generated response and the context of the retrieved documents.
8. Setting Up API Endpoints
Now that the backend can process user queries and interact with Milvus, the next step is to expose this functionality through API endpoints. These endpoints serve as the bridge between our backend and frontend (or other client applications).
app.post("/chat", async (req, res) => {
    try {
        const { chatHistory, input } = req.body;

        if (!input?.trim()) {
            return res.status(400).json({
                error: "Invalid input",
                message: "No input provided"
            });
        }

        const formattedHistory = Array.isArray(chatHistory)
            ? chatHistory.map(msg =>
                msg.role === "user"
                    ? new HumanMessage(msg.content)
                    : new AIMessage(msg.content)
            )
            : [];

        const response = await handleQuery(formattedHistory, input);
        res.json(response);
    } catch (error) {
        console.error("Chat request error:", error);
        res.status(500).json({
            error: "Internal server error",
            message: process.env.NODE_ENV === 'production'
                ? "An unexpected error occurred"
                : error.message
        });
    }
});

app.get("/health", async (req, res) => {
    try {
        const store = await getMilvusStore();
        res.json({
            status: "ok",
            timestamp: new Date().toISOString(),
            milvusInitialized: !!store,
            config: CONFIG
        });
    } catch (error) {
        res.status(500).json({
            status: "error",
            error: error.message
        });
    }
});
The /chat endpoint processes incoming POST requests that contain a user’s query and chat history. The chat history is formatted into HumanMessage and AIMessage objects to maintain context. If the query is invalid (e.g., empty), the endpoint responds with a 400 Bad Request status and an appropriate error message. If the query is valid, the handleQuery function is called to process the input, retrieve relevant documents from Milvus, and generate a response. The result is returned as a JSON object. If an error occurs, it is logged, and the server responds with a 500 Internal Server Error.
On the other hand, the /health endpoint provides a way to monitor the status of the server. It checks whether the Milvus store is initialized and responds with a status of ok or error, along with the server configuration and current timestamp.
9. Starting the Server
The final step is to start the server and make it available to handle requests.
app.listen(CONFIG.PORT, () => {
    console.log(`Server running on http://localhost:${CONFIG.PORT}`);
    console.log('Configuration:', CONFIG);
});
The app.listen method starts the server on the port specified in the configuration, in this case, port 30080. Once the server is running, it logs a message indicating the URL where it can be accessed, as well as the current configuration. This provides a confirmation that the backend is ready to handle requests.
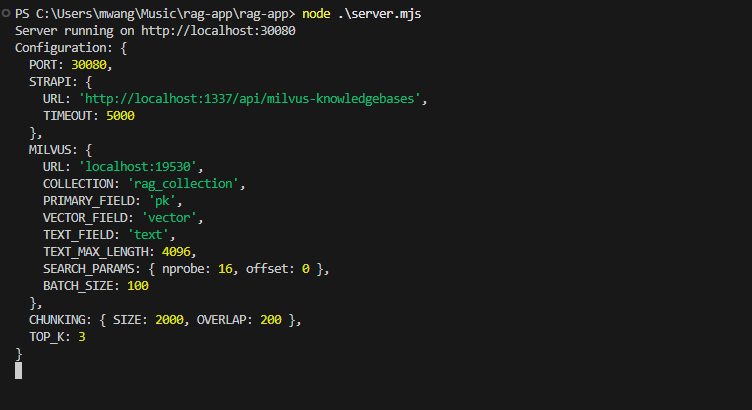 Figure- RAG system backend server running while logging the current configurations
Figure: RAG system backend server running while logging the current configurations
To run the server, proceed to the terminal and run this command.
node .\server.mjs
We are now done creating the backend for our RAG system.
Creating the Frontend of Your RAG System
With the backend of the RAG system fully functional, the next step is to create a frontend to allow users to interact with the system. The frontend will be a chatbot interface that connects to the backend, enabling users to input queries and receive AI-generated responses.
Creating the User Interface
Start by creating a file named ChatbotUI.js in the src directory. This file will define the chatbot component and manage the flow of user queries and backend responses.
import React, { useState, useEffect, useRef } from 'react';
import ReactMarkdown from 'react-markdown';
import axios from 'axios';
import './ChatbotUI.css';

const ChatbotUI = () => {
  const [chatHistory, setChatHistory] = useState([]);
  const [userInput, setUserInput] = useState('');
  const [isLoading, setIsLoading] = useState(false);
  const [error, setError] = useState(null);
  const chatContainerRef = useRef(null);

  useEffect(() => {
    // Scroll to the latest message when chat history updates
    chatContainerRef.current.scrollTop = chatContainerRef.current.scrollHeight;
  }, [chatHistory]);

  const handleUserInput = (e) => setUserInput(e.target.value);

  const handleSendMessage = async () => {
    if (userInput.trim() !== '') {
      const newMessage = { role: 'user', content: userInput };
      const updatedChatHistory = [...chatHistory, newMessage];
      setChatHistory(updatedChatHistory);
      setUserInput('');
      setIsLoading(true);

      try {
        const response = await axios.post('http://localhost:30080/chat', {
          chatHistory: updatedChatHistory,
          input: userInput,
        });

        const botMessage = {
          role: 'assistant',
          content: response.data.answer || 'Sorry, I didn’t quite get that.',
        };

        setTimeout(() => {
          setChatHistory((prevMessages) => [...prevMessages, botMessage]);
        }, 1000); // Simulate typing delay
      } catch (err) {
        console.error('Error:', err);
        setError('Unable to connect to the server.');
      } finally {
        setIsLoading(false);
      }
    }
  };

  return (
    <div className="chatbot-ui">
      {/* Header */}
      <div className="chat-header">
        <img src="/milvus_logo.png" alt="Assistant" className="assistant-logo" />
        <h2>Chat Assistant</h2>
      </div>

      {/* Chat Messages */}
      <div className="chat-body" ref={chatContainerRef}>
        {chatHistory.map((message, index) => (
          <div
            key={index}
            className={`message ${message.role === 'user' ? 'user-message' : 'bot-message'}`}
          >
            <ReactMarkdown>{message.content}</ReactMarkdown>
          </div>
        ))}
        {isLoading && (
          <div className="bot-message typing-indicator">
            <span></span>
            <span></span>
            <span></span>
          </div>
        )}
        {error && <div className="error-message">{error}</div>}
      </div>

      {/* Footer */}
      <div className="chat-footer">
        <input
          type="text"
          placeholder="Ask me anything..."
          value={userInput}
          onChange={handleUserInput}
          onKeyPress={(e) => {
            if (e.key === 'Enter') handleSendMessage();
          }}
          disabled={isLoading}
        />
        <button onClick={handleSendMessage} disabled={isLoading}>
          <span className="send-icon">✈</span>
        </button>
      </div>
    </div>
  );
};

export default ChatbotUI;
This component uses React's useState to manage states such as the chat history and user input. The useEffect hook ensures the chat container scrolls to the latest message automatically. When the user submits a query, it is sent to http://localhost:30080/chat backend API endpoint via an axios POST request. The backend response is then displayed in the chat interface.
Styling the Chatbot
Next, create a file named ChatbotUI.css in the src directory. This file will style the chatbot interface.
/* Full-Screen Gradient Background */
.chatbot-ui {
  display: flex;
  flex-direction: column;
  align-items: center;
  justify-content: center;
  width: 100%;
  height: 100vh;
  background: linear-gradient(135deg, #8358ff, #00a6ff); /* Milvus color palette */
  font-family: 'Roboto', sans-serif;
  color: #fff;
}

/* Chat Header */
.chat-header {
  display: flex;
  align-items: center;
  justify-content: center;
  background: linear-gradient(90deg, #1e1e2d, #28293e);
  width: 100%;
  padding: 15px;
  border-radius: 15px 15px 0 0;
  box-shadow: 0 4px 10px rgba(0, 0, 0, 0.2);
}

.assistant-logo {
  width: 50px;
  height: 50px;
  margin-right: 15px;
  border-radius: 50%;
  background: radial-gradient(circle, #8358ff, #00a6ff); /* Dynamic logo glow */
  animation: pulse 2s infinite;
}

.chat-header h2 {
  font-size: 1.8rem;
  font-weight: bold;
  color: #ffffff;
}

.chat-header p {
  font-size: 0.9rem;
  color: #a0a0b1;
  margin-top: 5px;
}

/* Chat Body */
.chat-body {
  flex: 1;
  width: 100%;
  padding: 15px;
  overflow-y: auto;
  display: flex;
  flex-direction: column;
  gap: 12px;
  background: #1e1e2d;
  color: #ffffff;
  border-radius: 0 0 15px 15px;
}

.message {
  max-width: 80%;
  padding: 12px 15px;
  border-radius: 10px;
  font-size: 1rem;
  line-height: 1.5;
  animation: fadeIn 0.3s ease-in-out;
}

.user-message {
  align-self: flex-end;
  background: linear-gradient(90deg, #8358ff, #00a6ff);
  color: #ffffff;
  box-shadow: 0 4px 10px rgba(0, 0, 0, 0.2);
}

.bot-message {
  align-self: flex-start;
  background: #29293f;
  color: #d4d4e5;
  box-shadow: 0 4px 10px rgba(0, 0, 0, 0.2);
}

/* Typing Indicator */
.typing-indicator {
  display: flex;
  justify-content: flex-start;
  gap: 5px;
}

.typing-indicator span {
  width: 8px;
  height: 8px;
  background-color: #00a6ff;
  border-radius: 50%;
  animation: blink 1.2s infinite;
}

.typing-indicator span:nth-child(2) {
  animation-delay: 0.2s;
}

.typing-indicator span:nth-child(3) {
  animation-delay: 0.4s;
}

/* Footer */
.chat-footer {
  display: flex;
  align-items: center;
  width: 100%;
  padding: 10px 15px;
  background: #1e1e2d;
  border-top: 1px solid #28293e;
  border-radius: 0 0 15px 15px;
  box-shadow: 0 -4px 10px rgba(0, 0, 0, 0.2);
}

.chat-footer input {
  flex: 1;
  padding: 12px 15px;
  border-radius: 30px;
  border: 1px solid #8358ff;
  font-size: 1rem;
  outline: none;
  background: #29293f;
  color: #ffffff;
  transition: border-color 0.3s ease;
}

.chat-footer input:focus {
  border-color: #00a6ff;
}

.chat-footer button {
  margin-left: 10px;
  padding: 12px 20px;
  border: none;
  border-radius: 30px;
  background: linear-gradient(90deg, #8358ff, #00a6ff);
  color: white;
  font-size: 1.2rem;
  cursor: pointer;
  box-shadow: 0 4px 10px rgba(0, 0, 0, 0.2);
  transition: transform 0.3s ease, box-shadow 0.3s ease;
}

.chat-footer button:hover {
  transform: scale(1.1);
  box-shadow: 0 6px 15px rgba(0, 0, 0, 0.4);
}

.chat-footer button:disabled {
  background: #29293f;
  color: #a0a0b1;
  cursor: not-allowed;
}

@keyframes blink {
  0%, 80%, 100% {
    opacity: 0;
  }
  40% {
    opacity: 1;
  }
}

@keyframes fadeIn {
  from {
    opacity: 0;
    transform: translateY(10px);
  }
  to {
    opacity: 1;
    transform: translateY(0);
  }
}

@keyframes pulse {
  0%, 100% {
    transform: scale(1);
    box-shadow: 0 0 10px rgba(131, 88, 255, 0.5);
  }
  50% {
    transform: scale(1.1);
    box-shadow: 0 0 20px rgba(0, 166, 255, 0.7);
  }
}
The CSS styles create a chatbot interface inspired by the Milvus color palette. The background uses a gradient with deep purple and cyan shades, reflecting Milvus' branding. The chat header follows a dark gradient style, while user messages are highlighted with a bright gradient matching Milvus’ primary colors. Bot messages are styled with a darker, muted theme. This design leverages Milvus' colors for a unified and functional user interface.
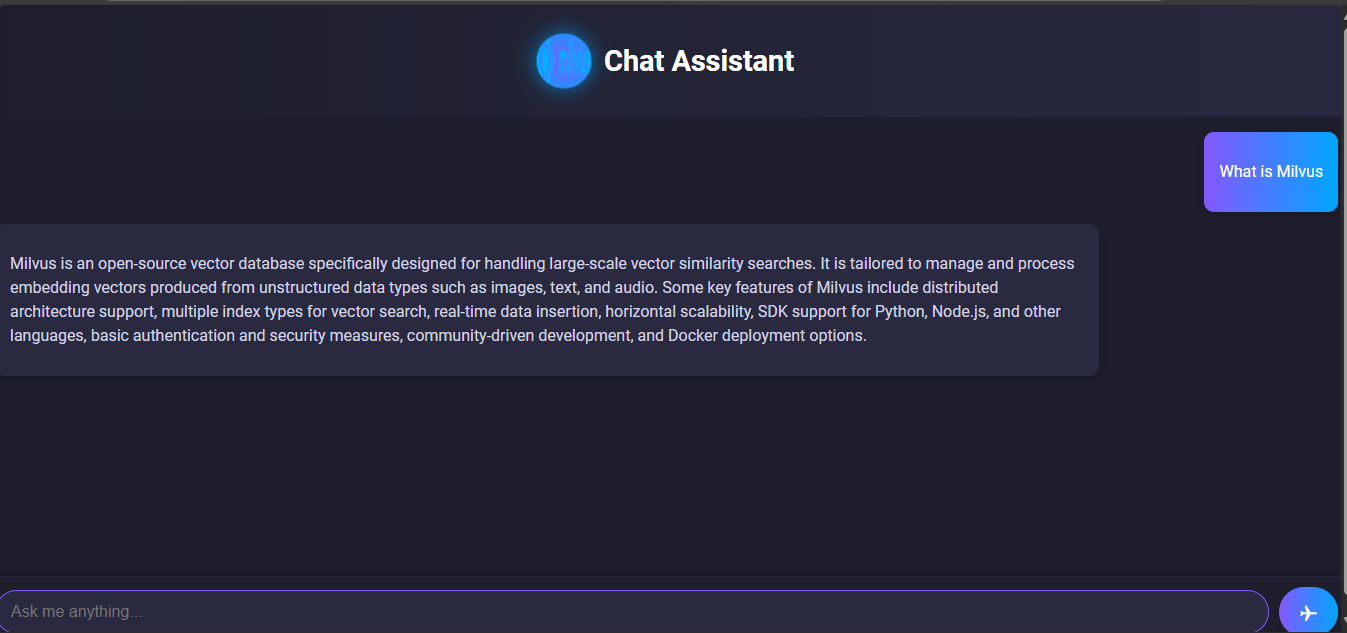 Figure- RAG system completed user interface
Figure: RAG system completed user interface
That is what the final UI looks like.
Integrating the Chatbot into the Application
Finally, update the App.js file in the src directory to render the ChatbotUI component.
import React from 'react';
import ChatbotUI from './ChatbotUI';

const App = () => {
  return (
    <div>
      <ChatbotUI />
    </div>
  );
};

export default App;
This ensures the chatbot is rendered as the main component when the application starts. The App component serves as the entry point for the React application.
Testing Your RAG System
After completing the backend and frontend setup, it's time to test the entire RAG pipeline to ensure it works as expected. Here’s how to proceed:
Starting the Backend
Open a terminal, navigate to the project directory, and start the backend server:
node server.mjs
Ensure the backend is running on http://localhost:30080. Check the logs to verify that Milvus has initialized and is ready for queries.
Running the Frontend
Open a separate terminal, navigate to the rag-app directory, and start the React frontend:
npm start
This will launch the application at http://localhost:3000 in your default browser.
Testing the Chatbot Interface
On the chatbot interface, type a question related to Milvus or Zilliz. Also, try typing questions outside these topics to see whether the system will respond with the appropriate message. Finally, try typing questions that might be outside the Strapi knowledge base. Here are sample results:
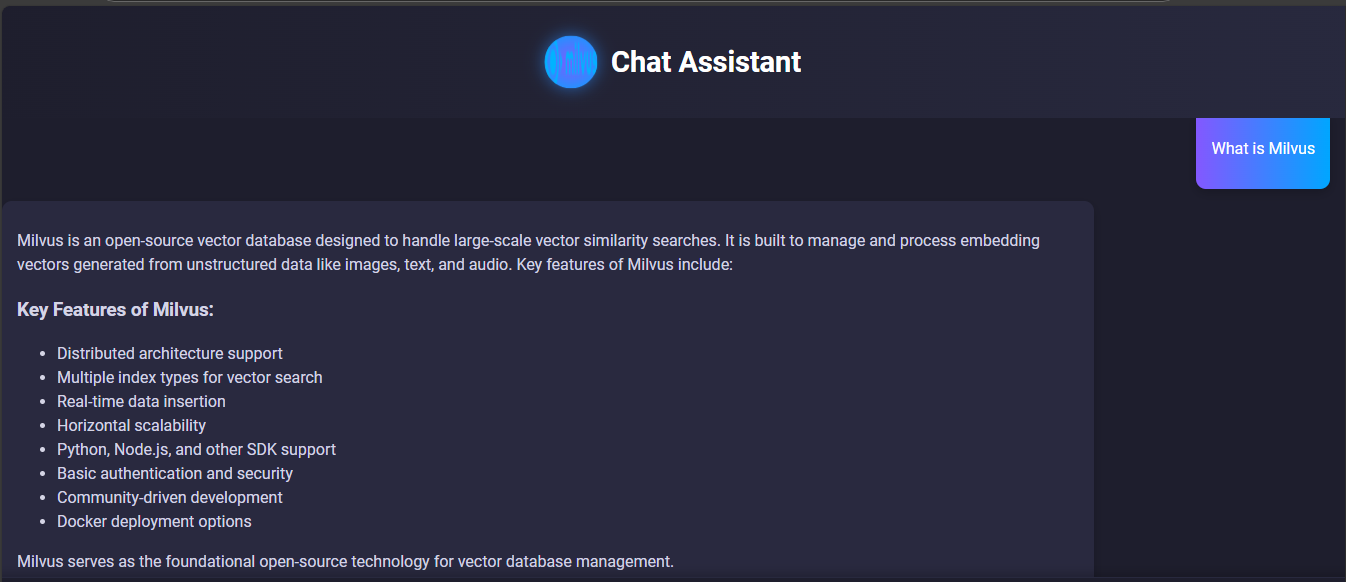 Figure- RAG system result of a query related to Milvus
Figure: RAG system result of a query related to Milvus
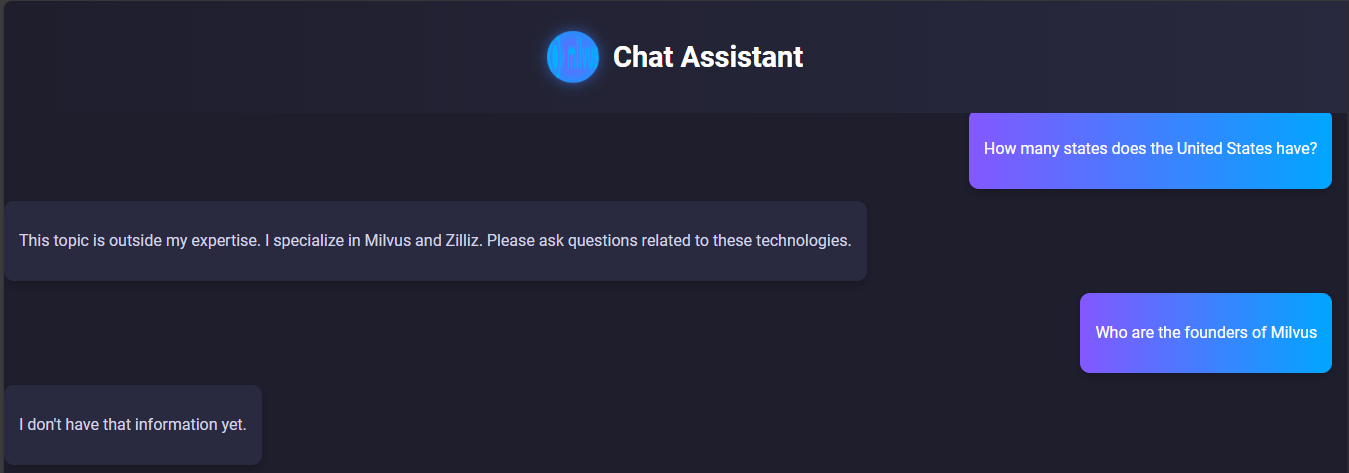 Figure- RAG system testing results
Figure: RAG system testing results
The above screenshots show our RAG system is running as expected and displaying the correct results. It is also grounded in using our knowledgebase which is why it does not know the founders of Milvus as this information does not exist in Strapi.
Go ahead and add more content to the knowledge base and test the system.
Conclusion
Integrating LangChain, Milvus, and Strapi to build a Retrieval-Augmented Generation (RAG) system showcases how AI can deliver accurate, domain-specific responses grounded in real, up-to-date knowledge. This architecture is ideal for applications like customer support, knowledge management, and educational tools. With a clear understanding of the architecture and this step-by-step guide, you can now create RAG systems tailored to your specific needs.
Related Resources
- Understanding RAG and Vector Search
- Setting Up Your Development Environment
- Building the Backend Server
- Creating the Frontend of Your RAG System
- Conclusion
- Related Resources
Content
Start Free, Scale Easily
Try the fully-managed vector database built for your GenAI applications.
Try Zilliz Cloud for FreeKeep Reading

Introducing Zilliz Cloud Global Cluster: Region-Level Resilience for Mission-Critical AI
Zilliz Cloud Global Cluster delivers multi-region resilience, automatic failover, and fast global AI search with built-in security and compliance.
Vector Databases vs. Hierarchical Databases
Use a vector database for AI-powered similarity search; use a hierarchical database for organizing data in parent-child relationships with efficient top-down access patterns.

Empowering Women in AI: RAG Hackathon at Stanford
Empower and celebrate women in AI at the Women in AI RAG Hackathon at Stanford. Engage with experts, build innovative AI projects, and compete for prizes.
