


AIを使ってセレブなスタイリストを探す(後編)
前回のブログ記事「【AIを使って有名人のスタイリストを見つける】(https://zilliz.com/blog/using-ai-to-find-your-celebrity-stylist)」では、オープンソースのAIネイティブ・ベクター・データベースであるMilvusやHugging Faceモデルなどの人工知能(AI)技術を活用して、自分に合った有名人のスタイルを見つける方法を説明した。このフォローアップ投稿では、さらに一歩進めて、前回のプロジェクトにいくつかのコード変更を加えることで、より詳細で正確な結果を得る方法を示します。さらに、あなた自身でこのプロジェクトを拡張する方法を提案します。
このプロジェクトを直接試してみたい方は、写真と完成したノートブックをダウンロードしてください。前回のブログで取り上げたプロジェクトに興味がある方は、使用している写真とそのチュートリアルをご覧ください。
前回のファッションAIプロジェクトのチュートリアルのまとめ
このプロジェクトに深く飛び込む前に、前回の記事で説明したチュートリアルを簡単に振り返っておこう。そのため、このページを離れることなく、その背景を学ぶことができます。
画像操作に必要なライブラリのインポート
特徴抽出のための torch、transformers の segformer オブジェクト、matplotlib、そして Resize、masks_to_boxes、crop などの torchvision のインポートなど。
インポートトーチ
from torch import nn, tensor
from transformers import AutoFeatureExtractor, SegformerForSemanticSegmentation.
import matplotlib.pyplot as plt
from torchvision.transforms import Resize
import torchvision.transforms as T
from torchvision.ops import masks_to_boxes
from torchvision.transforms.functional import crop
セレブ画像の前処理
画像操作に必要なパッケージをすべてインポートしたら、画像の処理を開始します。以下の3つの関数(get_segmentation、get_masks、crop_images)を使用して、衣服のセグメンテーションとトリミングを行います。
def get_segmentation(extractor, model, image):
    inputs = extractor(images=image, return_tensors="pt")


    出力 = model(**inputs)
    logits = outputs.logits.cpu()


    upsampled_logits = nn.functional.interpolate(
        logits、
        size=image.size[::-1]、
        mode="bilinear"、
        align_corners=False、
    )


    pred_seg = upsampled_logits.argmax(dim=1)[0].
    return pred_seg


# マスク(テンソル)とobj_ids(int)の2つのリストを返す。
# "mattmdjaga/segformer_b2_clothes" from hugging face
def get_masks(segmentation):
    obj_ids = torch.unique(segmentation)
    obj_ids = obj_ids[1:].
    masks = segmentation == obj_ids[:, None, None].
    return masks, obj_ids


def crop_images(masks, obj_ids, img):
    boxes = masks_to_boxes(masks)
    crop_boxes = [].
    for box in boxes:
        crop_box = tensor([box[0], box[1], box[2]-box[0], box[3]-box[1])
        crop_boxes.append(crop_box)
    preprocess = T.Compose([)
        T.Resize(size=(256, 256))、
        T.ToTensor()
    ])
    cropped_images = {}.
    for i in range(len(crop_boxes)):
        crop_box = crop_boxes[i].
        cropped = crop(img, crop_box[1].item(), crop_box[0].item(), crop_box[3].item(), crop_box[2].item())
        cropped_images[obj_ids[i].item()] = preprocess(cropped)
    return cropped_images
画像データをベクターデータベースに格納する
画像データの保存には、オープンソースのAIネイティブベクターデータベースであるMilvusを使用します。まず、このプロジェクトのphotosのzipファイルを解凍し、ノートブックと同じルートディレクトリにフォルダをインクルードします。このステップが完了したら、以下のコードを実行して画像を処理し、データをMilvusに保存します。
import os
image_paths = [].
for celeb in os.listdir("./photos"):
    for image in os.listdir(f"./photos/{celeb}/"):
        image_paths.append(f"./photos/{celeb}/{image}")


from milvus import default_server
from pymilvus import utility, connections
default_server.start()
connections.connect(host="127.0.0.1", port=default_server.listen_port)
ディメンション = 2048
バッチサイズ = 128
COLLECTION_NAME = "ファッション"
TOP_K = 3
from pymilvus import FieldSchema, CollectionSchema, Collection, DataType


fields = [
    FieldSchema(name="id", dtype=DataType.INT64, is_primary=True, auto_id=True)、
    FieldSchema(name='filepath',dtype=DataType.VARCHAR,max_length=200)、
    FieldSchema(name="name", dtype=DataType.VARCHAR, max_length=200)、
    FieldSchema(name="seg_id", dtype=DataType.INT64)、
    FieldSchema(name='embedding',dtype=DataType.FLOAT_VECTOR,dim=DIMENSION))。
]


schema = CollectionSchema(fields=fields)
コレクション = コレクション(name=COLLECTION_NAME, schema=schema)
index_params = { {インデックス・タイプ
    「index_type":"IVF_FLAT"、
    「metric_type":"L2",
    「params":params": {"nlist":128},
}
collection.create_index(field_name="embedding", index_params=index_params)
コレクション.load()
次に、以下のコードを実行すると、Hugging FaceのNvidia ResNet 50モデルを使ってエンベッディングを生成することができます。
# もしSSL証明書のURLErrorに遭遇したら、resnet50モデルをインポートする前にこれを実行してください。
インポート ssl
ssl._create_default_https_context = ssl._create_unverified_context
# 最後のレイヤーを削除した埋め込みモデルをロードする
embeddings_model = torch.hub.load('NVIDIA/DeepLearningExamples:torchhub', 'nvidia_resnet50', pretrained=True)
embeddings_model = torch.nn.Sequential(*(list(embeddings_model.children())[:-1]))
embeddings_model.eval()
以下の関数は、データを埋め込み、挿入する方法を定義しています。それに続いて、コードは全ての画像をループし、Milvusに埋め込み、挿入します。
注意: Milvusの新しい動的スキーマ機能を利用する場合、以下のコンポーネントの多くは変更または削除されます。
def embed_insert(data, collection, model):
    with torch.no_grad():
        出力 = model(torch.stack(data[0])).squeeze()
        collection.insert([data[1], data[2], data[3], output.tolist()])
from PIL import Image
data_batch = [[], [], [], []].


for path in image_paths:
    image = Image.open(パス)
    path_split = path.split("/")
    name = ".join(path_split[2].split("_"))
    セグメンテーション = get_segmentation(extractor, model, image)
    masks, ids = get_masks(segmentation)
    cropped_images = crop_images(masks, ids, image)
    for key, image in cropped_images.items():
        data_batch[0].append(image)
        data_batch[1].append(path)
        data_batch[2].append(name)
        data_batch[3].append(key)
        if len(data_batch[0]) % BATCH_SIZE == 0:
            embed_insert(data_batch, collection, embeddings_model)
            data_batch = [[], [], [], []]。


if len(data_batch[0]) != 0:
    embed_insert(data_batch, collection, embeddings_model)


collection.flush()
ベクターデータベースに問い合わせる
次のコードは、Milvusに入力画像をクエリし、各衣類の上位3つの結果を取得する方法を示しています。
def embed_search_images(data, model):
    with torch.no_grad():
    出力 = model(torch.stack(data))
    if len(output) > 1:
        return output.squeeze().tolist()
    else:
        return torch.flatten(output, start_dim=1).tolist().
# data_batch[0] はテンソルのリストです。
# data_batch[1] は画像のファイルパス(文字列)のリスト。
# data_batch[2] は画像に写っている人物の名前のリスト(文字列) # data_batch[3] はテンソルのリスト。
# data_batch[3]はセグメンテーションキーのリスト (int)
data_batch = [[], [], [], []]。


search_paths = ["./photos/Taylor_Swift/Taylor_Swift_3.jpg", "./photos/Taylor_Swift/Taylor_Swift_8.jpg"].


for path in search_paths:
    image = Image.open(パス)
    path_split = path.split("/")
    name = ".join(path_split[2].split("_"))
    セグメンテーション = get_segmentation(extractor, model, image)
    masks, ids = get_masks(segmentation)
    cropped_images = crop_images(masks, ids, image)
    for key, image in cropped_images.items():
        data_batch[0].append(image)
        data_batch[1].append(path)
        data_batch[2].append(name)
        data_batch[3].append(key)


embeds = embed_search_images(data_batch[0], embeddings_model)
import time
start = time.time()
res = collection.search(embeds、
    anns_field='embedding'、
    param={"metric_type":"L2",
        「params":params: {"nprobe":10}},
    limit=TOP_K、
    output_fields=['filepath'])
finish = time.time()
print(finish - start)
for index, result in enumerate(res):
    print(index)
    print(result)
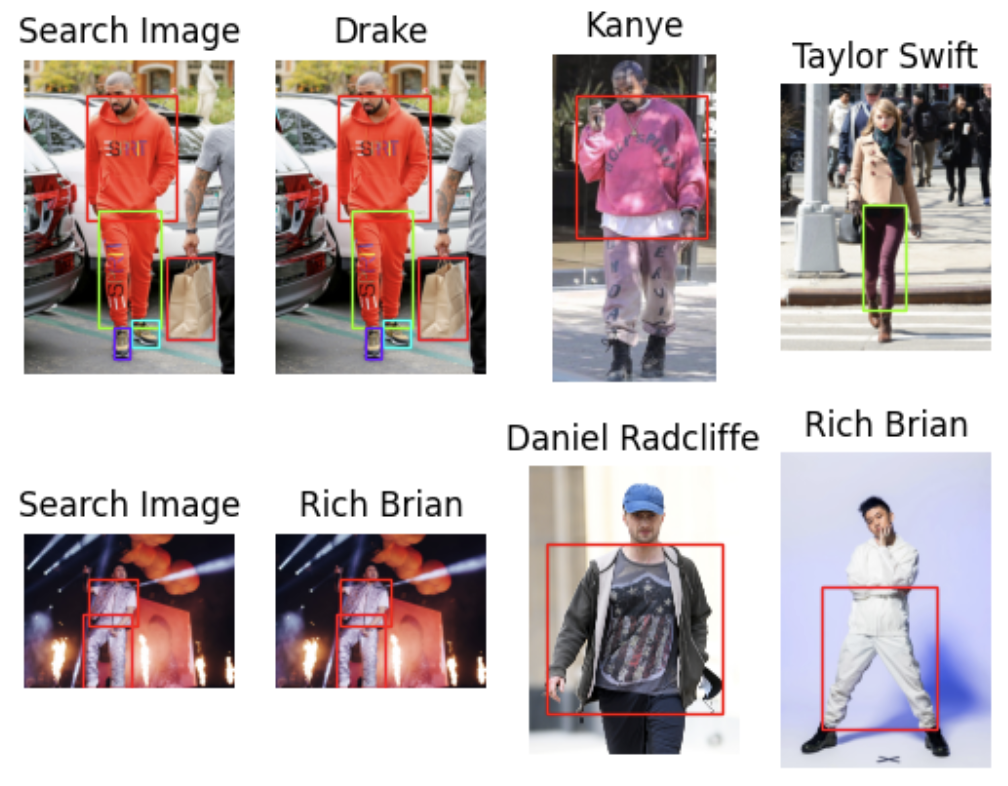
さらなるパターンマッチング:各画像からオブジェクトを選択する
上記のチュートリアルに従うことで、検索した各服のトップ3セレブスタイルを発見することができます。また、マッチしたアイテムのバウンディングボックスを除いた下のような画像を作成することもできます。このセクションでは、前のチュートリアルで使用したものに少しコードを変更するだけで、より自分のパターンに近いファッションスタイルを見つける方法を説明します。
 画像
画像
画像操作に必要なライブラリをすべてインポートする。
まずはじめに、画像操作に必要なライブラリをすべてインポートします。すでにインポートしている場合は、このステップは省略できます。
インポートトーチ
from torch import nn, tensor
from transformers import AutoFeatureExtractor, SegformerForSemanticSegmentation
import matplotlib.pyplot as plt
from torchvision.transforms import Resize
import torchvision.transforms as T
from torchvision.ops import masks_to_boxes
from torchvision.transforms.functional import crop
画像の前処理
画像操作に必要なパッケージをすべてインポートしたら、画像のセグメンテーション処理を行う:get_segmentation、get_masks、crop_images` の3つの関数を使用する。
get_segmentation関数は特にコードを変更する必要はない。 get_masks 関数では、wanted リストのセグメンテーション ID に対応するセグメンテーションを取得するだけでよい。Hugging Faceのモデルカードに記載されているように、segmentation IDs for articles of clothingを新たに追加したものです。
crop_image`関数に最も変更を加えます。前回のチュートリアルでは、この関数は切り取られた画像のリストを返していました。いくつかのコードを変更した後、この関数は3つのオブジェクトを返すようになりました:切り取られた画像の埋め込み、元の画像上のボックスの座標のリスト、セグメンテーションIDのリストです。この新しい設定は、埋め込みをバッチ挿入から変換ステップに移動させます。
wanted = [1, 3, 4, 5, 6, 7, 8, 9, 10, 16, 17].
def get_segmentation(image):
    input = extractor(images=image, return_tensors="pt")


    出力 = segmentation_model(**inputs)
    logits = outputs.logits.cpu()


    upsampled_logits = nn.functional.interpolate(
        logits、
        size=image.size[::-1]、
        mode="bilinear"、
        align_corners=False、
    )


    pred_seg = upsampled_logits.argmax(dim=1)[0].
    return pred_seg


# マスク(テンソル)とobj_ids(int)の2つのリストを返す。
# "mattmdjaga/segformer_b2_clothes" from hugging face
def get_masks(segmentation):
    obj_ids = torch.unique(segmentation)
    obj_ids = obj_ids[1:].
    wanted_ids = [x.item() for x in obj_ids if x in wanted].
    wanted_ids = torch.Tensor(wanted_ids)
    masks = segmentation == wanted_ids[:, None, None].
    return masks, obj_ids


def crop_images(masks, obj_ids, img):
    boxes = masks_to_boxes(masks)
    crop_boxes = [].
    for box in boxes:
        crop_box = tensor([box[0], box[1], box[2]-box[0], box[3]-box[1])
        crop_boxes.append(crop_box)
    preprocess = T.Compose([)
        T.Resize(size=(256, 256))、
        T.ToTensor()
    ])
    cropped_images = [].
    seg_ids = [].
    for i in range(len(crop_boxes)):
        crop_box = crop_boxes[i].
        cropped = crop(img, crop_box[1].item(), crop_box[0].item(), crop_box[3].item(), crop_box[2].item())
        cropped_images.append(preprocess(cropped))
        seg_ids.append(obj_ids[i].item())
    with torch.no_grad():
        embeddings = embeddings_model(torch.stack(cropped_images)).squeeze().tolist()
    return embeddings, boxes.tolist(), seg_ids
画像が手に入ったので、次はそれらを読み込みます。このステップでは、前回のチュートリアルで取り上げたバッチ挿入を行います。このチュートリアルでは、リストのリストではなく、辞書のリストとしてすべてのデータを一度に挿入します。この挿入方法の方がずっとすっきりしていて、挿入時にスキーマに新しいフィールドを追加することができます。今回は、クロップ・コーナーのリストを追加します。
for path in image_paths:
    image = Image.open(path)
    path_split = path.split("/")
    name = ".join(path_split[2].split("_"))
    セグメンテーション = get_segmentation(image)
    masks, ids = get_masks(segmentation)
    embeddings, crop_corners, seg_ids = crop_images(masks, ids, image)
    inserts = [{"embedding": embeddings[x], "seg_id": seg_ids[x], "name": name, "filepath": path, "crop_corner": crop_corners[x]} for x in range(len(embeddings))].
    collection.insert(挿入)
    collection.flush()
ベクターデータベースに問い合わせる
さて、いよいよvector databaseであるMilvusでクエリを実行します。前のチュートリアルの手順と比べると、ここではいくつかの違いがあります:
- まず、1つの画像で気にする "マッチ "の数を5つに制限します。
- 次に、最も近い3つの画像を表示します。
- 3つ目は、異なる色でバウンディング・ボックスを描くためのカラー・マップを得る関数を追加することです。
次に、matplotlibの図形と軸をセットアップする。次に、すべての画像をループ処理し、前述の3つの処理関数を適用して、セグメンテーションとバウンディングボックスを取得する。
画像の前処理が終わったら、Milvusで画像を検索することができる。各画像について、"マッチする "記事の数に基づいて上位3つの回答を得る。最後に、マッチを返したバウンディングボックスとともに結果を印刷する。
from pprint import pprint
from PIL import ImageDraw
from collections import Counter
import matplotlib.patches as patches


LIMIT = 5 # 衣類1点につき何枚のクローズマッチを分析するか
CLOSEST = 3 # 最も近い画像を何枚表示するか。CLOSEST <= リミット


search_paths = ["./photos/Taylor_Swift/Taylor_Swift_2.jpg", "./photos/Jenna_Ortega/Jenna_Ortega_6.jpg"].# 検索する画像


def get_cmap(n, name='hsv'):
    '''0,1,...,n-1の各インデックスを個別の
    キーワード引数 name は、標準的な mpl カラーマップ名でなければなりません。
    ソースは https://stackoverflow.com/questions/14720331/how-to-generate-random-colors-in-matplotlib'''
    return plt.cm.get_cmap(name, n)


# 結果のサブプロットを作成する
f, axarr = plt.subplots(max(len(search_paths), 2), CLOSEST + 1)


for search_i, path in enumerate(search_paths):
    # 見つかったすべての項目について、クロップと埋め込みを生成する
    image = Image.open(path)
    セグメンテーション = get_segmentation(image)
    masks, ids = get_masks(segmentation)
    embeddings, crop_corners, _ = crop_images(masks, ids, image)


# カラーマップを生成
    cmap = get_cmap(len(crop_corners))


    # 検索中の画像で最初のボックスを表示する
    axarr[search_i][0].imshow(image)
    axarr[search_i][0].set_title('画像検索')
    axarr[search_i][0].axis('off')
    for i, (x0, y0, x1, y1) in enumerate(crop_corners):
        rect = patches.Rectangle((x0, y0), x1-x0, y1-y0, linewidth=1, edgecolor=cmap(i), facecolor='none')
        axarr[search_i][0].add_patch(rect)


    # すべての作物についてデータベースを検索する
    start = time.time()
    res = collection.search(embeddings、
        anns_field='embedding'、
        param={"metric_type":"L2",
        「params":params: {"nprobe":10}, "offset":0},
        limit=LIMIT、
        output_fields=['filepath', 'crop_corner'])
    finish = time.time()


    print("総検索時間: ", finish - start)


    # ユニークな結果の上位を要約し、結果内の位置に基づいて重み付けする
    ファイルパス = [].
    for hits in res:
        seen = set()
        for i, hit in enumerate(hits):
            if hit.entity.get("filepath") not in seen:
                seen.add(hit.entity.get("filepath"))
                filepaths.extend([hit.entity.get("filepath") for _ in range(len(hits) - i)])
    # 最も多くランク付けされた結果画像を見つける
    counts = Counter(filepaths)
    most_common = [path for path, _ in counts.most_common(CLOSEST)].
    # 各画像について、検索画像と相関のある対応するアイテムを抽出する
    matches = {} # 各画像について、検索画像と相関のある対応するアイテムを抽出する
    for i, hits in enumerate(res):
        matches[i] = {} とする。
        トラッカー = set(most_common)
        for hit in hits:
            if hit.entity.get("filepath") in tracker:
                matches[i][hit.entity.get("filepath")] = hit.entity.get("crop_corner")
                tracker.remove( hit.entity.get("filepath"))
        # 最も一般的な画像を結果に表示する
    for res_i, res_path in enumerate(most_common):
    # 検索画像の隣にそれぞれの画像を表示する
        image = Image.open(res_path)
        axarr[search_i][res_i+1].imshow(image)
        axarr[search_i][res_i+1].set_title(" ".join(res_path.split("/")[2].split("_")))
        axarr[search_i][res_i+1].axis('off')
# マッチした項目すべてにブーディングボックスを追加する
    for key, value in matches.items():
        if res_path in value:
            x0, y0, x1, y1 = value[res_path].
            rect = patches.Rectangle((x0, y0), x1-x0, y1-y0, linewidth=1, edgecolor=cmap(key), facecolor='none')
            axarr[search_i][res_i+1].add_patch(rect)
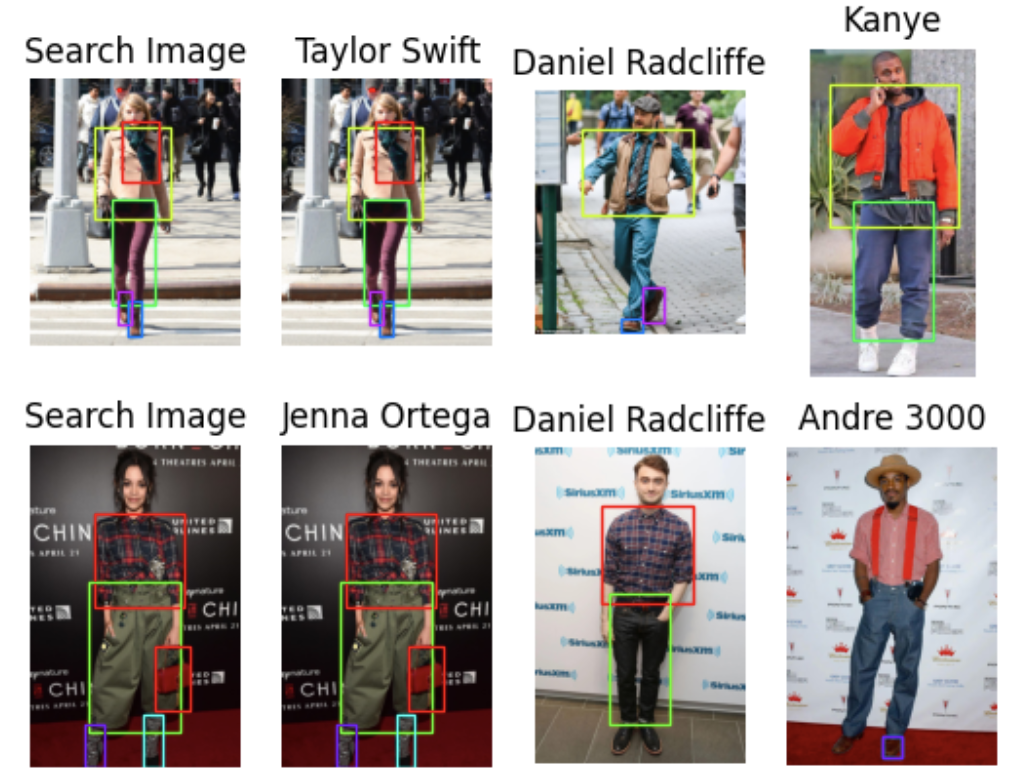
以上のステップを完了すると、下図またはこのセッションの冒頭のような結果が得られるはずです。
 画像
画像
次は何だ? プロジェクト拡張の可能性
今のところ、私はこのプロジェクトを保留にして他のプロジェクトに取り組んでいる!可能性のある拡張を3つ挙げます。
まず、比較ゲームをもう少し詳しくすることができます。例えば、2つの靴を1つのアイテムとしてマークするなど、分割されたアイテムをグループ化することができます。また、有名人や友人の写真を追加して、比較対象を増やすこともできます。
第二に、このプロジェクトをファッション識別子やレコメンダー・システムに変えることができる。有名人の画像を使う代わりに、オンラインで買える洋服の写真を使うことができる。ユーザーが写真をアップロードすると、ベクター・データベースの画像と比較し、ユーザーに最も近い服を提案することができます。
第三に、スタイルジェネレーターを作成することができます。これを行うには様々な方法がありますが、1つのアイデアは、ユーザーの複数の写真を撮影し、それに基づいて提案を生成することです。このアプローチでは、スタイル提案を提供するために生成画像モデルを使用し、参考のために最も近いユーザーの写真と比較します。そして、この比較に基づいて納得のいくものを提案することができる。
これら3つの拡張機能は、Milvusのような画像モデルとベクトルデータベースを使用して、私のシンプルなプロジェクトを強化する方法の一例に過ぎません。ベクトル・データベースを使うことで、様々な類似性検索タスクが可能になり、特に写真を比較するのに重宝する。
まとめ
このチュートリアルでは、Milvusの新しい動的スキーマを使用し、特定のセグメンテーションIDをフィルタリングし、マッチした画像のバウンディングボックスを追跡することで、最初のセレブスタイルプロジェクトを拡張しました。また、検索結果をソートし、マッチした数に基づいて上位3つの結果を返すようにしました。
Milvusの新しいダイナミック・スキーマは、辞書形式を使用してデータをアップロードする際にフィールドを追加できるため、当初はリストのリストを一括アップロードしていた方法を変更することができました。また、スキーマを変更することなく作物の座標を追加することも容易になった。
新たな前処理として、『ハギング・フェイス』のモデル・カードに基づいて、衣服に関連しない特定のIDをフィルタリングした。get_masks関数でこれらのIDをフィルタリングしている。面白いことに、この関数のobj_ids` オブジェクトは実際にはテンソルである。
また、バウンディングボックスの追跡も行った。埋め込みステップを画像切り出し関数に移し、バウンディングボックスとセグメンテーションIDを埋め込んで返した。そして、動的スキーマを使って、これらの埋め込みをMilvusに保存した。
クエリ時に、バウンディングボックスの数で返された画像を集約することで、さまざまな衣服から最も近い有名人の画像を見つけることができます。 あとはあなた次第です。例えば、ファッション推薦システム、あなたとあなたの友人のためのより良いスタイル比較システム、あるいは生成的ファッションAIアプリなどです。
読み続けて

Why We Built Vector Lakebase: Rethinking Unstructured Data Architecture for AI
Vector Lakebase: a unified, lake-native data foundation for AI workloads — and an answer to what happens after vector databases succeed.

Legal Document Analysis: Harnessing Zilliz Cloud's Semantic Search and RAG for Legal Insights
Enhance legal document analysis with Zilliz Cloud’s Semantic Search and RAG. Improve accuracy, efficiency, and scalability for contracts, case law, and compliance.

DeepRAG: Thinking to Retrieval Step by Step for Large Language Models
Discover DeepRAG, an advanced retrieval-augmented generation (RAG) model that improves LLM accuracy by retrieving only essential data through step-by-step reasoning.