


MilvusとTowheeでAIチャットボットを構築する方法
オープンソースのベクトルデータベースであるMilvusは、効率的でスケーラブルなベクトル検索機能を必要とするあらゆるAIアプリケーションのための完璧なバックボーンであり、チャットボットのデータ管理のための傑出した選択肢です。Towheeは、複雑なMLモデルの実装とオーケストレーションのプロセスを簡素化する機械学習ワークフローのための新しいフレームワークです。また、アプリケーションの開発を管理しやすく、理解しやすくします。
このチュートリアルでは、MilvusとTowheeを使ってPythonでシンプルなAIチャットボットを構築する方法を学びます。非構造化データの取り込み、分析、埋め込みによる保存、クエリーの処理方法に焦点を当てます。
環境のセットアップ
まず、チャットボットを実行するための Python 仮想環境を作成します。
これはLinuxのシェルセッションです。環境を作成し、有効化し、pipを最新バージョンにアップグレードします。
[egoebelbecker@ares milvus_chatbot]$ python -m venv ./chatbot_venv
[egoebelbecker@ares milvus_chatbot]$ source chatbot_venv/bin/activate
(chatbot_venv) [egoebelbecker@ares milvus_chatbot]$ pip install --upgrade pip
要件は既に満たしています: pip in ./chatbot_venv/lib64/python3.11/site-packages (22.2.2)
pip の収集
  キャッシュされた pip-23.1.2-py3-none-any.whl (2.1 MB) を使用
収集したパッケージのインストール: pip
  アンインストール中: pip
    既存のインストールが見つかりました: pip 22.2.2
    pip-22.2.2をアンインストールしています:
      pip-22.2.2 のアンインストールに成功しました。
pip-23.1.2 のインストールに成功しました。
次に、コードを実行するのに必要なパッケージをインストールする:pandas、jupyter、langchain、towhee、unstructured、milvus、pymilvus、sentence_transformers、gradio。
(chatbot_venv) [egoebelbecker@ares milvus_chatbot]$ pip install pandas jupyter langchain towhee unstructured milvus pymilvus sentence_transformers gradio
pandasの収集
  Obtaining dependency information for pandas from https://files.pythonhosted.org/packages/d0/28/88b81881c056376254618fad622a5e94b5126db8c61157ea1910cd1c040a/pandas-2.0.3-cp311-cp311-manylinux_2_17_x86_64.manylinux2014_x86_64.whl.metadata
  キャッシュされたpandas-2.0.3-cp311-cp311-manylinux_2_17_x86_64.manylinux2014_x86_64.whl.metadataを使用 (18 kB)
jupyterの収集
  キャッシュされた jupyter-1.0.0-py2.py3-none-any.whl を使用 (2.7 kB)
(snip)
収集したパッケージのインストールwebencodings, wcwidth, pytz, pure-eval, ptyprocess, pickleshare, json5, ipython-genutils, filetype, fastjsonschema, executing, backcall, zipp, XlsxWriter, xlrd, widgetsnbextension, websocket-client, webcolors, urllib3, uri-template, tzdata, typing-extensions, traitlets, tqdm, tornado, tinycss2, tenacity、tabulate, soupsieve, sniffio, six, send2trash, rpds-py, rfc3986-validator, rfc3986, regex, pyzmq, PyYAML, python-magic, python-json-logger, pypandoc, pygments、pycparser, psutil, prompt-toolkit, prometheus-client, platformdirs, pkginfo, pillow, pexpect, parso, pandocfilters, packaging, overrides, olefile, numpy、nest-asyncio、mypy-extensions、multidict、more-itertools、mistune、mdurl、markupsafe、markdown、lxml、jupyterlab-widgets、jupyterlab-pygments、jsonpointer、joblib、jeepney、idna、greenlet、frozenlist、fqdn、et-xmlfile、docutils、defusedxml、decorator、debugpy、click、charset-normalizer、chardet、certifi、babel、attrs, async-timeout, async-lru, yarl, typing-inspect, terminado, SQLAlchemy, rfc3339-validator, requests, referencing, qtpy, python-pptx, python-docx、python-dateutil, pydantic, pdf2image, openpyxl, numexpr, nltk, msg-parser, matplotlib-inline, marshmallow, markdown-it-py, jupyter-core, jinja2, jedi, jaraco.classes、importlib-metadata、comm、cffi、bleach、beautifulsoup4、asttokens、anyio、aiosignal、stack-data、rich、requests-toolbelt、readme-renderer、pandas、openapi-schema-pydantic、langsmith、jupyter-server-terminals、jupyter-client、jsonschema-specifications、dataclasses-json、cryptography、arrow、argon2-cffi-bindings、aiohttp、SecretStorage、pdfminer.six、langchain、jsonschema、isoduration、ipython、argon2-cffi、unstructured、nbformat、keyring、ipykernel、twine、qtconsole、nbclient、jupyter-events、jupyter-console、ipywidgets、towhee、nbconvert、jupyter-server、notebook-shim、jupyterlab-server、jupyter-lsp、jupyterlab、notebook、jupyter
PyYAML-6.0.1 SQLAlchemy-2.0.19 SecretStorage-3.3.3 XlsxWriter-3.1.2 aiohttp-3.8.5 aiosignal-1.3.1 anyio-3.7.1 argon2-cffi-21.3.0 argon2-cffi-bindings-21.2.0 arrow-1.2.3 asttokens-2.2.1 async-lru-2.0.4 async-timeout-4.0.2 attrs-23.1.0 babel-2.12.1 backcall-0.2.0 beautifulsoup4-4.12.2 bleach-6.0.0 certifi-2023.7.22 cffi-1.15.1 chardet-5.1.0 charset-normalizer-3.2.0 click-8.1.6 comm-0.1.3 cryptography-41.0.2 dataclasses-json-0.5.14 debugpy-1.6.7 decorator-5.1.1 defusedxml-0.7.1 docutils-0.20.1 et-xmlfile-1.1.0 executing-1.2.0 fastjsonschema-2.18.0 filetype-1.2.0 fqdn-1.5.1 frozenlist-1.4.0 greenlet-2.0.2 idna-3.4 importlib-metadata-6.8.0 ipykernel-6.25.0 ipython-8.14.0 ipython-genutils-0.2.0 ipywidgets-8.0.7 isoduration-20.11.0 jaraco.classes-3.3.0 jedi-0.19.0 jeepney-0.8.0 jinja2-3.1.2 joblib-1.3.1 json5-0.9.14 jsonpointer-2.4 jsonschema-4.18.4 jsonschema-specifications-2023.7.1 jupyter-1.0.0 jupyter-client-8.3.0 jupyter-console-6.6.3 jupyter-core-5.3.1 jupyter-events-0.7.0 jupyter-lsp-2.2.0 jupyter-server-2.7.0 jupyter-server-terminals-0.4.4 jupyterlab-4.0.3 jupyterlab-pygments-0.2.2 jupyterlab-server-2.24.0 jupyterlab-widgets-3.0.8 keyring-24.2.0 langchain-0.0.248 langsmith-0.0.15 lxml-4.9.3 markdown-3.4.4 markdown-it-py-3.0.0 markupsafe-2.1.3 marshmallow-3.20.1 matplotlib-inline-0.1.6 mdurl-0.1.2 mistune-3.0.1 more-itertools-10.0.0 msg-parser-1.2.0 multidict-6.0.4 mypy-extensions-1.0.0 nbclient-0.8.0 nbconvert-7.7.3 nbformat-5.9.2 nest-asyncio-1.5.7 nltk-3.8.1 notebook-7.0.1 notebook-shim-0.2.3 numexpr-2.8.4 numpy-1.25.2 olefile-0.46 openapi-schema-pydantic-1.2.4 openpyxl-3.1.2 overrides-7.3.1 packaging-23.1 pandas-2.0.3 pandocfilters-1.5.0 parso-0.8.3 pdf2image-1.16.3 pdfminer.6-20221105 pexpect-4.8.0 pickleshare-0.7.5 pillow-10.0.0 pkginfo-1.9.6 platformdirs-3.10.0 prometheus-client-0.17.1 prompt-toolkit-3.0.39 psutil-5.9.5 ptyprocess-0.7.0 pure-eval-0.2.2 pycparser-2.21 pydantic-1.10.12 pygments-2.15.1 pypandoc-1.11 python-dateutil-2.8.2 python-docx-0.8.11 python-json-logger-2.0.7 python-magic-0.4.27 python-pptx-0.6.21 pytz-2023.3 pyzmq-25.1.0 qtconsole-5.4.3 qtpy-2.3.1 readme-renderer-40.0 referencing-0.30.0 regex-2023.6.3 requests-2.31.0 requests-toolbelt-1.0.0 rfc3339-validator-0.1.4 rfc3986-2.0.0 rfc3986-validator-0.1.1 rich-13.5.1 rpds-py-0.9.2 send2trash-1.8.2 six-1.16.0 sniffio-1.3.0 soupsieve-2.4.1 stack-data-0.6.2 tabulate-0.9.0 tenacity-8.2.2 terminado-0.17.1 tinycss2-1.2.1 tornado-6.3.2 towhee-1.1.1 tqdm-4.65.0 traitlets-5.9.0 twine-4.0.2 typing-extensions-4.7.1 typing-inspect-0.9.0 tzdata-2023.3 unstructured-0.8.7 uri-template-1.3.0 urllib3-2.0.4 wcwidth-0.2.6 webcolors-1.13 webencodings-0.5.1 websocket-client-1.6.1 widgetsnbextension-4.0.8 xlrd-2.0.1 yarl-1.9.2 zipp-3.16.2
(chatbot_venv) [egoebelbecker@ares milvus_chatbot]$
このチュートリアルのコードが書かれたJupyterノートブックがこちらにあります。ダウンロードしてJupyterを起動し、ノートブックをロードしてください:
chatbot_venv) [egoebelbecker@ares milvus_chatbot]$ jupyter notebook milvus_chatbot.ipynb
[I 2023-07-31 11:29:01.748 ServerApp] notebookパッケージのインポートに0.0000秒かかりました。
[I 2023-07-31 11:29:01.759 ServerApp] jupyter_lspパッケージのインポートに0.0108秒かかりました。
[W 2023-07-31 11:29:01.759 ServerApp] jupyter_lspで`_jupyter_server_extension_points`関数が見つかりませんでした。 代わりに`_jupyter_server_extension_paths`関数が見つかったので、当面はこれを使用します。この関数名はJupyter Serverの将来のリリースでは非推奨となります。
[I 2023-07-31 11:29:01.764 ServerApp] jupyter_server_terminalsパッケージのインポートに0.0045秒かかりました。
[I 2023-07-31 11:29:01.765 ServerApp] jupyterlab パッケージのインポートに 0.0000s かかりました。
[I 2023-07-31 11:29:02.124 ServerApp] notebook_shim パッケージのインポートに 0.0000s を要した
チャットボットの作成
さて、チャットボットの作成に取りかかろう。
ドキュメントストア
ボットはドキュメントのチャンクと、そこからTowheeが抽出したエンベッディングを保存する必要があります。そのためにMilvusを使います。Milvusの軽量版であるMilvus Liteは、上記のmilvusライブラリと一緒にインストール済みです。
コマンドラインからサーバを実行することができる:
(chatbot_venv) [egoebelbecker@ares milvus_chatbot]$ milvus-server

    __ _________ _ ____ ______
   / |/ / _/ /| | / / / / / __/
  / /|_/ // // /_| |/ / /_/ /\ \
 /_/ /_/___/____/___/____/___/ {ライト}

 Milvusをご利用いただきありがとうございます!

 バージョン: v2.2.12-lite
 プロセス   139309
 開始   2023-07-31 12:43:43
 コンフィグ    /home/egoebelbecker/.milvus.io/milvus-server/2.2.12/configs/milvus.yaml
 ログ      /ホーム/egoebelbecker/.milvus.io/milvus-server/2.2.12/logs

 Ctrl+C で終了 ...
または、ノートブックに示されているように、アプリケーションコードの一部として:
from milvus import default_server

# Milvusサービスを開始する
default_server.start()

# Milvus サービスを停止する
# default_server.stop()
アプリケーション変数の設定と OpenAI API キーの取得
次に、いくつかの変数を設定し、残っている SQLite ファイルをクリーンアップします。以下、チャットの履歴に SQLite を使います。
- MILVUS_URI** - Milvusサーバーの接続情報。ホストとポートで解析される。
- MILVUS_HOST** - Milvusが動作しているホスト。
- MILVUS_PORT** - サーバがリッスンするポート。
- DROP_EXIST** - 起動時に既存のMilvusコレクションを削除します。
- EMBED_MODEL** - 組み込みデータを作成する際に使用する文の変換モデルです。
- COLLECTION_NAME** - データと埋め込み用のMilvusコレクションの名前。
- DIM - モデルが各テキストに対して作成する埋め込み次元。
- OPENAI_API_KEY** - LLM APIのキー。
import getpass
インポート os

milvus_uri = 'http://localhost:19530'
[MILVUS_HOST, MILVUS_PORT] = MILVUS_URI.split('://')[1].split(':')
DROP_EXIST = True
EMBED_MODEL = 'all-mpnet-base-v2'
COLLECTION_NAME = 'chatbot_demo'
DIM = 768

OPENAI_API_KEY = getpass.getpass('OpenAIのAPIキーを入力してください: ')

if os.path.exists('./sqlite.db'):
    os.remove('./sqlite.db')
このコードを実行して変数を定義し、APIキーのプロンプトに答える。
サンプルパイプライン
次に、データをダウンロードしてMilvusに保存する番だ。その前に、非構造化データをダウンロードして処理するためのサンプルパイプラインを見てみましょう。
この例ではTowheeのドキュメントページを使用します。異なるサイトを試して、コードが異なるデータセットをどのように処理するかを確認することができます。
このコードはTowheeパイプラインを使用しています:
- 入力** - 渡されたソースで新しいパイプラインを開始します。
- map - ops.text_loader() を使用して URL を取得し、'doc' にマップします。
- flat_map - ops.text_splitter()を使用して、ドキュメントを保存用の「チャンク」に分割する。
- output** - パイプラインを閉じ、使用する準備をする。
このパイプラインを DataCollection に渡すと、どのように動作するかを確認できます。
from towhee import pipe, ops, DataCollection

pipe_load = (
    pipe.input('source')
        .map('source', 'doc', ops.text_loader())
        .flat_map('doc', 'doc_chunks', ops.text_splitter(chunk_size=300))
        .output('source', 'doc_chunks')
)
DataCollection(pipe_load('https://towhee.io')).show()
以下は、show()からの出力です:
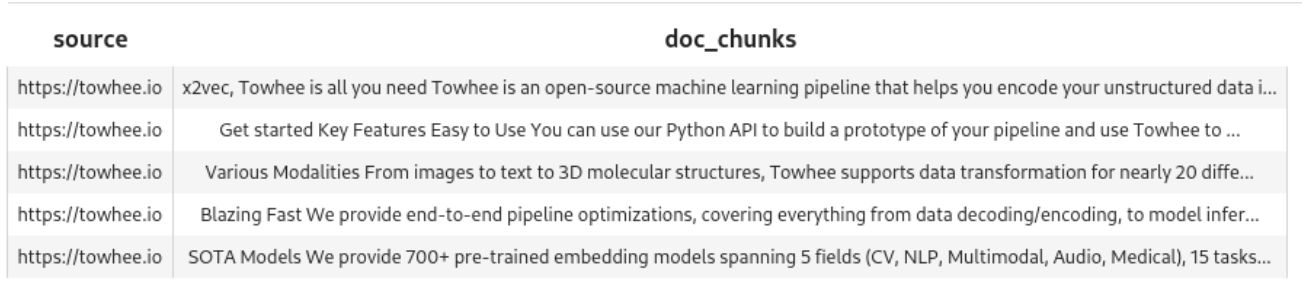
パイプラインはドキュメントから5つのチャンクを作成しました。
サンプル埋め込みパイプライン
パイプラインはデータを取得し、チャンクを作成しました。埋め込みも作成する必要があります。別のサンプルパイプラインを見てみましょう。
これはmap()を使用して、各チャンクに対してops.sentence_embedding.sbert()を実行します。この例では、1つのテキストブロックを渡しています。
pipe_embed = (
    pipe.input('doc_chunk')
        .map('doc_chunk', 'vec', ops.sentence_embedding.sbert(model_name=EMBED_MODEL))
        .map('vec', 'vec', ops.np_normalize())
        .output('doc_chunk', 'vec')
)

text = '''SOTAモデル

5つの分野(CV, NLP, Multimodal, Audio, Medical)、15のタスク、140以上のモデルアーキテクチャにまたがる700以上の事前学習済み埋め込みモデルを提供しています。
BERT、CLIP、ViT、SwinTransformer、data2vecなどが含まれます。
'''

データコレクション(pipe_embed(text)).show()
このコードを実行して、パイプラインが単一のテキストブロックをどのように処理するかを確認します。

Milvusの準備
さて、データを保持するコレクションが必要である。この時計はcreate_collection()を定義しており、MILVUS_HOSTとMILVUS_PORTを使用してMilvusに接続し、指定された名前の既存のコレクションをすべて削除し、このスキーマで新しいコレクションを作成する:
- id** - 整数の識別子。
- エンベッディング** - エンベッディングに対応する浮動小数点数のベクトル。
- 埋め込みに対応するテキスト。
from pymilvus import (
    connections, utility, Collection、
    CollectionSchema, FieldSchema, DataType
)


def create_collection(collection_name):
    connections.connect(host=MILVUS_HOST, port=MILVUS_PORT)

    has_collection = utility.has_collection(コレクション名)

    if has_collection:
        コレクション = コレクション(コレクション名)
        if DROP_EXIST:
            collection.drop()
        else:
            コレクションを返す

    # コレクションを作成する
    fields = [
        FieldSchema(name='id', dtype=DataType.INT64, is_primary=True, auto_id=True)、
        FieldSchema(name='embedding', dtype=DataType.FLOAT_VECTOR, dim=DIM)、
        FieldSchema(name='text', dtype=DataType.VARCHAR, max_length=500)
    ]
    schema = CollectionSchema(
        fields=fields、
        description="Towhee demo"、
        enable_dynamic_field=True
        )
    コレクション = コレクション(name=コレクション名, schema=schema)

    index_params = { {インデックス・パラメータ
        'metric_type': 'IP'、
        'index_type': 'IVF_FLAT'、
        params':params': {'nlist': 1024}.
        }
    コレクション.create_index(
        field_name='embedding'、
        index_params=index_params
    )
    コレクションを返す
パイプラインの挿入
入力されたテキストを処理してMilvusに挿入する番だ。まずは上記で学んだことを折りたたむパイプラインから。
この関数は
- 新しいコレクションを作成します。
- データを取得する
- データをチャンクに分割する
- EMBED_MODEL**を使って埋め込みを作成します。
- テキストとエンベッディングをMilvusに挿入する。
load_data = (
    .pipe.input('collection_name', 'source')
        .map('collection_name', 'collection', create_collection)
        .map('source', 'doc', ops.text_loader())
        .flat_map('doc', 'doc_chunk', ops.text_splitter(chunk_size=300))
        .map('doc_chunk', 'vec', ops.sentence_embedding.sbert(model_name=EMBED_MODEL))
        .map('vec', 'vec', ops.np_normalize())
        .map(('collection_name', 'vec', 'doc_chunk'), 'mr'、
             ops.ann_insert.osschat_milvus(host=MILVUS_HOST, port=MILVUS_PORT))
        .output('mr')
)
実際に動かしてみましょう。ウィキペディアのフロド・バギンズのページに対して実行してみよう。
プロジェクト名 = 'towhee_demo'
data_source = 'https://en.wikipedia.org/wiki/Frodo_Baggins'
mr = load_data(COLLECTION_NAME, data_source)

print('Doc chunks inserted:', len(mr.to_list()))
埋め込みを含む408個のチャンクが挿入される:
2023-07-31 16:50:53,369 - 139993906521792 - node.py-node:167 - INFO:Node-inputの実行を開始します。
2023-07-31 16:50:53,371 - 139993906521792 - node.py-node:167 - INFO:Node-create_collection-0の実行を開始します。
2023-07-31 16:50:53,373 - 139993881343680 - node.py-node:167 - INFO:Node-text-loader-1 の実行を開始します。
2023-07-31 16:50:53,374 - 139993898129088 - node.py-node:167 - INFO:Node-text-splitter-2 の実行を開始します。
2023-07-31 16:50:53,376 - 139993872950976 - node.py-node:167 - INFO:Node-sentence-embedding/sbert-3の実行を開始する。
2023-07-31 16:50:53,377 - 139993385268928 - node.py-node:167 - INFO:Node-np-normalize-4の実行を開始する。
2023-07-31 16:50:53,378 - 139993376876224 - node.py-node:167 - INFO:Node-an-insert/osschat-milvus-5の実行を開始します。
2023-07-31 16:50:53,379 - 139993368483520 - node.py-node:167 - INFO:Node-_output の実行を開始します。

(snip)

カテゴリー
2023-07-31 18:07:53,530 - 140552729257664 - logger.py-logger:14 - DETAIL:単語トークンが5個を超えないため、文をスキップする
カテゴリー
2023-07-31 18:07:53,532 - 140552729257664 - logger.py-logger:14 - DETAIL:単語トークンが3個を超えないため、文をスキップする
隠しカテゴリ
2023-07-31 18:07:53,533 - 140552729257664 - logger.py-logger:14 - DETAIL:単語トークンが3個を超えないため、文をスキップする
隠しカテゴリ
2023-07-31 18:07:53,533 - 140552729257664 - logger.py-logger:14 - DETAIL:物語ではありません。テキストに動詞が含まれていません:

隠されたカテゴリ:
2023-07-31 18:07:53,534 - 140552729257664 - logger.py-logger:14 - DETAIL:単語トークンが5個を超えないため、文をスキップします。
隠されたカテゴリ

ドキュメントチャンクが挿入されました:408
ナレッジベースを検索する
Milvusにエンベッディングとテキストが格納されたので、検索できるようになりました。
この関数はクエリパイプラインを作成します。最も重要なステップはこれです:
ops.ann_search.osschat_milvus(host=MILVUS_HOST, port=MILVUS_PORT、
                              **{'metric_type': 'IP', 'limit': 3, 'output_fields':['text']})
osschat_milvus](https://towhee.io/ann-search/osschat-milvus)は、投稿されたテキストにマッチする埋め込みを検索します。
これがパイプラインの全体です:
pipe_search = (
    pipe.input('collection_name', 'query')
        .map('query', 'query_vec', ops.sentence_embedding.sbert(model_name=EMBED_MODEL))
        .map('query_vec', 'query_vec', ops.np_normalize())
        .map(('collection_name', 'query_vec'), 'search_res'、
             ops.ann_search.osschat_milvus(host=MILVUS_HOST, port=MILVUS_PORT、
                                           **{'metric_type': 'IP', 'limit': 3, 'output_fields':['text']})
        .flat_map('search_res', ('id', 'score', 'text'), lambda x: (x[0], x[1], x[2]))
        .output('query', 'text', 'score')
)
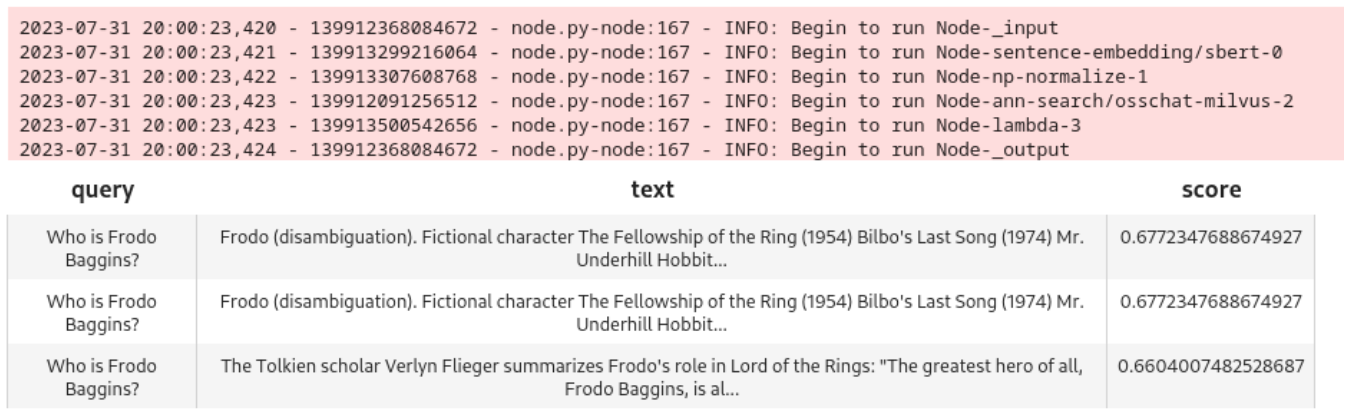
試してみてください:
query = 'フロド・バギンズは誰ですか?
DataCollection(pipe_search(project_name, query)).show()
このモデルは、よく一致する3つのノードを引き出します:
LLMを追加する
さて、いよいよ大規模な言語モデル(LLM)を追加して、ユーザーがチャットボットと会話ができるようにしましょう。この例ではChatGPTとOpenAI APIを使います。
チャット履歴
LLMからより良い結果を得るためには、チャット履歴を保存し、クエリで表示する必要があります。このステップではSQLiteを使います。
履歴を取得する関数を以下に示します:
pipe_get_history = (
    pipe.input('collection_name', 'session')
        .map(('collection_name', 'session'), 'history', ops.chat_message_histories.sql(method='get'))
        .output('collection_name', 'session', 'history')
)
保存するのはこちらです:
pipe_add_history = (
    pipe.input('collection_name', 'session', 'question', 'answer')
        .map(('collection_name', 'session', 'question', 'answer'), 'history', ops.chat_message_histories.sql(method='add'))
        .output('history')
)
LLMクエリパイプライン
さて、ChatGPTにクエリを投入するためのパイプラインが必要です。
このパイプラインは
- ユーザのクエリを使ってMilvusを検索する。
- 現在のチャット履歴を収集
- クエリ、Milvus検索、チャット履歴をChatGPTに送信します。
- ChatGPTの結果をチャット履歴に追加します。
- 結果を呼び出し元に返す
chat = (
    pipe.input('collection_name', 'query', 'session')
        .map('query', 'query_vec', ops.sentence_embedding.sbert(model_name=EMBED_MODEL))
        .map('query_vec', 'query_vec', ops.np_normalize())
        .map(('collection_name', 'query_vec'), 'search_res'、
            ops.ann_search.osschat_milvus(host=MILVUS_HOST、
                                        port=MILVUS_PORT、
                                        **{'metric_type': 'IP', 'limit': 3, 'output_fields':['text']})
        .map('search_res', 'knowledge', lambda y: [x[2] for x in y])
        .map(('collection_name', 'session'), 'history', ops.chat_message_histories.sql(method='get'))
        .map(('query', 'knowledge', 'history'), 'messages', ops.prompt.question_answer())
        .map('messages', 'answer', ops.LLM.OpenAI(api_key=OPENAI_API_KEY、
                                                モデル名='gpt-3.5-turbo'、
                                                temperature=0.8))
        .map(('collection_name', 'session', 'query', 'answer'), 'new_history', ops.chat_message_histories.sql(method='add'))
        .output('クエリ', 'ヒストリ', 'アンサー', )
)
GUIに接続する前に、このパイプラインをテストしてみよう:
new_query = 'フロドは指輪をどこに持っていったか?'
DataCollection(chat(COLLECTION_NAME, new_query, session_id)).show()
これがノートブックの出力と結果です:

パイプラインは機能している。Gradioのインターフェースを作ってみよう。
Gradio GUI
まず、セッション識別子を作成し、インターフェースからのクエリに応答する関数が必要だ。
これらの関数は、UUIDを使用してセッションIDを作成し、クエリーパイプライン用のセッションとクエリーを受け入れます。
インポート uuid
インポート io

def create_session_id():
    uid = str(uuid.uuid4())
    suid = ''.join(uid.split('-'))
    return 'sess_' + suid


def respond(session, query):
    res = chat(COLLECTION_NAME, query, session).get_dict()
    アンサー = res['answer']
    レスポンス = res['history']
    response.append((query, answer))
    レスポンスを返す
次に、Gradioインターフェースはこれらの関数を使用してチャットボットを構築する。
Blocks API を使って ChatBot インターフェースを作ります。メッセージ送信ボタンはChatGPTにリクエストを送るためにrespond**関数を使います。
インポート gradio as gr

with gr.Blocks() as demo:
    session_id = gr.State(create_session_id)

    with gr.Row():
        with gr.Column(scale=2):
            gr.Markdown(''## チャット'')
            会話 = gr.チャットボット(label='会話').style(height=300)
            question = gr.Textbox(label='question', value=None)

            send_btn = gr.Button('メッセージ送信')
            send_btn.click(
                fn=respond、
                inputs=[
                    session_id、
                    質問
                ],
                outputs=会話、
            )

demo.launch(server_name='127.0.0.1', server_port=8902)
これだ:
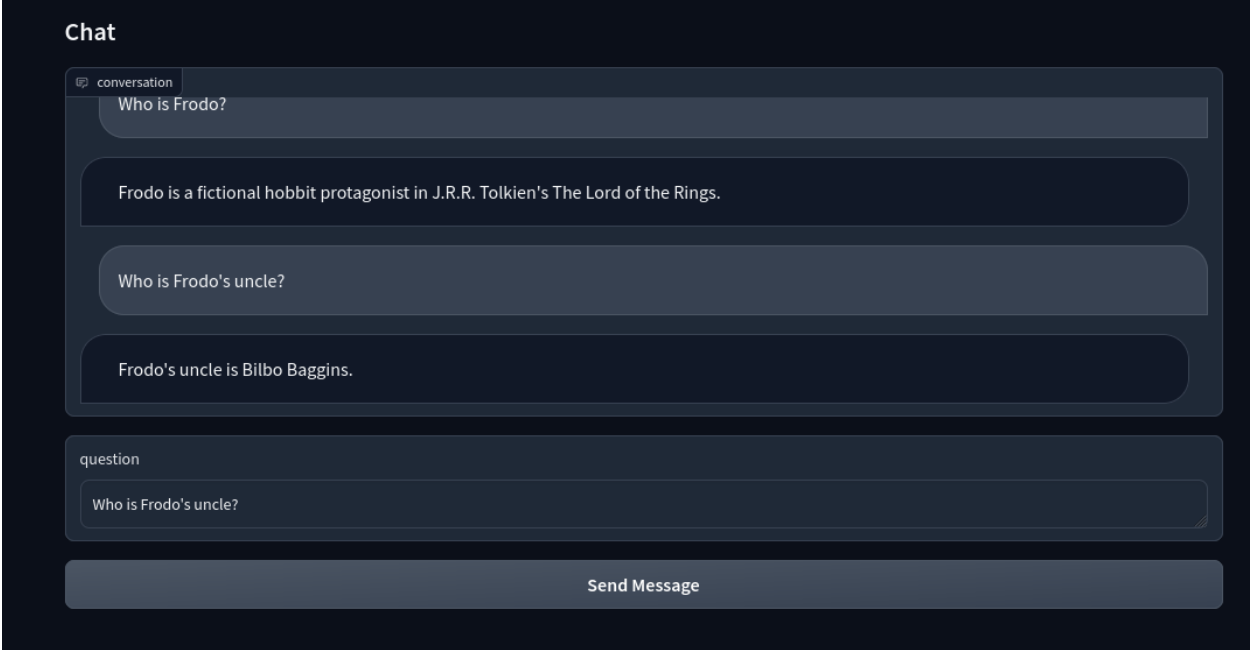
これで、LLMベースのインテリジェントチャットボットが完成しました!
まとめ
この投稿では、Towheeパイプラインを作成し、非構造化データを取り込み、埋め込み処理を行い、埋め込みデータをMilvusに保存しました。そして、チャット機能用のクエリパイプラインを作成し、チャットボットをLLMに接続した。そして、インテリジェントなチャットボットが完成した。
このチュートリアルは、Milvusを使ったアプリケーションの構築がいかに簡単であるかを示しています。Milvusは、アプリケーション、特に機械学習と人工知能に依存するアプリケーションに統合された場合、多くの利点をもたらします。Milvusは、チャットボット、推薦システム、画像認識、テキスト認識などのアプリケーションにおいて、非常に効率的でスケーラブル、かつ信頼性の高いベクトル類似検索と分析機能を提供します。
*この投稿はEric Goebelbeckerによって書かれました。エリックは25年間ニューヨークの金融市場で、市場データと金融情報交換(FIX)プロトコルネットワークのインフラストラクチャを開発してきた。彼は、チームを効果的にする(あるいはそうでない!)ものについて話すのが大好きだ。

読み続けて
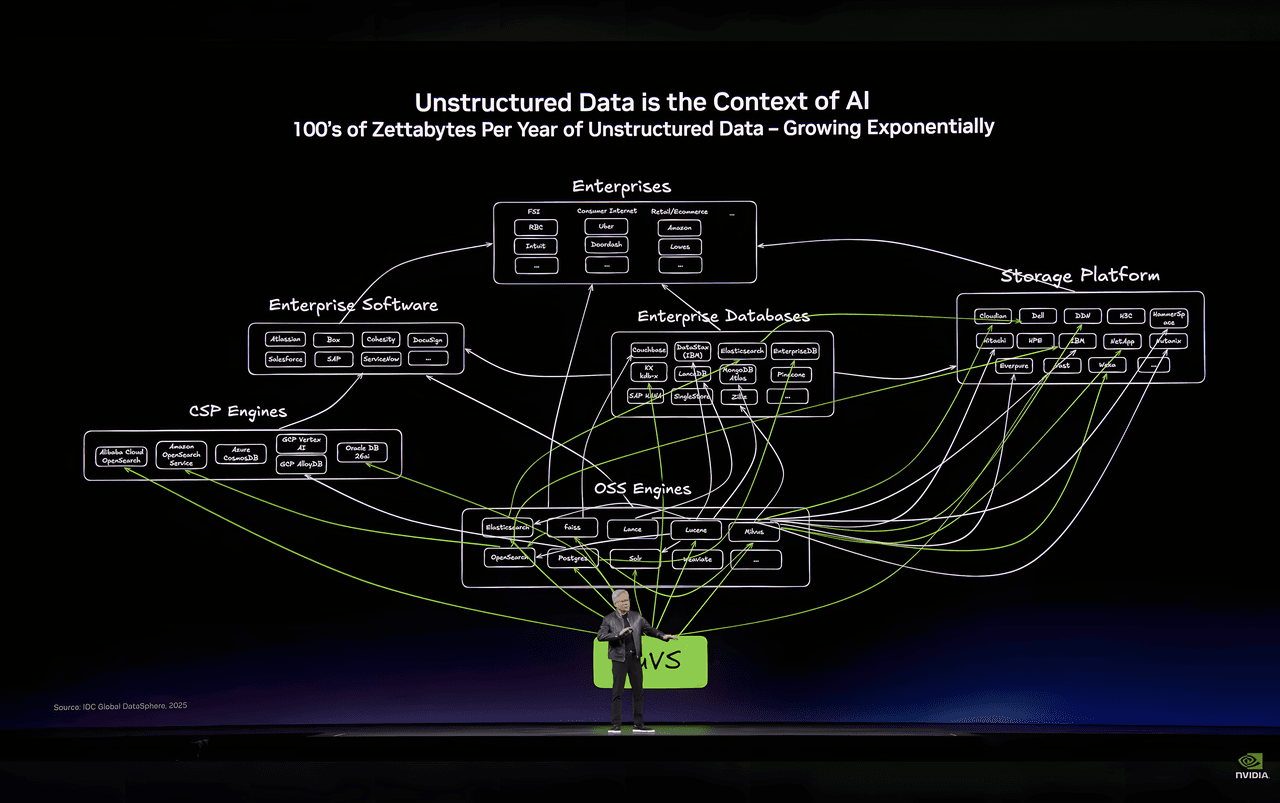
How Zilliz Ended Up at the Center of NVIDIA’s Unstructured Data Story at GTC 2026
If unstructured data is the context of AI, then the ceiling of AI applications will be set not just by models, but by how mature the infrastructure for unstructured data becomes.

Announcing the General Availability of Zilliz Cloud BYOC on Google Cloud Platform
Zilliz Cloud BYOC on GCP offers enterprise vector search with full data sovereignty and seamless integration.
Vector Databases vs. Object-Relational Databases
Use a vector database for AI-powered similarity search; use an object-relational database for complex data modeling with both relational integrity and object-oriented features.