


PyMilvusを使い始める
オープンソースのベクトルデータベースであるMilvusは、PyMilvus - Python SDKと組み合わされ、大規模なデータセットを扱い、高度な計算や検索を実行するための強力なツールである。
このチュートリアルでは、MilvusとPyMilvusを使用するための開発環境のインストールとセットアップについて説明します。そして、オーディオファイルを分析し、そのデータをMilvusに保存し、それを使ってオーディオサンプルの類似性を比較するサンプルコードを説明します。それでは始めましょう。
Milvusとは?
Milvusはオープンソースのベクトルデータベースで、1兆スケールのベクトル類似性検索と分析を扱います。機械学習、コンピュータビジョン、推薦システム、その他の人工知能(AI)分野でますます重要性を増しているベクトル埋め込みによる非構造化データの管理と検索のための強力で効率的なプラットフォームです。
Milvusの核心は、データポイントを高次元ベクトルとして表現する埋め込みの概念を活用することです。これらのベクトルは、意味的または視覚的特徴に基づいてデータポイント間の類似性をキャプチャすることができます。Milvusは、これらのベクトルの保存、索引付け、検索を可能にし、ユーザが膨大なデータセットに対して高速な類似性検索を実行できるようにします。
分散アーキテクチャとGPUアクセラレーションのサポートにより、Milvusは大量のベクトルデータを効率的に処理し、リアルタイムの検索結果を提供することができます。さらに、近似最近傍(ANN)検索アルゴリズムを含む、さまざまなユースケースに最適化されたインデックス作成アルゴリズムを提供し、精度と効率のバランスを実現しています。
Milvusは様々なプログラミング言語をサポートし、使いやすいAPIを提供しているため、開発者や研究者が利用しやすい。さらに、一般的な機械学習フレームワークやデータ処理ツールとの統合性も高く、既存のワークフローへのシームレスな統合が可能です。
PyMilvusとは?
PyMilvusはMilvusのPython SDKです。Python開発者が簡単かつ効率的にMilvusと対話できるように設計されており、データ管理、ベクトル類似度検索、インデックス構築などの作業を容易にします。
PyMilvusを使用することで、開発者は基礎となるデータベース操作の複雑さを気にすることなく、PythonアプリケーションでMilvusのフルパワーを活用することができます。PyMilvusはMilvusの複雑な操作の多くを抽象化し、既存のPythonワークフローとシームレスに統合するシンプルで使いやすいAPIを提供します。
チュートリアルのセットアップ
この記事のコマンドラインの例はLinuxのものですが、Windows Subsystem for Linux (WSL)を使えばmacOSやWindowsにも簡単に移植できるはずです。DockerまたはDocker Desktop、Python 3.10+、gitがあるシステムが必要です。
Milvusブートキャンプリポジトリ
このチュートリアルでは、Github上のMilvus Bootcampリポジトリのコードを使用します。まず、このリポジトリをローカルにクローンしてください。
[egoebelbecker@ares bootcamp]$ git clone https://github.com/milvus-io/bootcamp.git
bootcamp' にクローンする...
リモートにクローンします:オブジェクトを列挙しています:61861, 完了しました。
リモート:オブジェクトをカウント中:100% (4488/4488), 完了。
リモート:オブジェクトを圧縮:100% (1628/1628), 完了。
リモート:合計61861(デルタ2983)、再利用4180(デルタ2791)、パック再利用57373
オブジェクトの受信:100% (61861/61861), 166.78 MiB | 4.91 MiB/s, 完了。
差分を解決:100% (28214/28214), 完了。
Python仮想環境
次に、コードを実行するための仮想環境を作成します。bootcamp repoをクローンしたディレクトリに置きます。環境を作成したらアクティベートします。
[egoebelbecker@ares bootcamp]$ cd bootcamp
[egoebelbecker@ares bootcamp]$ git checkout archive20230625
[egoebelbecker@ares bootcamp]$ python3 -m venv ./venv
[egoebelbecker@ares bootcamp]$ source venv/bin/activate
(venv) [egoebelbecker@ares bootcamp]$
Pythonの依存関係をインストールする
いよいよプロジェクトのセットアップだ。
Audio Similarity Searchのサンプルを使います。この例では、一般に公開されているオーディオファイル一式を使用して、異なるサンプル間の類似性を検出するためにMilvusをどのように使用できるかを示します。
プロジェクトのサブディレクトリに移動し、コードと一緒に提供されている requirements.txt ファイルを見てください。
(venv) [egoebelbecker@ares bootcamp]$ cd solutions/audio/audio_similarity_search/.
(venv) [egoebelbecker@ares audio_similarity_search]$ cat requirements.txt
pymilvus
redis
librosa
numpy
panns_inference
トーチ
ディスクキャッシュ
ダウン
これらはプロジェクトの実行に必要なPythonライブラリです。pip**を使ってインストールしてください。次に、ノートブックを実行できるように Jupyter を追加します。
(venv) [egoebelbecker@ares audio_similarity_search]$ pip install -r requirements.txt
(たくさんの出力)
(venv) [egoebelbecker@ares audio_similarity_search]$ pip install jupyter
(さらに出力)
Redisを起動する
次に、RedisのDockerコンテナを起動します。
docker run --name redis -d -p 6379:6379 redis
Milvus Liteをインストールして起動する
最後に、Milvusサーバーが必要だ。Pythonで動作するMilvus Liteが最も簡単にMilvusを立ち上げることができます。milvus**パッケージをインストールしてください。
(venv) [egoebelbecker@ares audio_similarity_search]$ pip install milvus
(たくさんの出力)
(venv) [egoebelbecker@ares audio_similarity_search]$ milvus-server


    __ _________ _ ____ ______
   / |/ / _/ /| | / / / / / __/
  / /|_/ // // /_| |/ / /_/ /\ \


 Milvusをご利用いただきありがとうございます!

 バージョン: v2.2.8-lite
 プロセス   275118
 開始   2023-05-25 12:41:47
 コンフィグ    /ホーム/egoebelbecker/.milvus.io/milvus-server/2.2.8/configigs/milvus.yaml
 ログ      /ホーム/egoebelbecker/.milvus.io/milvus-server/2.2.8/logs

 Ctrl+C で終了 ...
PyMilvus プロジェクト
これで環境が整ったので、チュートリアルを実行できます。
Jupyter を起動する
仮想環境からJupyterを起動します。
(venv) [egoebelbecker@ares audio_similarity_search]$ python -m jupyter notebook --notebook-dir=`pwd`
  _ _ _ _
 | | | |_ __ __| |__ _| |_ ___
 | |_| | '_ \/ _` / _` | _/ -_)
  \___/| .__/\__,_\__,_|\__\___|
       |_|

Notebook 7への移行計画を読んで、新機能と拡張機能を使用している場合に取るべき行動について学んでください。

https://jupyter-notebook.readthedocs.io/en/latest/migrate_to_notebook7.html

(さらに出力)
これでJupyter Filesのページがデフォルトのブラウザで開きます。
 solutions/audio/audio_similarity_search`ディレクトリに移動します。

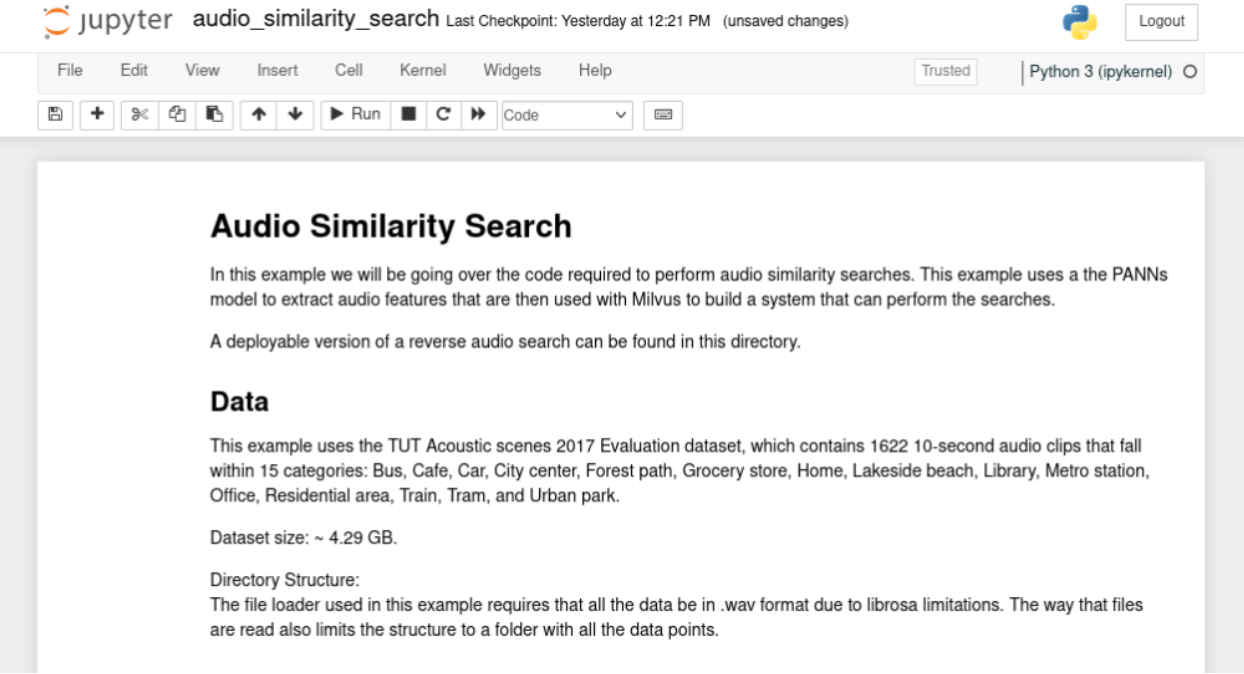
audio_similarity_search`ノートブックを開く。
RedisとMilvusに接続する。
最初のセットアップはすでに終わっているので、コードの概要セクションまでスクロールしてください。コードはRedisとMilvusのライブラリをインポートすることから始まります。
2行目に、Milvusへの接続、Collectionの作成、Collectionへのデータの追加と取得に必要なクラスがあります。
import redis
from pymilvus import connections, DataType, FieldSchema, CollectionSchema, Collection, utility

connections.connect(host = '127.0.0.1', port = 19530)
red = redis.Redis(host = '127.0.0.1', port=6379, db=0)
次に、2つのサーバーに接続する。このブロックを実行する。次に、各オーディオファイルの情報を格納するMilvusコレクションを作成します。
import time

red.flushdb()
time.sleep(.1)
コレクション名 = "audio_test_collection"

if utility.has_collection(collection_name):
    print("既存のコレクションを削除します...")
    collection = Collection(名前=コレクション名)
    collection.drop()

#if not utility.has_collection(collection_name):
field1 = FieldSchema(name="id", dtype=DataType.INT64, description="int64", is_primary=True,auto_id=True)
field2 = FieldSchema(name="embedding", dtype=DataType.FLOAT_VECTOR, description="float vector", dim=2048, is_primary=False)
schema = CollectionSchema(fields=[ field1,field2], description="collection description")
collection = Collection(name=collection_name, schema=schema)
print("Created new collection with name: " + collection_name)
Milvusコレクションの作成
このステップでは、2つのフィールドを持つ audio_test_collection という名前のコレクションを作成する:
- id** - 整数の識別フィールドである。
- エンベッディング** - オーディオファイルに関するデータを格納する2048浮動小数点数のベクトル
このブロックを実行すると、このようなメッセージが表示されます:
既存のコレクションを削除しています。
名前: audio_test_collection で新しいコレクションを作成しました。
次に、新しいコレクションにインデックスを追加します:
if utility.has_collection(collection_name):
    コレクション = コレクション(名前 = コレクション名)
default_index = {"index_type":"IVF_SQ8", "metric_type":"L2", "params":{"nlist":16384}}
status = collection.create_index(field_name = "embedding", index_params = default_index)
if not status.code:
    print("Successfully create index in collection:{} with param:{}".format(collection_name, default_index))
このブロックを実行します:
collection:audio_test_collection に {'index_type': 'IVF_SQ8', 'metric_type': 'L2', 'params' を指定してインデックスを作成します:{'nlist': 16384}} である。
オーディオデータの保存
Milvusはオーディオデータを保存する準備ができました。次のコードブロックを分解してよく見てみましょう。
インポート os
インポート librosa
インポート gdown
インポート zipfile
np として numpy をインポート
from panns_inference import SoundEventDetection, labels, AudioTagging

data_dir = './example_audio'
at = AudioTagging(checkpoint_path=None, device='cpu')

def download_audio_data():
    url = 'https://drive.google.com/uc?id=1bKu21JWBfcZBuEuzFEvPoAX6PmRrgnUp'
    gdown.download(url)
    with zipfile.ZipFile('example_audio.zip', 'r') as zip_ref:
        zip_ref.extractall(data_dir)
このセクションでは、ファイルを処理するためのライブラリをインポートします。そして、Panns Inference libraryからAudioTaggingオブジェクトを生成する。
これはLarge-Scale Pretrained Audio Neural Networks for Audio Pattern Recognition (PANNs)へのPythonインターフェースです。
AudioTaggingクラスは、各オーディオ・ファイルに対して、以下のようなデータ・ポイントのセットを作成します:
音声:0.893
電話のベルの音:0.754
狭い部屋の中0.235
電話0.183
音楽: 0.092
着信音: 0.047
室内、広い部屋、ホール0.028
アラーム: 0.014
動物: 0.009
乗り物: 0.0080.008
エンベッディング: (2048,)
次に、ファイルをダウンロードして分析し、データをMilvusに、ファイル情報をRedisに挿入するコードです:
def embed_and_save(path, at):

    audio, _ = librosa.core.load(path, sr=32000, mono=True)
    audio = audio[None, :].
    を試す:
        _, embedding = at.inference(audio)
        embedding = embedding/np.linalg.norm(embedding)
        embedding = embedding.tolist()[0].
        mr = collection.insert([[embedding]])
        ids = mr.primary_keys
        collection.load()
        red.set(str(ids[0]), path)
    except Exception as e:
        print("failed:" + path + "; エラー {}".format(e))
このコードブロックがすべてをまとめる:
print("Starting Insert")
download_audio_data()
for subdir, dirs, files in os.walk(data_dir):
    for file in files:
        path = os.path.join(subdir, file)
        embed_and_save(path, at)
print("挿入完了")
コードを実行する:
チェックポイントのパス/ホーム/egoebelbecker/panns_data/Cnn14_mAP=0.431.pth
CPUを使用。
インサート開始

ダウンロード中
から:[https://drive.google.com/uc?id=1bKu21JWBfcZBuEuzFEvPoAX6PmRrgnUp](https://drive.google.com/uc?id=1bKu21JWBfcZBuEuzFEvPoAX6PmRrgnUp)
へ:/home/egoebelbecker/src/bootcamp/solutions/audio/audio_similarity_search/example_audio.zip
100%|""""""""""""""""" 474k/474k [00:00<00:00, 8.87MB/s].

挿入完了
類似検索
データベースを検索するには、一致させたいファイルに対して同じ分析を行う必要がある。以下は、ランダムに選択されたファイルIDのセットに対してそれを行うコードである。
python
def get_embed(paths, at):
    embedding_list = [].
    for x in paths:
        audio, _ = librosa.core.load(x, sr=32000, mono=True)
        audio = audio[None, :] とする。
        を試す:
            _, embedding = at.inference(audio)
            embedding = embedding/np.linalg.norm(embedding)
            embedding_list.append(embedding)
        ただし
            print("埋め込みに失敗しました: " + x)
    return np.array(embedding_list, dtype=np.float32).squeeze()

random_ids = [int(red.randomkey()) for x in range(2)].
search_clips = [x.decode("utf-8") for x in red.mget(random_ids)].
embeddings = get_embed(search_clips, at)
print(embeddings.shape)
このブロックを実行して2つのファイルを選択し、分析を実行します。さて、いよいよMilvusで検索を実行します。このコードは検索結果をオーディオプレーヤーに表示します:
import IPython.display as ipd

def show_results(query, results, distances):
    print("Query: ")
    ipd.display(ipd.Audio(query))
    print("結果: ")
    for x in range(len(results)):
        print("Distance:" + str(距離[x]))
        ipd.display(ipd.Audio(results[x]))
    print("-"*50)
次に、このプログラムは上記のembeddings配列を受け取り、リストに変換します。次に、検索パラメーターを作成します。ここでは2つの似た音を検索し、条件にはnprobeを使っています。これは、上記で使用したインデックスタイプと一致します。
embeddings_list = embeddings.tolist()

search_params = {"metric_type":"L2", "params":{"nprobe":16}}
最後に、検索です。
を試す:
    start = time.time()
    results = collection.search(embeddings_list, anns_field="embedding", param=search_params, limit=3)
    end = time.time() - start
    print("検索にかかった時間: ", end)
    for x in range(len(results)):
        query_file = search_clips[x].
        result_files = [red.get(y.id).decode('utf-8') for y in results[x]].
        distances = [y.distance for y in results[x].
        show_results(query_file, result_files, distances)
except Exception as e:
    print("Milvus でのベクトル検索に失敗しました: {}".format(e))
実行すると、ランダムに選択されたファイルと2つの検索結果がオリジナルからの距離とともに表示されます。
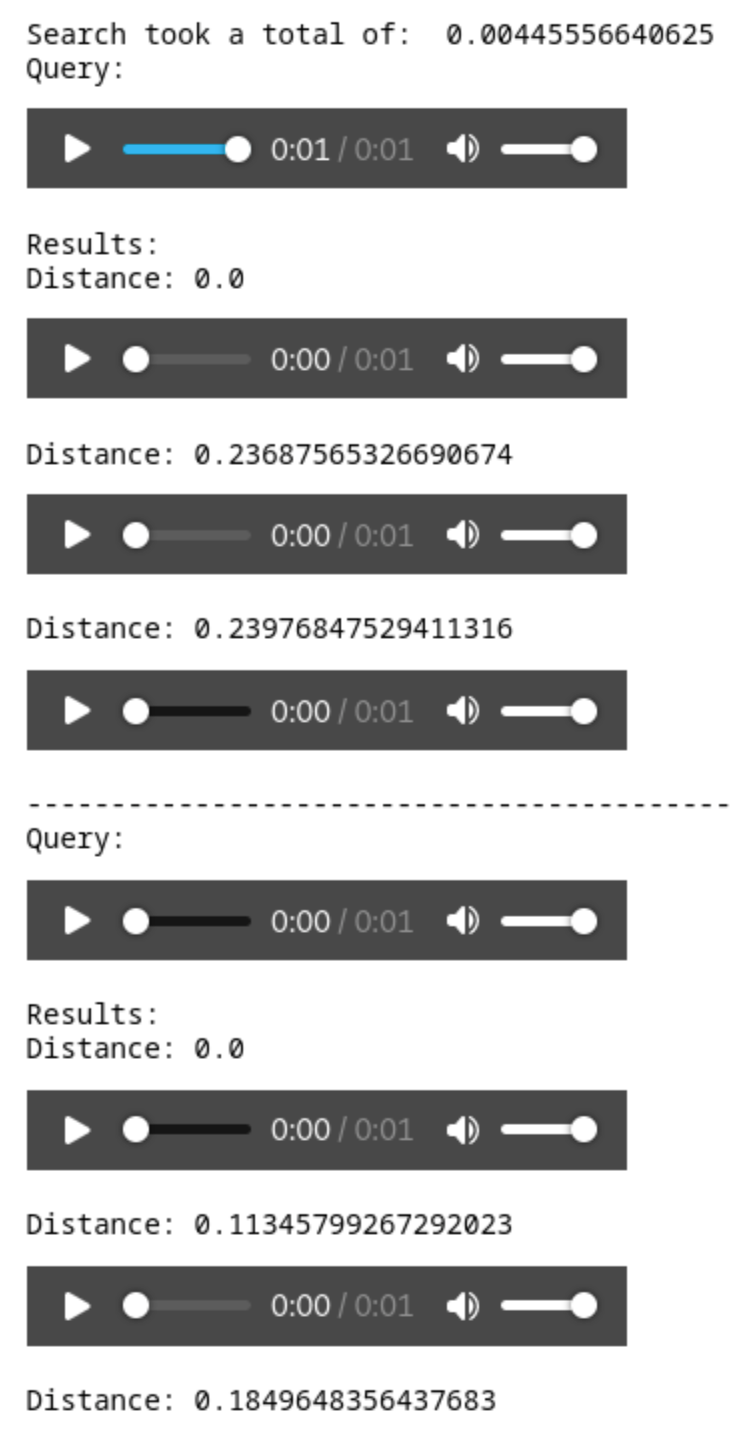
それぞれのファイルを聴くと、完全に一致するファイルと、最も近い隣人のファイルが表示されます。
要約
この投稿では、Milvusで作業するためのPython環境を構築する方法を学びました。サーバとPyMilvus SDKをセットアップした後、Milvus Bootcampリポジトリからサンプルチュートリアルを実行しました。コレクションを作成し、インデックスを作成し、データを保存し、基本的な検索を実行するコードを見ました。
Milvusを使い始めるのがいかに簡単かわかったと思いますので、ブートキャンププロジェクトを続けて、Milvusを使ってどのようにプロジェクトを強化できるかを見てください。
*この投稿はEric Goebelbeckerによって書かれました。Ericは、25年間ニューヨークの金融市場で、市場データと金融情報交換(FIX)プロトコルネットワークのインフラストラクチャを開発してきました。彼は、チームを効果的にする(あるいはそうでない!)ものについて話すのが大好きだ。

読み続けて

Our Journey to 35K+ GitHub Stars: The Real Story of Building Milvus from Scratch
Join us in celebrating Milvus, the vector database that hit 35.5K stars on GitHub. Discover our story and how we’re making AI solutions easier for developers.

Why Not All VectorDBs Are Agent-Ready
Explore why choosing the right vector database is critical for scaling AI agents, and why traditional solutions fall short in production.

Announcing the General Availability of Zilliz Cloud BYOC on Google Cloud Platform
Zilliz Cloud BYOC on GCP offers enterprise vector search with full data sovereignty and seamless integration.