Setting up Milvus on Amazon EKS

Milvus is designed from the start to support Kubernetes and can be easily deployed on AWS. To build a reliable, elastic Milvus vector database cluster, we can use Amazon Elastic Kubernetes Service (Amazon EKS) as the managed Kubernetes, Amazon S3 as the Object Storage, Amazon Managed Streaming for Apache Kafka (Amazon MSK) as the Message Storage, and Amazon Elastic Load Balancing (Amazon ELB) as the Load Balancer.
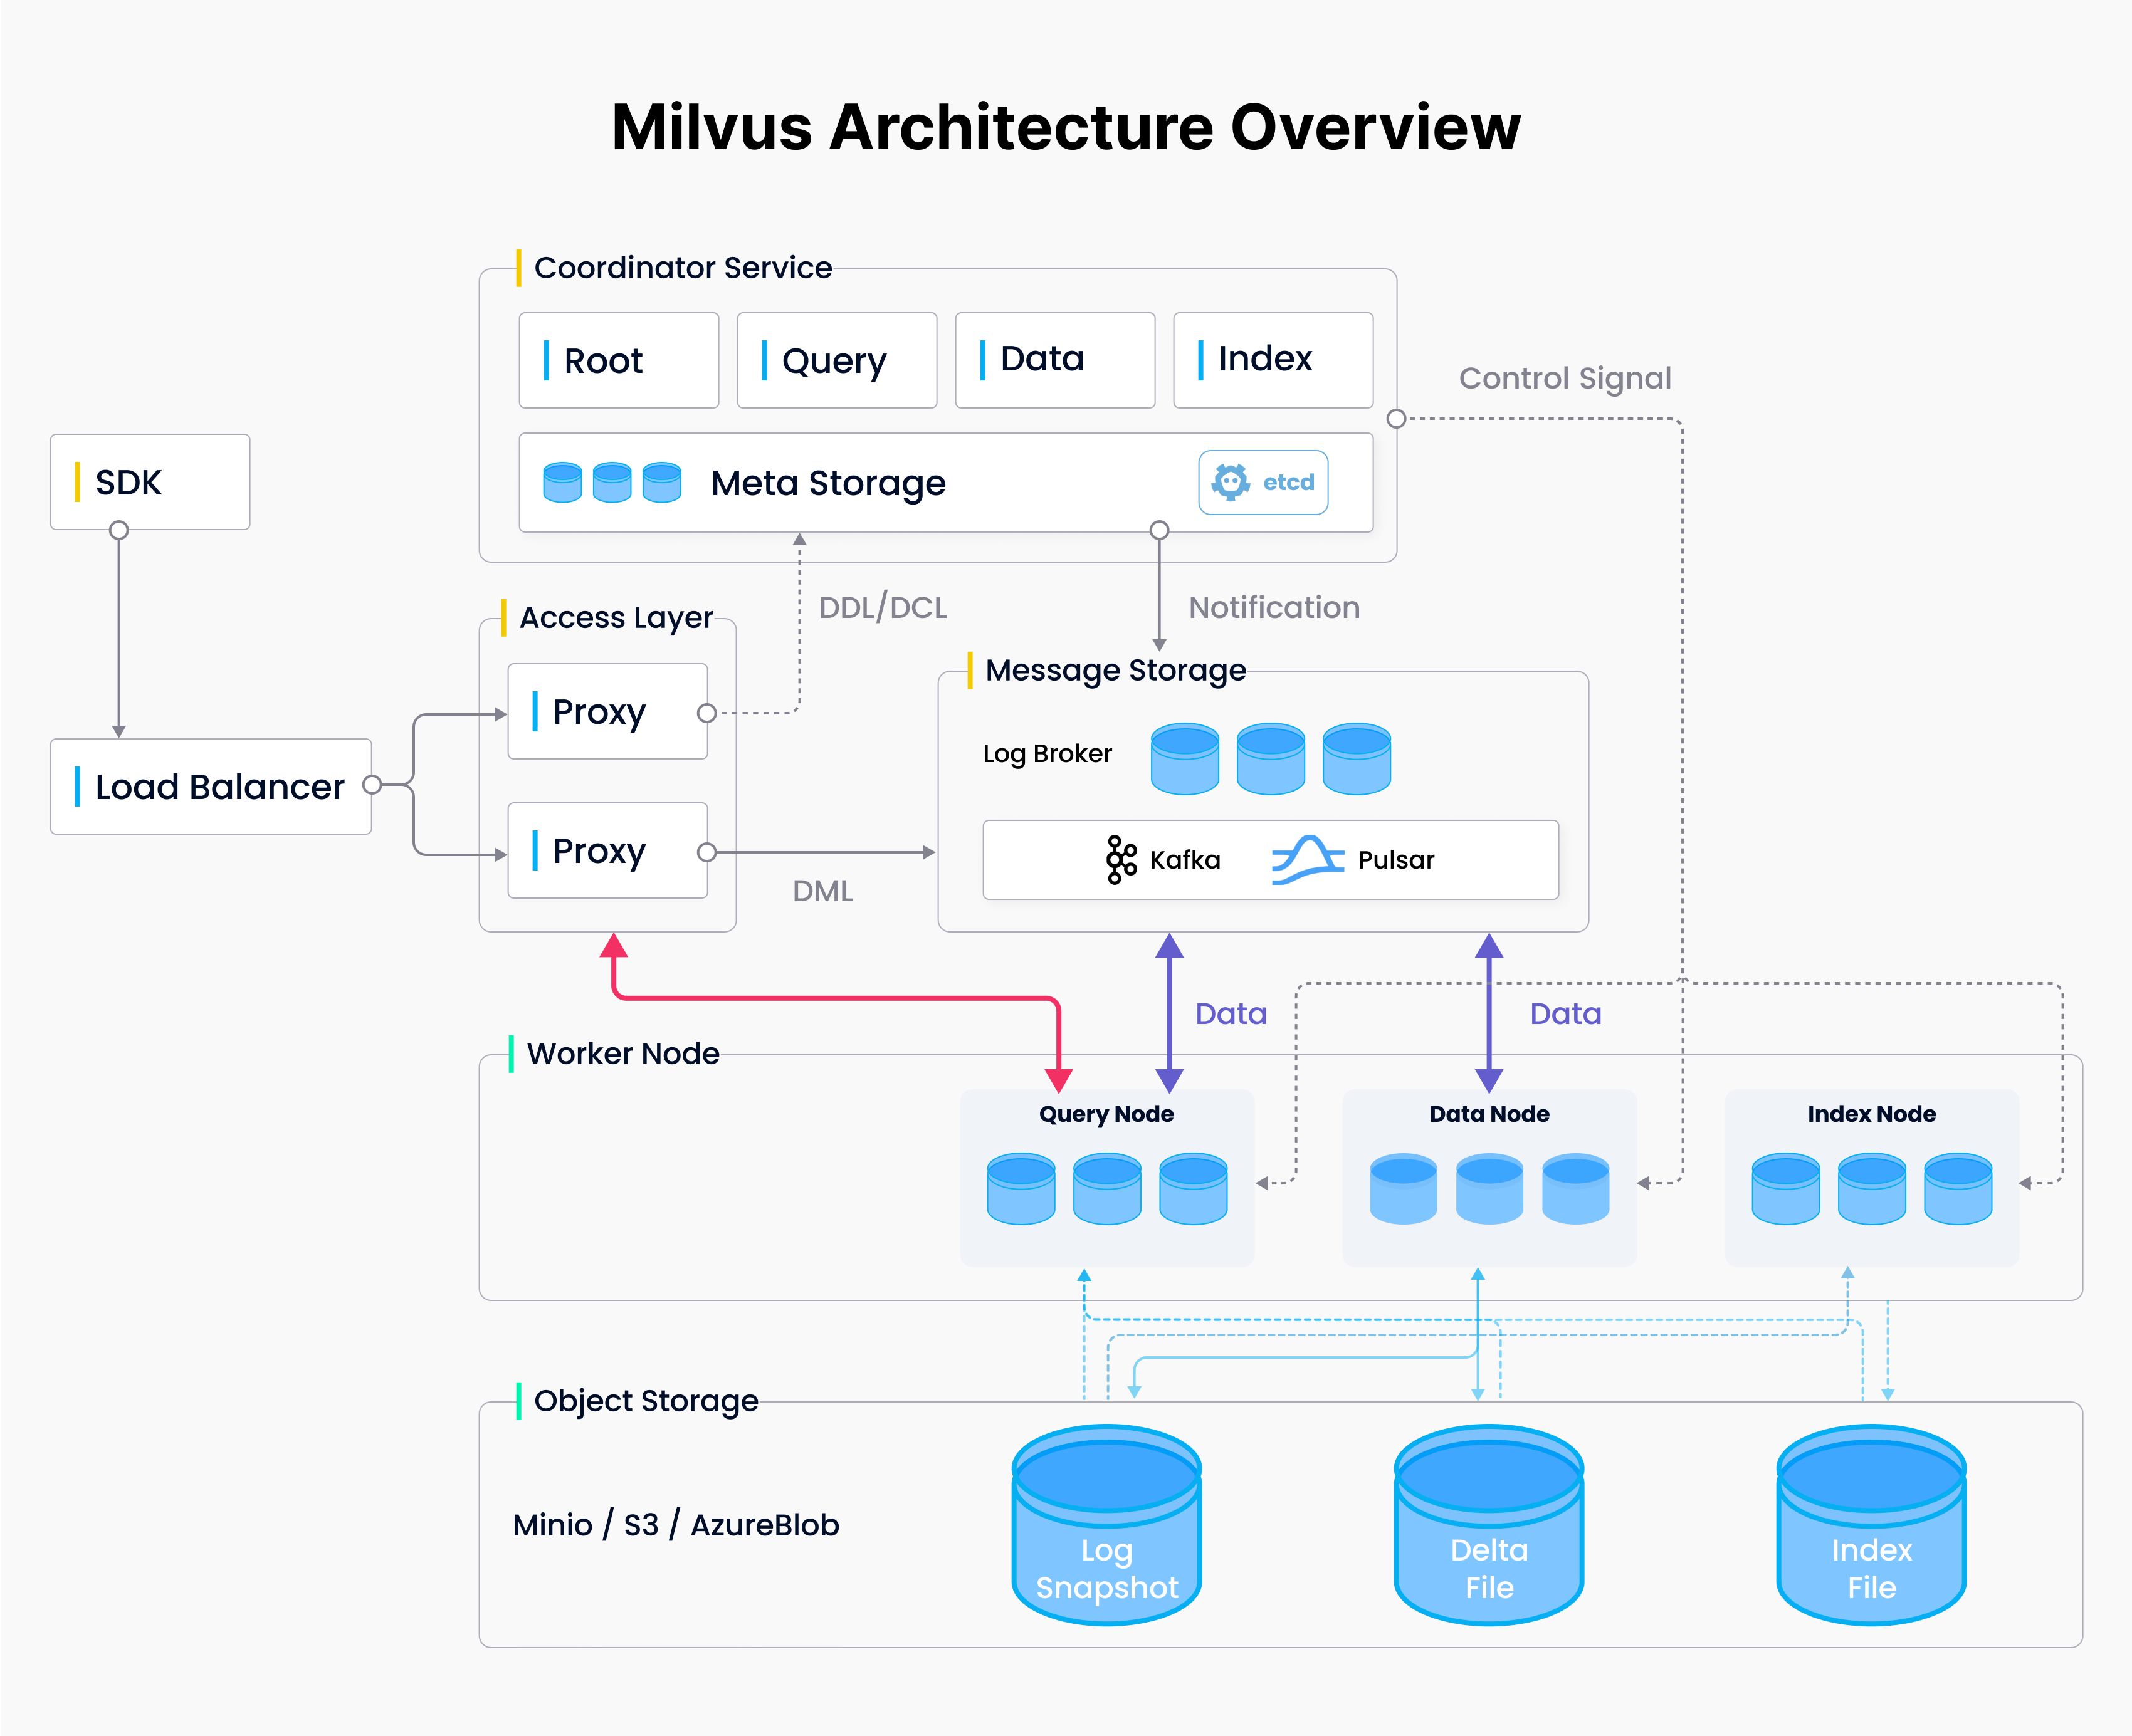 Milvus Architecture Overview
Milvus Architecture
EKS is Amazon’s managed Kubernetes service that runs on EC2 or serverless on Fargate. It's ideal for organizations already using Kubernetes on-premises, allowing them to migrate their deployments to AWS with minimal changes.
This blog uses EC2 for deployment because Fargate can’t handle persistent volume claims (PVCs) needed for Milvus dependencies such as etcd.
We'll provide step-by-step guidance on deploying a Milvus cluster using EKS and other services. A more detailed version of this blog is available here.
Prerequisites
AWS CLI
Install AWS CLI on your local PC/Mac or Amazon EC2 instance, which will serve as your endpoint for the operations covered in this document. If you use Amazon Linux 2 or Amazon Linux 2023, the AWS CLI tools are installed by default. Refer to How to install AWS CLI.
Below is a screenshot verifying AWS CLI is installed.
% which aws
/usr/local/bin/aws

% aws --version
aws-cli/2.15.34 Python/3.11.8 Darwin/23.5.0 exe/x86_64 prompt/off
EKS Tools: Kubectl, eksctl, helm
Install EKS tools on the preferred endpoint device, including:
Refer to EKS getting started for detailed installation steps. Below is a screenshot verifying the installations and versions on a Mac M2 laptop using z shell:
% kubectl version
Client Version: v1.30.2
Kustomize Version: v5.0.4-0.20230601165947-6ce0bf390ce3

# Download eksctl
ARCH=arm64
PLATFORM=$(uname -s)_$ARCH
curl -sLO "https://github.com/eksctl-io/eksctl/releases/latest/download/eksctl_$PLATFORM.tar.gz"
tar -xzf eksctl_$PLATFORM.tar.gz -C /tmp && rm eksctl_$PLATFORM.tar.gz
sudo mv /tmp/eksctl /usr/local/bin

% eksctl version
0.185.0

% helm list --all-namespaces
NAME        NAMESPACE   REVISION    UPDATED                                 STATUS      CHART           APP VERSION
my-milvus   default     1           2024-07-09 16:00:14.117945 -0700 PDT    deployed    milvus-4.1.34   2.4.5
Create an Amazon S3 Bucket
Read the Bucket Naming Rules and observe them when naming your AWS S3 bucket using the AWS console.
 Create an Amazon S3 Bucket
Create a KMS, Customer managed key.
The KMS key cannot be an AWS-managed key. It must be a Customer-managed key. After you create it, you’ll need to wait about 10 minutes for the key to become active before you can use it in the AWS Secrets Manager. Using the AWS console, go to KMS > Customer managed keys.
 Create a KMS, Customer managed key. .png
Create a custom secret in the AWS Secrets Manager.
Make sure you’ve waited about 10 minutes after creating your KMS Customer managed key. Now, create a new AWS Secrets Manager secret. Using the AWS console.
Choose another type of secret for the secret type.
Toggle the Key/value pairs editor to Plaintext. Enter JSON with keys exactly matching “username” and “password”.
The name of the secret must start with the AmazonMSK_.
Encryption key must be a KMS customer-managed key, not an AWS-managed key.
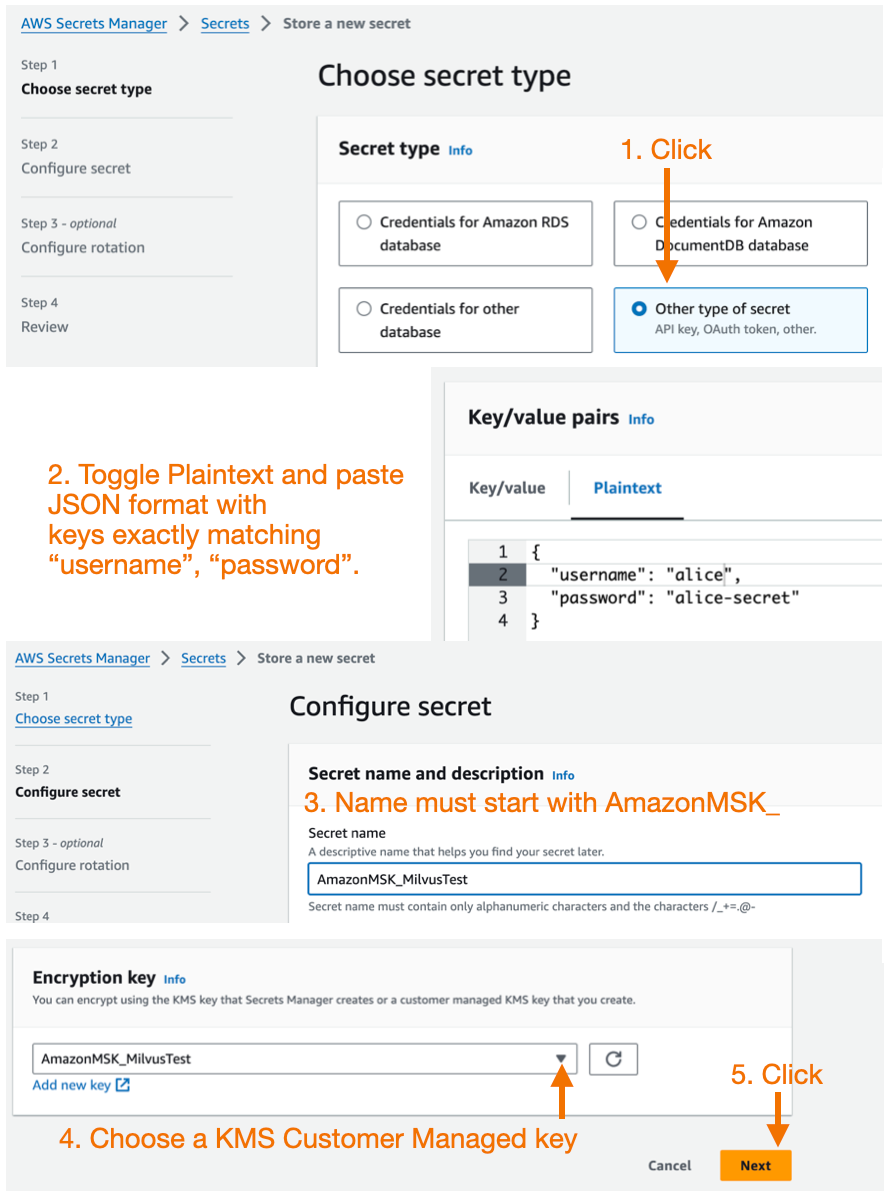 Create a custom secret in the AWS Secrets Manager. .png
Create a MSK Instance
Next, use the AWS console to create an Amazon MSK cluster with the Kafka autoCreateTopics feature and SASL/SCRAM security enabled.
Considerations when creating MSK:
The latest stable version of Milvus (v2.4.x) depends on the autoCreateTopics feature of Kafka, so when creating MSK, a custom configuration needs to be used, as well as the auto.create.topics.enable property needs to be changed from the default false to true.
In addition, to increase the message throughput of MSK, it is recommended to increase the values of message.max.bytes and replica.fetch.max.bytes.
auto.create.topics.enable=true
message.max.bytes=10485880
replica.fetch.max.bytes=20971760
See the Custom MSK configurations for details.
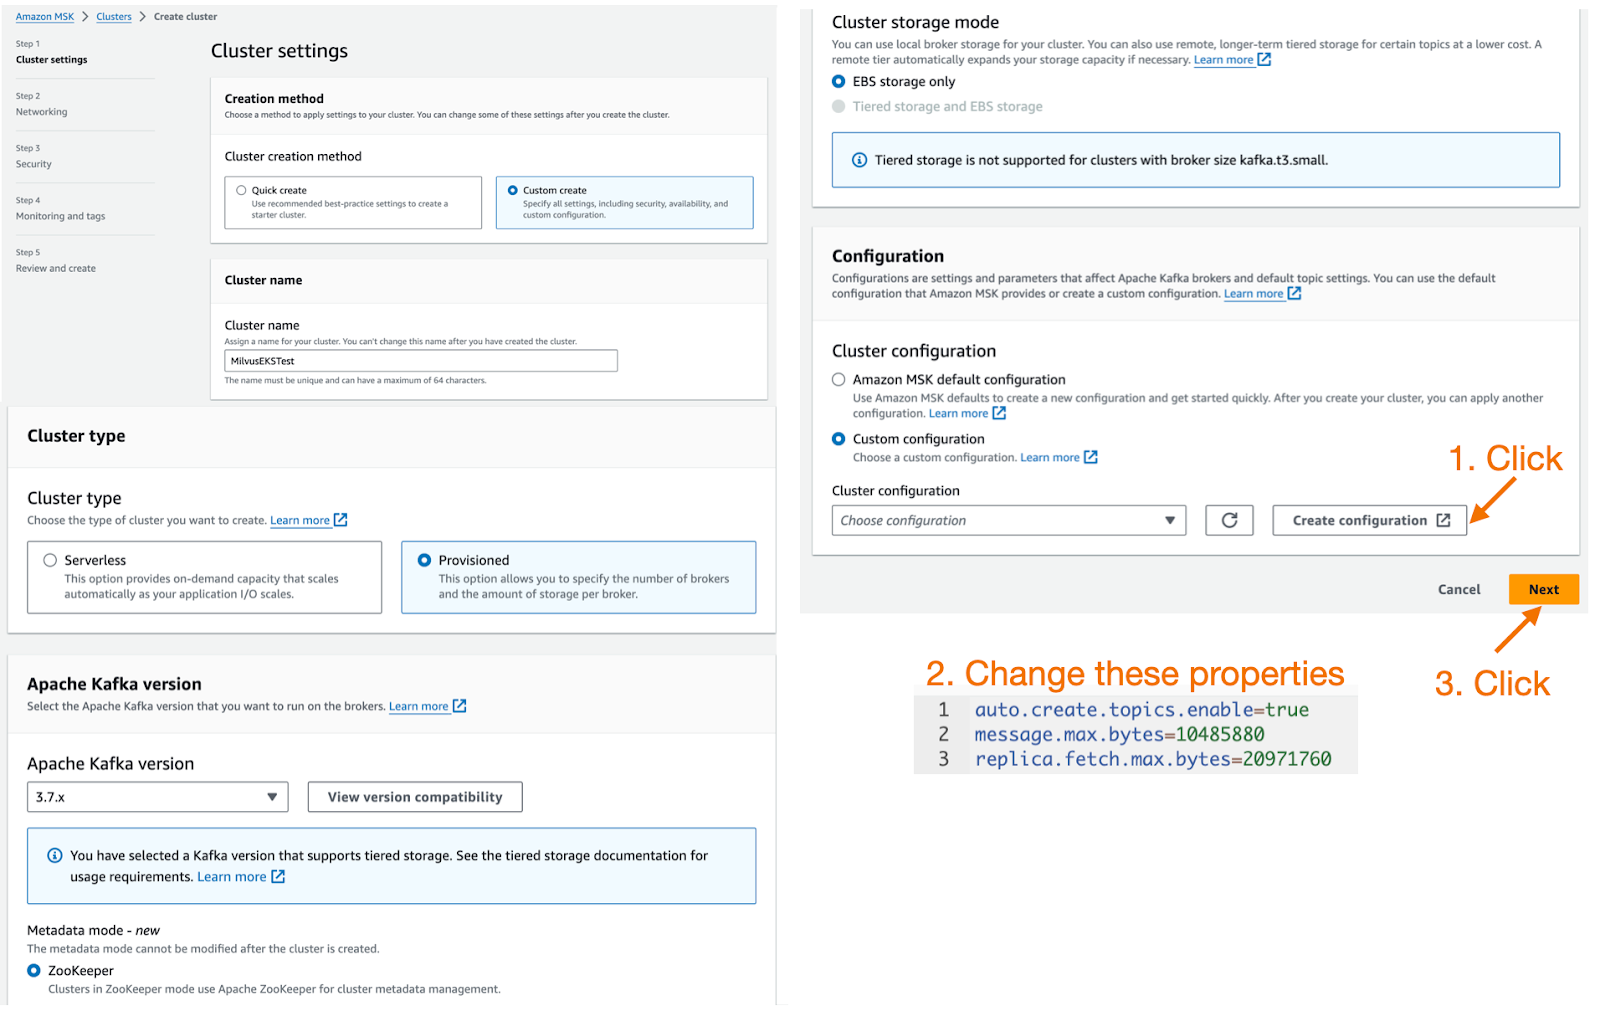 Create a MSK Instance.png
Milvus does not support IAM role-based authentication for MSK, so when creating MSK, enable the SASL/SCRAM authentication option in the security configuration and configure the username and password in AWS Secrets Manager. See Sign-in credentials authentication with AWS Secrets Manager for details.
The security group for MSK needs to allow access from the security group or IP address range of the EKS cluster.
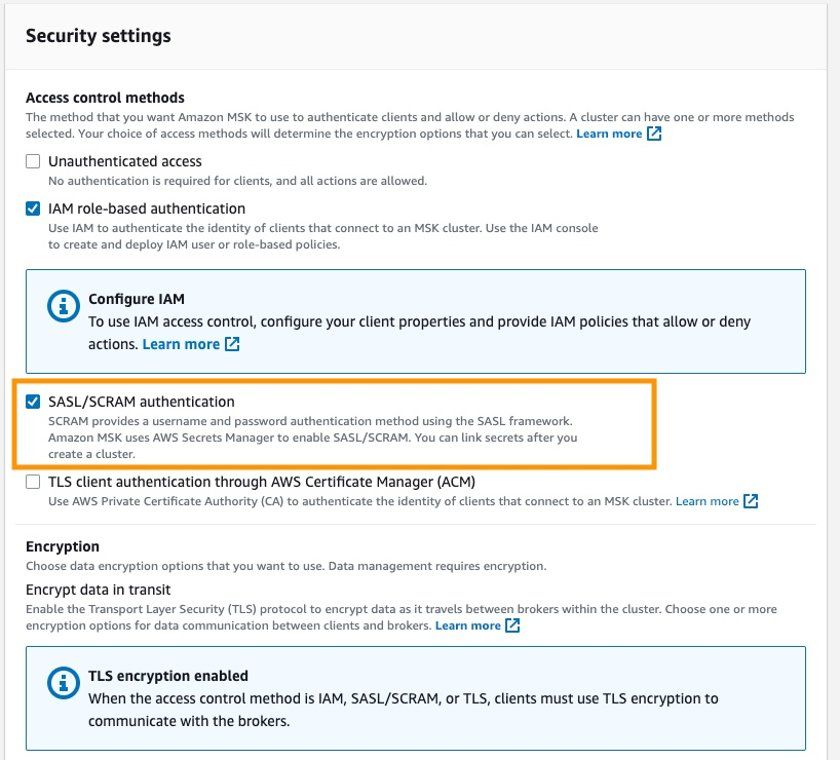 security settings
Wait ~15 minutes for the MSK instance to provision. Once it is ready, click on it and you can associate the AWS Secrets Manager custom secret you created earlier.
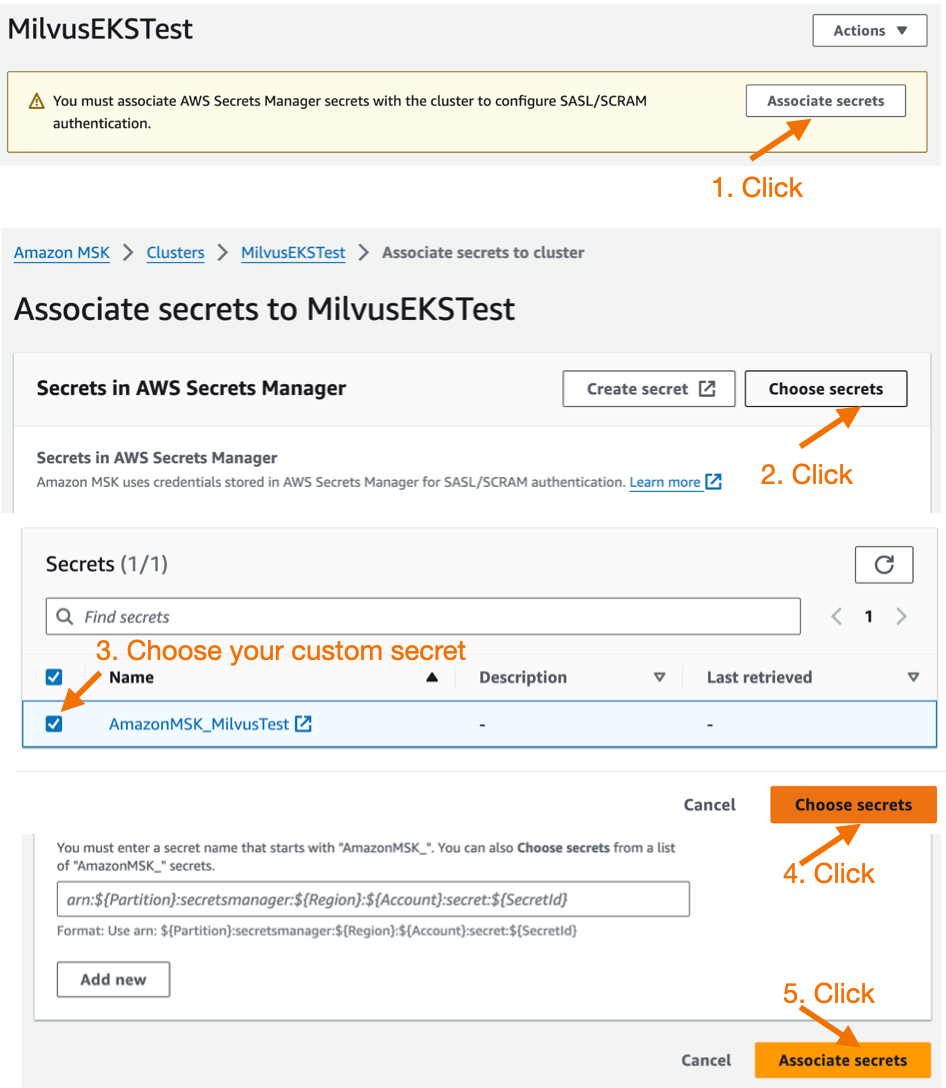 AWS Secrets Manager
Create an Amazon EKS Cluster
There are many ways to create an EKS cluster, such as via the console, CloudFormation, or eksctl. Refer to the document Set up to use Amazon EKS.
This post will use eksctl. eksctl is a simple command line tool for creating and managing Kubernetes clusters on Amazon EKS. eksctl provides the fastest and easiest way to create a new cluster with nodes for Amazon EKS. For more information, refer to eksctl’s official documentation.
Step 1: Create an eks_cluster.yaml file.
See the the Milvus documentation for an example .yaml file.
Replace the cluster name with your cluster name,
Replace region-code with the AWS region where you want to create the cluster.
Replace private-subnet-idx with your private subnets. Note: This configuration file creates an EKS cluster in an existing VPC by specifying private subnets. You can also remove the VPC and subnets configuration so eksctl will automatically create a new VPC.
**Step 2: Run the eksctl create cluster -f eks_cluster.yaml command to create the EKS cluster. **
create cluster -f eks_cluster.yaml
Refer to Amazon EKS Quickstart. This command will create the following resources:
An EKS cluster with the specified version.
A managed node group with 3 m6i.2xlarge EC2 instances.
An IAM OIDC identity provider and a ServiceAccount called aws-load-balancer-controller will be used later when installing the AWS Load Balancer Controller.
A namespace milvus and a ServiceAccount milvus-s3-access-sa within this namespace. This will be used later when configuring S3 as the object storage for Milvus.
Note: For simplicity, the milvus-s3-access-sa is granted full S3 access permissions. In production deployments, it's recommended to follow the principle of least privilege and only grant access to the specific S3 bucket used for Milvus.
- Multiple add-ons, where vpc-cni, coredns, kube-proxy are core add-ons required by EKS. aws-ebs-csi-driver is the AWS EBS CSI driver that allows EKS clusters to manage the lifecycle of Amazon EBS volumes.
% eksctl create cluster -f eks_cluster.yaml
2024-07-10 17:45:32 [ℹ]  eksctl version 0.185.0
2024-07-10 17:45:32 [ℹ]  using region us-west-2
2024-07-10 17:45:32 [✔]  using existing VPC (vpc-84c5b3fc) and
…
2024-07-10 17:45:32 [ℹ]  building cluster stack "eksctl-MilvusEKSTest-cluster"
2024-07-10 17:45:33 [ℹ]  deploying stack
…
Wait for the cluster creation to complete. Upon completion, you should see a response like the following output:
% EKS cluster "MilvusEKSTest" in "us-west-2" region is ready
Once the cluster is created, you can view nodes by running:
% kubectl get nodes -A -o wide
NAME                                          STATUS   ROLES    AGE   VERSION               INTERNAL-IP     EXTERNAL-IP     OS-IMAGE         KERNEL-VERSION                  CONTAINER-RUNTIME
ip-172-31-22-240.us-west-2.compute.internal   Ready    <none>   11m   v1.28.8-eks-ae9a62a   172.31.22.240   52.40.226.172   Amazon Linux 2   5.10.219-208.866.amzn2.x86_64   containerd://1.7.11
ip-172-31-31-71.us-west-2.compute.internal    Ready    <none>   11m   v1.28.8-eks-ae9a62a   172.31.31.71    35.165.133.62   Amazon Linux 2   5.10.219-208.866.amzn2.x86_64   containerd://1.7.11
ip-172-31-33-44.us-west-2.compute.internal    Ready    <none>   11m   v1.28.8-eks-ae9a62a   172.31.33.44    35.91.5.162     Amazon Linux 2   5.10.219-208.866.amzn2.x86_64   containerd://1.7.11
Step 3: Create a ebs-sc StorageClass configured with GP3 as the storage type, and set it as the default StorageClass.
Milvus uses etcd as the Meta Storage and needs this StorageClass to create and manage PVCs.
- Run this cat command.
% cat <<EOF | kubectl apply -f -
apiVersion: storage.k8s.io/v1
kind: StorageClass
metadata:
  name: ebs-sc
provisioner: ebs.csi.aws.com
volumeBindingMode: WaitForFirstConsumer
parameters:
  type: gp3
EOF
storageclass.storage.k8s.io/ebs-sc created
- Run a patch command after creation to make this StorageClass the default.
% kubectl patch storageclass gp2 -p '{"metadata": {"annotations":{"storageclass.kubernetes.io/is-default-class":"false"}}}'
storageclass.storage.k8s.io/gp2 patched
- Verify the storage class was configured correctly.
% kubectl get storageclass
NAME     PROVISIONER             RECLAIMPOLICY   VOLUMEBINDINGMODE      ALLOWVOLUMEEXPANSION   AGE
ebs-sc   ebs.csi.aws.com         Delete          WaitForFirstConsumer   false                  6m39s
gp2      kubernetes.io/aws-ebs   Delete          WaitForFirstConsumer   false                  44m
Step 4: Install the AWS Load Balancer Controller
This will be used later for the Milvus Service and Attu Ingress. Refer to the official EKS Load Balancer Controller instructions.
Add the eks-charts repo and update it.
% helm repo add eks https://aws.github.io/eks-charts
"eks" has been added to your repositories

% helm repo update
Hang tight while we grab the latest from your chart repositories...
...Successfully got an update from the "eks" chart repository
...Successfully got an update from the "zilliztech" chart repository
...Successfully got an update from the "milvus" chart repository
Update Complete. ⎈Happy Helming!⎈
Install the AWS Load Balancer Controller. Replace cluster-name with your cluster name. The ServiceAccount named aws-load-balancer-controller was already created when the EKS cluster was created.
% helm install aws-load-balancer-controller eks/aws-load-balancer-controller \
  -n kube-system \
  --set clusterName=MilvusEKSTest \
  --set serviceAccount.create=false \
  --set serviceAccount.name=aws-load-balancer-controller
NAME: aws-load-balancer-controller
LAST DEPLOYED: Wed Jul 10 19:00:34 2024
NAMESPACE: kube-system
STATUS: deployed
REVISION: 1
TEST SUITE: None
NOTES:
AWS Load Balancer controller installed!
Verify if the controller was installed successfully. The output should look like:
% kubectl get deployment -n kube-system aws-load-balancer-controller
NAME                           READY   UP-TO-DATE   AVAILABLE   AGE
aws-load-balancer-controller   2/2     2            2           88s
Deploy a Milvus Cluster on Amazon EKS
Milvus supports multiple deployment methods like Operator and Helm. Using Operator is simpler, but Helm is more direct and flexible. So we use Helm for deployment.
You can customize the configuration via the values when deploying Milvus with the milvus_helm.yaml file.
By default, Milvus creates in-cluster minio and pulsar as the Object Storage and Message Storage, respectively. We will make some configuration changes to make it more suitable for production.
Step 1: Add the Milvus Helm repo and update it.
% helm repo add milvus https://zilliztech.github.io/milvus-helm/
helm repo update
"milvus" already exists with the same configuration, skipping
Hang tight while we grab the latest from your chart repositories...
...Successfully got an update from the "eks" chart repository
...Successfully got an update from the "zilliztech" chart repository
...Successfully got an update from the "milvus" chart repository
Update Complete. ⎈Happy Helming!⎈
Step 2: Create a milvus_cluster.yaml file.
The following code customizes the installation of Milvus, such as configuring Amazon S3 as the object storage, Amazon MSK as the message queue, etc. We’ll provide detailed explanations and configuration guidance after the code block.
#####################################
# Section 1
#
# Configure S3 as the Object Storage
#####################################


# Service account
# - this service account are used by External S3 access
serviceAccount:
  create: false
  name: milvus-s3-access-sa


# Close in-cluster minio
minio:
  enabled: false


# External S3
# - these configs are only used when `externalS3.enabled` is true
externalS3:
  enabled: true
  host: "s3.<region-code>.amazonaws.com"
  port: "443"
  useSSL: true
  bucketName: "<bucket-name>"
  rootPath: "<root-path>"
  useIAM: true
  cloudProvider: "aws"
  iamEndpoint: ""

#####################################
# Section 2
#
# Configure MSK as the Message Storage
#####################################

# Close in-cluster pulsar
pulsar:
  enabled: false

# External kafka
# - these configs are only used when `externalKafka.enabled` is true
externalKafka:
  enabled: true
  brokerList: "<broker-list>"
  securityProtocol: SASL_SSL
  sasl:
    mechanisms: SCRAM-SHA-512
    username: "<username>"
    password: "<password>"

#####################################
# Section 3
#
# Expose the Milvus service to be accessed from outside the cluster (LoadBalancer service).
# or access it from within the cluster (ClusterIP service). Set the service type and the port to serve it.
#####################################
service:
  type: LoadBalancer
  port: 19530
  annotations:
    service.beta.kubernetes.io/aws-load-balancer-type: external #AWS Load Balancer Controller fulfills services that has this annotation
    service.beta.kubernetes.io/aws-load-balancer-name : milvus-service #User defined name given to AWS Network Load Balancer
    #service.beta.kubernetes.io/aws-load-balancer-scheme: internal # internal or internet-facing, later allowing for public access via internet
    service.beta.kubernetes.io/aws-load-balancer-scheme: "internet-facing" #Places the load balancer on public subnets
    service.beta.kubernetes.io/aws-load-balancer-nlb-target-type: ip #The Pod IPs should be used as the target IPs (rather than the node IPs)

#####################################
# Section 4
#
# Installing Attu the Milvus management GUI
#####################################
attu:
  enabled: true
  name: attu
  service:
    annotations:
      service.beta.kubernetes.io/aws-load-balancer-type: external
      service.beta.kubernetes.io/aws-load-balancer-name : milvus-attu-service
      service.beta.kubernetes.io/aws-load-balancer-scheme: "internet-facing"
      service.beta.kubernetes.io/aws-load-balancer-nlb-target-type: ip
    labels: {}
    type: LoadBalancer
    port: 3000
  ingress:
    enabled: false

#####################################
# Section 5
#
# HA deployment of Milvus Core Components
#####################################
rootCoordinator:
  replicas: 2
  activeStandby:
    enabled: true  # Enable active-standby when you set multiple replicas for root coordinator
  resources:
    limits:
      cpu: 1
      memory: 2Gi
indexCoordinator:
  replicas: 2
  activeStandby:
    enabled: true  # Enable active-standby when you set multiple replicas for index coordinator
  resources:
    limits:
      cpu: "0.5"
      memory: 0.5Gi
queryCoordinator:
  replicas: 2
  activeStandby:
    enabled: true  # Enable active-standby when you set multiple replicas for query coordinator
  resources:
    limits:
      cpu: "0.5"
      memory: 0.5Gi
dataCoordinator:
  replicas: 2
  activeStandby:
    enabled: true  # Enable active-standby when you set multiple replicas for data coordinator
  resources:
    limits:
      cpu: "0.5"
      memory: 0.5Gi
proxy:
  replicas: 2
  resources:
    limits:
      cpu: 1
      memory: 4Gi

#####################################
# Section 6
#
# Milvus Resource Allocation
#####################################
queryNode:
  replicas: 1
  resources:
    limits:
      cpu: 2
      memory: 8Gi
dataNode:
  replicas: 1
  resources:
    limits:
      cpu: 1
      memory: 4Gi
indexNode:
  replicas: 1
  resources:
    limits:
      cpu: 4
      memory: 8Gi
The code is divided into six sections. Follow the following instructions to change the corresponding configurations.
Section 1: Configure S3 as the Object Storage. serviceAccount grants Milvus access to S3 (here it's milvus-s3-access-sa, which was already created when creating the EKS cluster).
Replace <region-code> with the AWS region where you created the cluster.
Replace <bucket-name> with the name of the S3 bucket and <root-path> with the prefix of the S3 bucket (can be empty).
Section 2: Configure MSK as the Message Storage.
- Replace <broker-list> with the MSK endpoint for SASL/SCRAM authentication type,
, and with the MSK username and password. You can get <broker-list> from MSK client information, as shown in the image.
- Replace <broker-list> with the MSK endpoint for SASL/SCRAM authentication type,
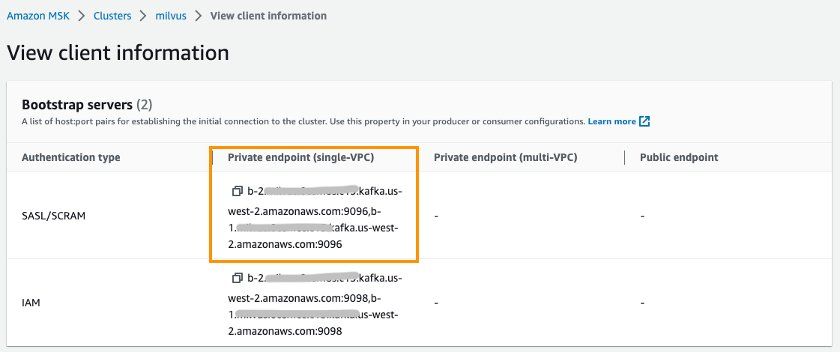 view client information.jpg
Section 3: This section exposes the Milvus service endpoint to be accessed from outside the cluster. By default, the Milvus endpoint uses the ClusterIP type service, which is only accessible within the EKS cluster. You can change it to the LoadBalancer type if needed to allow access from outside the EKS cluster. The LoadBalancer type Service uses Amazon NLB as the load balancer.
According to security best practices, aws-load-balancer-scheme is configured as internal mode by default here, which means only intranet access to Milvus is allowed. If you do need Internet access to Milvus, you need to change internal to internet-facing. Click to view the NLB configuration instructions.
- Change the line to:
aws-load-balancer-scheme: internet-facing
- Change the line to:
# service.beta.kubernetes.io/aws-load-balancer-scheme: internal
service.beta.kubernetes.io/aws-load-balancer-scheme: "internet-facing"
Section 4: Install and configure Attu, which is an open-source Milvus Administration tool. It has an intuitive GUI allows you to easily interact with the database. We enable Attu, configure ingress using AWS ALB, and set it to internet-facing type so Attu can be accessed via the Internet.
- Click here for the guide to ALB configuration.
Section 5: Enable HA deployment of Milvus Core Components. According to the architecture, we already know that Milvus contains multiple independent and decoupled components. For example, the coordinator service acts as the control layer, handling coordination for Root, Query, Data, and Index components. The Proxy in the access layer serves as the database access endpoint. These components default to only 1 pod replica. To improve Milvus availability, deploying multiple replicas of these service components is especially necessary.
- Note that the Root, Query, Data, and Index coordinator components must be deployed in multi-replica with the activeStandby option enabled.
Section 6: Adjust resource allocation for Milvus components to meet your workloads' requirements. The Milvus website also provides a sizing tool to generate configuration suggestions based on data volume, vector dimensions, index types, etc. It can also generate a Helm configuration file in one click.
- The following configuration is the suggestion given by the tool for 1 million 1024 dimensions vectors and HNSW index type.
Use Helm to create Milvus (deployed in namespace milvus).
- Note you can replace demo-milvus with a custom name.
% helm install demo-milvus milvus/milvus -n milvus -f milvus_cluster.yaml
W0710 19:35:08.789610   64030 warnings.go:70] annotation "kubernetes.io/ingress.class" is deprecated, please use 'spec.ingressClassName' instead
NAME: demo-milvus
LAST DEPLOYED: Wed Jul 10 19:35:06 2024
NAMESPACE: milvus
STATUS: deployed
REVISION: 1
TEST SUITE: None
Run the following command to check the deployment status.
% kubectl get deployment -n milvus
NAME                     READY   UP-TO-DATE   AVAILABLE   AGE
demo-milvus-attu         1/1     1            1           5m27s
demo-milvus-datacoord    2/2     2            2           5m27s
demo-milvus-datanode     1/1     1            1           5m27s
demo-milvus-indexcoord   2/2     2            2           5m27s
demo-milvus-indexnode    1/1     1            1           5m27s
demo-milvus-proxy        2/2     2            2           5m27s
demo-milvus-querycoord   2/2     2            2           5m27s
demo-milvus-querynode    1/1     1            1           5m27s
demo-milvus-rootcoord    2/2     2            2           5m27s
The output above shows that Milvus components are all AVAILABLE, and coordination components have multiple replicas enabled.
Access and Manage Milvus Endpoints
So far, we have successfully deployed the Milvus database. Now we can access Milvus through endpoints. Milvus exposes endpoints via Kubernetes services. Attu exposes endpoints via Kubernetes Ingress.
Access Milvus Endpoints using Kubernetes Services
Run the following command to get service endpoints:
% kubectl get svc -n milvus
NAME                    TYPE        CLUSTER-IP      EXTERNAL-IP                                             PORT(S)                         AGE
demo-etcd               ClusterIP   172.20.103.138   <none>                                                 2379/TCP,2380/TCP               62m
demo-etcd-headless      ClusterIP   None            <none>                                                  2379/TCP,2380/TCP               62m
demo-milvus             LoadBalancer   172.20.219.33    milvus-nlb-xxxx.elb.us-west-2.amazonaws.com   19530:31201/TCP,9091:31088/TCP   62m
demo-milvus-datacoord   ClusterIP   172.20.214.106   <none>                                                 13333/TCP,9091/TCP              62m
demo-milvus-datanode    ClusterIP   None            <none>                                                  9091/TCP                        62m
demo-milvus-indexcoord   ClusterIP      172.20.106.51   <none>                                                  31000/TCP,9091/TCP              62m
demo-milvus-indexnode   ClusterIP   None            <none>                                                  9091/TCP                        62m
demo-milvus-querycoord   ClusterIP      172.20.136.213   <none>                                                 19531/TCP,9091/TCP              62m
demo-milvus-querynode   ClusterIP   None            <none>                                                  9091/TCP                        62m
demo-milvus-rootcoord   ClusterIP   172.20.173.98   <none>                                                  53100/TCP,9091/TCP              62m
You can see several services. Milvus supports two ports, port 19530 and port 9091:
Port 19530 is for gRPC and RESTful API. It is the default port when you connect to a Milvus server with different Milvus SDKs or HTTP clients.
Port 9091 is a management port for metrics collection, pprof profiling, and health probes within Kubernetes.
Among them, the demo-milvus service provides a database access endpoint, which is used to establish a connection with clients. The database endpoint is accessed the NLB as the service load balancer. You can get the NLB service endpoint from the EXTERNAL-IP column.
Make note of the NLB EXTERNAL-IP column, which in this case is:
milvus-nlb-xxxx.elb.us-west-2.amazonaws.com 19530:31201/TCP,9091:31088/TCP
Access Milvus Endpoints using Attu
When we installed Milvus, we also installed Attu, an Admin tool to manage Milvus. Run the following command to get the endpoint:
% kubectl get ingress -n milvus
NAME            CLASS   HOSTS   ADDRESS                                                 PORTS   AGE
demo-milvus-attu   <none>   *       k8s-attu-xxxx.us-west-2.elb.amazonaws.com   80      27s
You should see an ingress called demo-milvus-attu, where the ADDRESS column is the external URL.
Open the Ingress address in a browser and see the following page.
Click Connect to log in.
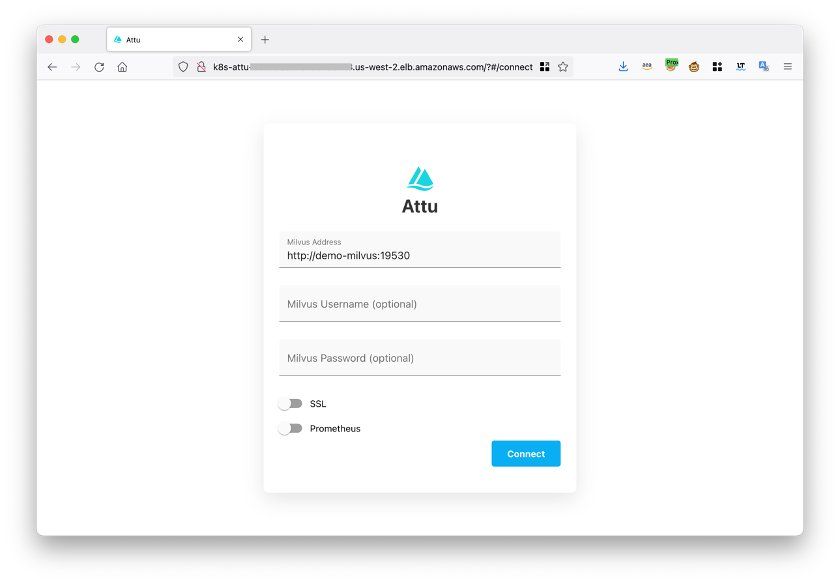 attu interface
After logging in, you can manage Milvus databases through:
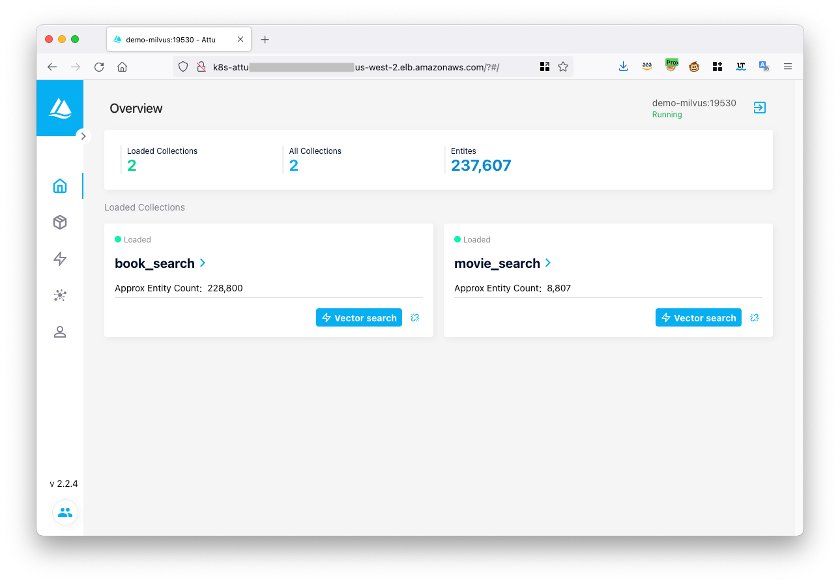 manage Milvus using Attu
Test the Milvus Vector Database
You can use Milvus' official example code to test if the Milvus database is working properly.
- Step 1: Directly download the hello_milvus.py example code.
% wget https://raw.githubusercontent.com/milvus-io/pymilvus/master/examples/hello_milvus.py
- Step 2: Modify the host in the example code to the Milvus Kubernetes endpoint we got earlier.
print(fmt.format("start connecting to Milvus"))
connections.connect(
"default",
host="milvus-nlb-xxx.elb.us-west-2.amazonaws.com",
port="19530")
- Step 3: Run the code. If the following result is returned, Milvus is running normally.
% python3 hello_milvus.py
=== start connecting to Milvus     ===
Does collection hello_milvus exist in Milvus: False
=== Create collection `hello_milvus` ===
=== Start inserting entities       ===
Number of entities in Milvus: 3000
=== Start Creating index IVF_FLAT  ===
=== Start loading                  ===
You have now successfully set up Milvus on EKS! CONGRATULATIONS!!!
Conclusion
This post introduced the open-source vector database Milvus and explained how to deploy it on AWS using managed services such as Amazon EKS, S3, MSK, and ELB to achieve higher elasticity and reliability.
Resources
AWS Milvus EKS Blog: https://aws.amazon.com/cn/blogs/china/build-open-source-vector-database-milvus-based-on-amazon-eks/
Milvus EKS Guide: https://milvus.io/docs/eks.md
Amazon EKS Stup Guide: https://docs.aws.amazon.com/eks/latest/userguide/setting-up.html
Amazon EKS User Guide: https://docs.aws.amazon.com/eks/latest/userguide/getting-started.html
Milvus Official Website: https://milvus.io/
Milvus Github: https://github.com/milvus-io/milvus
eksctl Official Website: https://eksctl.io/
YAML files you’ll need for the installation:
eks_cluster.yaml file: https://aws.amazon.com/cn/blogs/china/build-open-source-vector-database-milvus-based-on-amazon-eks/
milvus_helm.yaml file: https://raw.githubusercontent.com/milvus-io/milvus-helm/master/charts/milvus/values.yaml
milvus_cluster.yaml file: Copy/paste from inside this blog.
- Prerequisites
- Create an Amazon EKS Cluster
- Deploy a Milvus Cluster on Amazon EKS
- Access and Manage Milvus Endpoints
- Test the Milvus Vector Database
- Conclusion
- Resources
Content
Start Free, Scale Easily
Try the fully-managed vector database built for your GenAI applications.
Try Zilliz Cloud for FreeKeep Reading

How to Improve Retrieval Quality for Japanese Text with Sudachi, Milvus/Zilliz, and AWS Bedrock
Learn how Sudachi normalization and Milvus/Zilliz hybrid search improve Japanese RAG accuracy with BM25 + vector fusion, AWS Bedrock embeddings, and practical code examples.

Data Deduplication at Trillion Scale: How to Solve the Biggest Bottleneck of LLM Training
Explore how MinHash LSH and Milvus handle data deduplication at the trillion-scale level, solving key bottlenecks in LLM training for improved AI model performance.
Creating Collections in Zilliz Cloud Just Got Way Easier
We've enhanced the entire collection creation experience to bring advanced capabilities directly into the interface, making it faster and easier to build production-ready schemas without switching tools.
