Embedding Inference at Scale for RAG Applications with Ray Data and Milvus

Retrieval Augmented Generation (RAG) is one of the most popular use cases for enterprise Generative AI. Most RAG tutorials show how to use the OpenAI API for both the embedding model and large language model (LLM) inference. Why should you pay to access your own data, especially during the development process? You can access your own data and iterate as quickly as you like using open source.
One of the most intriguing discoveries was the remarkable performance boost achieved with Ray Data during the embedding step, where data is transformed into vectors.
Running open-source embeddings using pooled batch inference requests with tools such as Ray Data saved resources and time compared to Pandas. Using just four workers on a Mac M2 laptop with 16GB RAM, Ray Data was 60 times faster, more details later in this blog.
Our Open Source RAG Stack:
New BGM-M3 embedding model (generating 3 types of vectors in one round: sparse, dense, and multi-vector)
Ray Data for fast, distributed embedding inference
AWS S3 for temporarily storing the inference result
Milvus or Zilliz Cloud vector database
Example data downloaded from Kaggle IMDB poster
Our Open Source RAG Stack
BGM-M3 Embedding Model
Powerful Sparse, Dense, and Multi-vector Embeddings. The BGE-M3 embedding model is nicknamed for its “multi” capabilities: Multi-Linguality, Multi-Functionality, and Multi-Granularity. It can work with over 100 languages, simultaneously compute embeddings for the three common retrieval methods: dense, sparse, multi-vector embeddings. It also works with various text lengths from short sentences to long documents (up to 8,192 tokens). You can learn more from this Paper, or from this HuggingFace page about the model.
Since version 2.4, Milvus has built-in support for BGE M3.
Ray Data
Long-running data transformation tasks?
Ray Data’s scalable data processing makes it easier and faster to process massive amounts of data in parallel across multiple machines (CPUs, GPUs, etc.). Ray Data is especially helpful when the data can be split into parallel processes, such as many simultaneous chunkin and embedding transformations! Under the hood, Ray Data has a powerful streaming execution engine, to maximize the GPU utilization in the cluster. Compared to running embedding with an online service (such as OpenAI embedding API), running an offline embedding job with Ray Data can save the majority of cost.
Anyscale is a managed platform for Ray. You can easily scale out the embedding jobs on Anyscale to leverage hundreds of GPU machines.
Milvus and Zilliz
The secret sauce behind a lightning-fast RAG app is a powerful vector database!_ Milvus is built to handle massive amounts of data for large-scale use by businesses. Unlike some vector databases, Milvus can flexibly grow as your data needs increase – its architectural layers for Storing, Indexing, and Querying are designed to scale up independently and/or out. This makes your RAG app fast since Milvus smartly does offline computations before and while the queries come in real time. Plus, Milvus comes with other bells and whistles important for businesses, like keeping your data secure and organized (multi-tenancy and role-based access control) and ensuring it's always available (high availability).
Zilliz is a managed cloud product and uses open-source Milvus.
Set up Your RAG Tools
We will use the Python SDK for Milvus, Ray Data, Amazon S3, and Zilliz.
For Amazon S3, you’ll need to sign up for an AWS account.
In your browser, navigate to console.aws.amazon.com > IAM > My security credentials > Create access key. Copy and securely save locally your key and secret key.
Install libraries and run aws config. This will put the AWS variables in a credentials file.
pip install boto3
pip install awscli –force-reinstall –upgrade
aws config #fill in your key and secret key
more ~/.aws/credentials #make sure this looks correct
Install Ray Data:
pip install -U "ray[data]"
Install Pymilvus:
pip install -U pymilvus "pymilvus[model]" langchain
The BGE-M3 embedding model comes packaged already with Pymilvus since v2.4.
import ray, os, pprint, time, boto3
from langchain.text_splitter import RecursiveCharacterTextSplitter
import numpy as np
import pymilvus
print(pymilvus.__version__) # must be >= 2.4.0
from pymilvus.model.hybrid import BGEM3EmbeddingFunction
To use the Zilliz free tier (up to 2 collections, 1 million vectors each), sign up for an account and create a Starter cluster.
Prepare Data
The code in this blog uses the well-known public Kaggle IMDB poster data. It contains about 48,000 movies, reviews, poster links, and more metadata.
I copied all the text fields (movie name, description, review text) into a new column called ‘text’ and saved it in Parquet format, since it is more efficient than CSV.
Generate Embeddings
The steps to create embeddings are:
- Chunk the data: Split the input text into chunks, to keep the semantically related pieces of text together.
- Call an embedding model in inference mode to generate vector representations of the chunks.
Ray Data is able to parallelize these data operations using:
- flat_map() for chunking the data since the output will have more rows than the input.
- map_batches() for calling the embedding model from inside a callable Class method.
chunk_size = 512
chunk_overlap = np.round(chunk_size * 0.10, 0)

# Define a LangChain text splitter.
text_splitter = RecursiveCharacterTextSplitter(
   chunk_size=chunk_size,
   chunk_overlap=chunk_overlap,
   length_function=len)  #len is a built-in Python function

# 1. Define a regular python function for chunking.
def chunk_row(row, splitter=text_splitter):

   # Copy the row columns into metadata.
   metadata = row.copy()
   del metadata['text'] # Remove text from metadata

   # Split the text into chunks.
   chunks = splitter.create_documents(
       texts=[row["text"]],
       metadatas=[metadata])
   chunk_list = [{
       "text": chunk.page_content,
       **chunk.metadata} for chunk in chunks]

   return chunk_list

# 2. Define a class with a callable method to compute embeddings.
class ComputeEmbeddings:
     def __init__(self):
           # Initialize a Milvus built-in sparse-dense-late-interaction-reranking encoder.
           # https://huggingface.co/BAAI/bge-m3
           self.model = BGEM3EmbeddingFunction(use_fp16=False, device="cpu")
           print(f"dense_dim: {self.model.dim['dense']}")
           print(f"sparse_dim: {self.model.dim['sparse']}")

     def __call__(self, batch):

           # Ray data batch is a dictionary where values are array values.
           # BGEM3EmbeddingFunction input is docs as a list of strings.
           docs = list(batch['text'])

           # Encode the documents. bge-m3 dense embeddings are already normalized.
           embeddings = self.model(docs)
           batch['vector_dense'] = embeddings['dense']
           return batch

if __name__ == "__main__":

   FILE_PATH = "s3://zilliz/kaggle_imdb.parquet"

   # Load and transform data.

   ds = ray.data.read_parquet(FILE_PATH)

   # Chunk the input text
   chunked_ds = ds.flat_map(chunk_row)

   # Compute embeddings with a class that calls the embeddings model.
   embeddings_ds = chunked_ds.map_batches(ComputeEmbeddings, concurrency=4)

   # Save the embeddings to S3 in a folder of parquet part files.
   embeddings_ds.write_parquet('s3://zilliz/kaggle_imdb_embeddings')
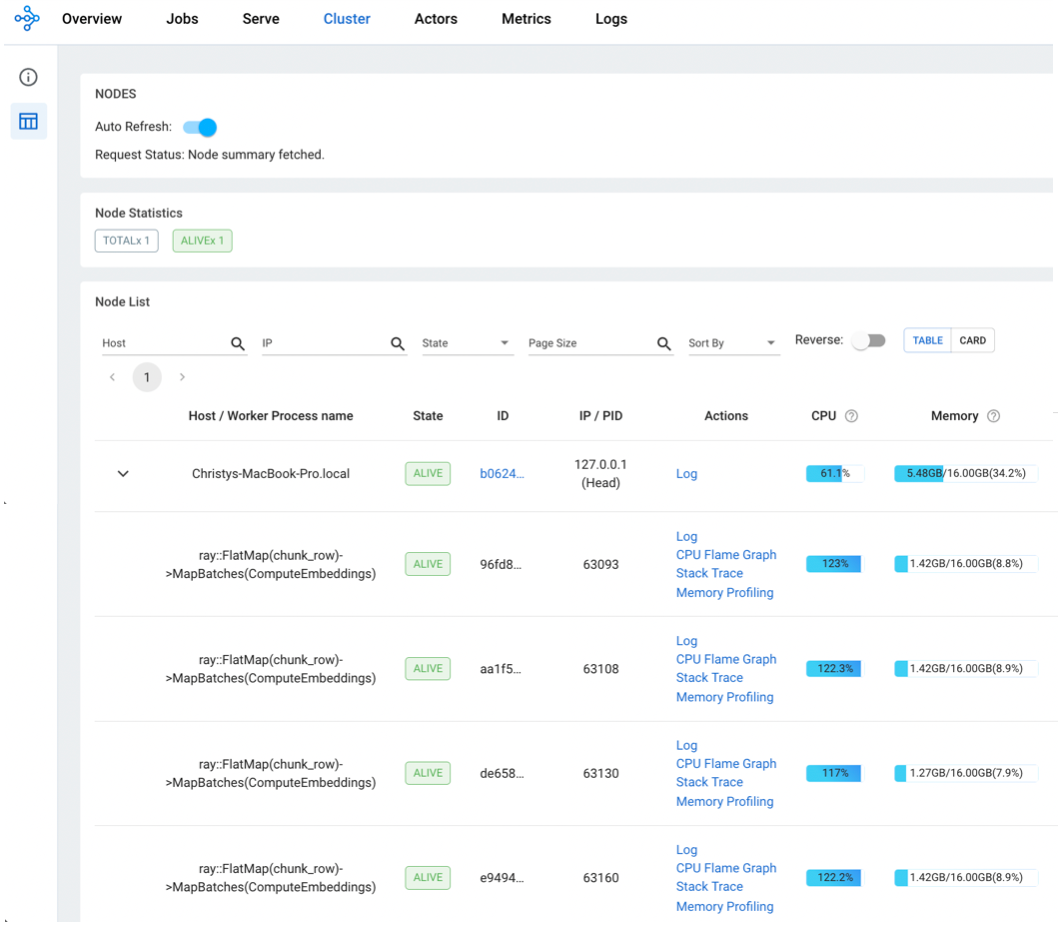
To run this, you’ll submit it as a Ray job:
Save the code into a Python script file. I called it ray_data_demo.py
To run locally from your laptop, create a clean directory, with only the .py script file and the .parquet data file. Only put the bare minimum in this clean directory. I called mine ‘ray_cluster’.
Run the Python script. This will start a Ray cluster and submit a job automatically.
**Navigate over to
http://127.0.0.1:8265. View the Cluster and Jobs timings.

Embedding Latency - 60x Faster on a Laptop
| Approach | Input data size | Total time | Screenshot |
| Pandas | 100 rows | 23 sec |

|
| Ray Data | 100 rows | 50 sec |

|
| Pandas | 45K rows | >4 hours |

|
| Ray Data | 45K rows | 4 min |

|
Table: Timings for embedding data on a M2 16GB laptop. Ray data batch processing was on a single-node Ray cluster, concurrency= 4 workers. Pandas was slow because it only had one processor, while Ray Data had 4 processors. Both would run faster on a bigger cluster.
Bulk-insert the Embedded Data from S3 Directly into Milvus or Zilliz
Both Milvus and Zilliz offer bulk-insert to import already embedded data directly from AWS, GCP, or Azure. In addition to the web console (shown below), Zilliz also offers a restful API and SDK.
For a large corpus of batch-generated embeddings, using bulk import can significantly save the machine resource and shorten insertion time compared to incremental insertion. More importantly, the vector search index built by bulk import is much more efficient than that from incremental insertion (think of global optimization v.s. local optimization).
Let’s see how to conveniently conduct bulk import with a few simple clicks on the Zilliz Cloud web console. Starting from the Cluster where you want to create the new collection, create a new collection with AutoID, only the “vector” column with correct EMBEDDING_DIMENSION, use the convenient “Dynamic Field” option, and click “Create Collection”.
Next, click “Import Data” and follow the screen instructions to copy the path to the parquet files written by the Ray Data job. (Note that you need to also specify the Access Key and Secret Key if your S3 bucket is private, so that Zilliz Cloud would be able to read the data in it). Any of Amazon S3, Google Cloud Storage, or Azure Blob Storage cloud sources are supported. Click “Import” to start importing all data into the vector database collection.
Once imported, you can optionally click on the build index on the collection to make the vector search more efficient in the Query your data step.

Image: Screenshot of the Zilliz bulk insert screens.
Query Your Data
To test the newly imported collection, let’s ask a question and retrieve answers from our movie data.
def mc_run_search(question, output_fields, top_k=2, filter_expression=""):

   # Embed the question using the same encoder.
   embeddings = model_bgem3([question])
   query_embeddings = embeddings['dense']

   # Run semantic vector search using your query and the vector database.
   results = mc.search(
       COLLECTION_NAME,
       data=query_embeddings,
       search_params=SEARCH_PARAMS,
       output_fields=output_fields,
       # Milvus can utilize metadata in boolean expressions to filter search.
       filter=filter_expression,
       limit=top_k,
       consistency_level="Eventually"
   )

   # Assemble retrieved context and context metadata.
   # The search result is in the variable `results[0]`, which is type
   # 'pymilvus.orm.search.SearchResult'.
   METADATA_FIELDS = [f for f in output_fields if f != 'chunk']
   formatted_results, context, context_metadata = _utils.client_assemble_retrieved_context(
       results, metadata_fields=METADATA_FIELDS, num_shot_answers=top_k)
   return formatted_results, context, context_metadata

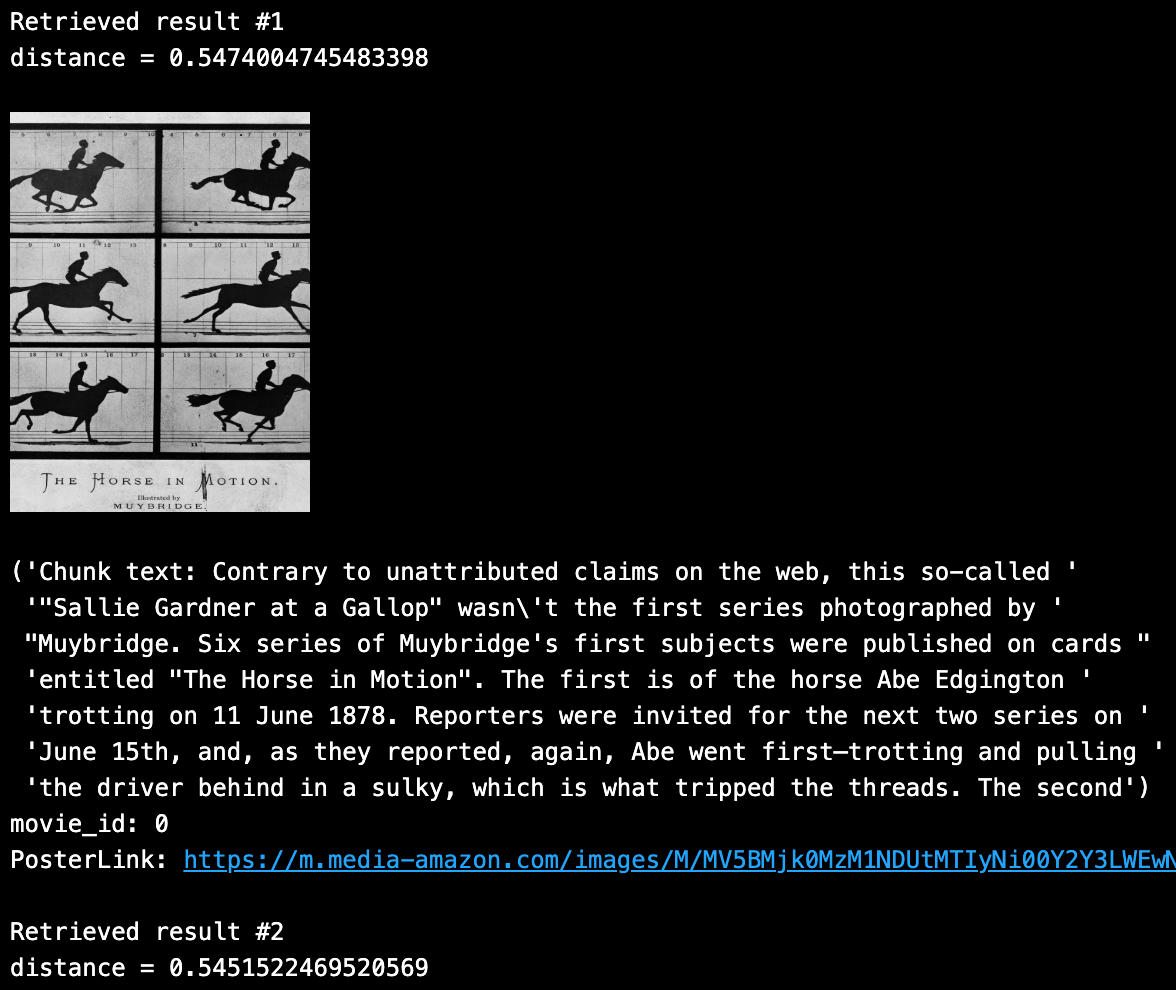
SAMPLE_QUESTION = "muybridge horse movie"

# Return top k unique results with HNSW index.
TOP_K = 2

# Define output fields to return.
OUTPUT_FIELDS = ["movie_id", "chunk", "PosterLink"]

formatted_results, context, context_metadata = \
   mc_run_search(SAMPLE_QUESTION, OUTPUT_FIELDS, TOP_K)
Looping through the top 2 unique results, we can see the following content closely returned from the above search query:

The full Ray Data script is available on GitHub.
Conclusion
This blog showed how to use Ray Data and Milvus Bulk Import features to significantly speed up the vector generation and efficiently batch load them into a vector database. For example, Embedding 102K rows of data using Ray Data took 4 minutes compared to 4 hours using a naive Pandas approach! ****Furthermore, using Bulk Import in Milvus can build a highly efficient vector index and save resources and time compared to regular incremental insertion. Check out Ray Data and Bulk Import features in Milvus and Zilliz Cloud for more details!
- Our Open Source RAG Stack
- Set up Your RAG Tools
- Prepare Data
- Generate Embeddings
- Embedding Latency - 60x Faster on a Laptop
- Bulk-insert the Embedded Data from S3 Directly into Milvus or Zilliz
- Query Your Data
- Conclusion
Content
Start Free, Scale Easily
Try the fully-managed vector database built for your GenAI applications.
Try Zilliz Cloud for FreeKeep Reading

Expanding Our Global Reach: Zilliz Cloud Launches in Azure Central India
Zilliz Cloud now operates in Azure Central India, offering AI and vector workloads with reduced latency, enhanced data sovereignty, and cost efficiency, empowering businesses to scale AI applications seamlessly in India. Ask ChatGPT

What Exactly Are AI Agents? Why OpenAI and LangChain Are Fighting Over Their Definition?
AI agents are software programs powered by artificial intelligence that can perceive their environment, make decisions, and take actions to achieve a goal—often autonomously.

Similarity Metrics for Vector Search
Exploring five similarity metrics for vector search: L2 or Euclidean distance, cosine distance, inner product, and hamming distance.

