How to Build an AI Chatbot with Milvus and Towhee

Milvus, an open-source vector database, is the perfect backbone for any AI application requiring efficient and scalable vector searching capabilities, making it a standout choice for your chatbot's data management. Towhee is an emerging framework for machine learning workflows that simplifies the process of implementing and orchestrating complex ML models. It also makes the development of your application manageable and easy to understand.
In this tutorial, you'll learn how to build a simple AI chatbot with Python using Milvus and Towhee. You'll focus on how to ingest unstructured data, analyze it, store it with embeddings, and process queries.
Setting up your environment
First, create a Python virtual environment to run your chatbot.
Here's a shell session from Linux. It creates the environment, activates it, and upgrades pip to the latest version.
[egoebelbecker@ares milvus_chatbot]$ python -m venv ./chatbot_venv
[egoebelbecker@ares milvus_chatbot]$ source chatbot_venv/bin/activate
(chatbot_venv) [egoebelbecker@ares milvus_chatbot]$ pip install --upgrade pip
Requirement already satisfied: pip in ./chatbot_venv/lib64/python3.11/site-packages (22.2.2)
Collecting pip
  Using cached pip-23.1.2-py3-none-any.whl (2.1 MB)
Installing collected packages: pip
  Attempting uninstall: pip
    Found existing installation: pip 22.2.2
    Uninstalling pip-22.2.2:
      Successfully uninstalled pip-22.2.2
Successfully installed pip-23.1.2
Next, install the packages you need to run the code: pandas, jupyter, langchain, towhee, unstructured, milvus, pymilvus, sentence_transformers and gradio.
(chatbot_venv) [egoebelbecker@ares milvus_chatbot]$ pip install pandas jupyter langchain towhee unstructured milvus pymilvus sentence_transformers gradio
Collecting pandas
  Obtaining dependency information for pandas from https://files.pythonhosted.org/packages/d0/28/88b81881c056376254618fad622a5e94b5126db8c61157ea1910cd1c040a/pandas-2.0.3-cp311-cp311-manylinux_2_17_x86_64.manylinux2014_x86_64.whl.metadata
  Using cached pandas-2.0.3-cp311-cp311-manylinux_2_17_x86_64.manylinux2014_x86_64.whl.metadata (18 kB)
Collecting jupyter
  Using cached jupyter-1.0.0-py2.py3-none-any.whl (2.7 kB)
(snip)
Installing collected packages: webencodings, wcwidth, pytz, pure-eval, ptyprocess, pickleshare, json5, ipython-genutils, filetype, fastjsonschema, executing, backcall, zipp, XlsxWriter, xlrd, widgetsnbextension, websocket-client, webcolors, urllib3, uri-template, tzdata, typing-extensions, traitlets, tqdm, tornado, tinycss2, tenacity, tabulate, soupsieve, sniffio, six, send2trash, rpds-py, rfc3986-validator, rfc3986, regex, pyzmq, PyYAML, python-magic, python-json-logger, pypandoc, pygments, pycparser, psutil, prompt-toolkit, prometheus-client, platformdirs, pkginfo, pillow, pexpect, parso, pandocfilters, packaging, overrides, olefile, numpy, nest-asyncio, mypy-extensions, multidict, more-itertools, mistune, mdurl, markupsafe, markdown, lxml, jupyterlab-widgets, jupyterlab-pygments, jsonpointer, joblib, jeepney, idna, greenlet, frozenlist, fqdn, et-xmlfile, docutils, defusedxml, decorator, debugpy, click, charset-normalizer, chardet, certifi, babel, attrs, async-timeout, async-lru, yarl, typing-inspect, terminado, SQLAlchemy, rfc3339-validator, requests, referencing, qtpy, python-pptx, python-docx, python-dateutil, pydantic, pdf2image, openpyxl, numexpr, nltk, msg-parser, matplotlib-inline, marshmallow, markdown-it-py, jupyter-core, jinja2, jedi, jaraco.classes, importlib-metadata, comm, cffi, bleach, beautifulsoup4, asttokens, anyio, aiosignal, stack-data, rich, requests-toolbelt, readme-renderer, pandas, openapi-schema-pydantic, langsmith, jupyter-server-terminals, jupyter-client, jsonschema-specifications, dataclasses-json, cryptography, arrow, argon2-cffi-bindings, aiohttp, SecretStorage, pdfminer.six, langchain, jsonschema, isoduration, ipython, argon2-cffi, unstructured, nbformat, keyring, ipykernel, twine, qtconsole, nbclient, jupyter-events, jupyter-console, ipywidgets, towhee, nbconvert, jupyter-server, notebook-shim, jupyterlab-server, jupyter-lsp, jupyterlab, notebook, jupyter
Successfully installed PyYAML-6.0.1 SQLAlchemy-2.0.19 SecretStorage-3.3.3 XlsxWriter-3.1.2 aiohttp-3.8.5 aiosignal-1.3.1 anyio-3.7.1 argon2-cffi-21.3.0 argon2-cffi-bindings-21.2.0 arrow-1.2.3 asttokens-2.2.1 async-lru-2.0.4 async-timeout-4.0.2 attrs-23.1.0 babel-2.12.1 backcall-0.2.0 beautifulsoup4-4.12.2 bleach-6.0.0 certifi-2023.7.22 cffi-1.15.1 chardet-5.1.0 charset-normalizer-3.2.0 click-8.1.6 comm-0.1.3 cryptography-41.0.2 dataclasses-json-0.5.14 debugpy-1.6.7 decorator-5.1.1 defusedxml-0.7.1 docutils-0.20.1 et-xmlfile-1.1.0 executing-1.2.0 fastjsonschema-2.18.0 filetype-1.2.0 fqdn-1.5.1 frozenlist-1.4.0 greenlet-2.0.2 idna-3.4 importlib-metadata-6.8.0 ipykernel-6.25.0 ipython-8.14.0 ipython-genutils-0.2.0 ipywidgets-8.0.7 isoduration-20.11.0 jaraco.classes-3.3.0 jedi-0.19.0 jeepney-0.8.0 jinja2-3.1.2 joblib-1.3.1 json5-0.9.14 jsonpointer-2.4 jsonschema-4.18.4 jsonschema-specifications-2023.7.1 jupyter-1.0.0 jupyter-client-8.3.0 jupyter-console-6.6.3 jupyter-core-5.3.1 jupyter-events-0.7.0 jupyter-lsp-2.2.0 jupyter-server-2.7.0 jupyter-server-terminals-0.4.4 jupyterlab-4.0.3 jupyterlab-pygments-0.2.2 jupyterlab-server-2.24.0 jupyterlab-widgets-3.0.8 keyring-24.2.0 langchain-0.0.248 langsmith-0.0.15 lxml-4.9.3 markdown-3.4.4 markdown-it-py-3.0.0 markupsafe-2.1.3 marshmallow-3.20.1 matplotlib-inline-0.1.6 mdurl-0.1.2 mistune-3.0.1 more-itertools-10.0.0 msg-parser-1.2.0 multidict-6.0.4 mypy-extensions-1.0.0 nbclient-0.8.0 nbconvert-7.7.3 nbformat-5.9.2 nest-asyncio-1.5.7 nltk-3.8.1 notebook-7.0.1 notebook-shim-0.2.3 numexpr-2.8.4 numpy-1.25.2 olefile-0.46 openapi-schema-pydantic-1.2.4 openpyxl-3.1.2 overrides-7.3.1 packaging-23.1 pandas-2.0.3 pandocfilters-1.5.0 parso-0.8.3 pdf2image-1.16.3 pdfminer.six-20221105 pexpect-4.8.0 pickleshare-0.7.5 pillow-10.0.0 pkginfo-1.9.6 platformdirs-3.10.0 prometheus-client-0.17.1 prompt-toolkit-3.0.39 psutil-5.9.5 ptyprocess-0.7.0 pure-eval-0.2.2 pycparser-2.21 pydantic-1.10.12 pygments-2.15.1 pypandoc-1.11 python-dateutil-2.8.2 python-docx-0.8.11 python-json-logger-2.0.7 python-magic-0.4.27 python-pptx-0.6.21 pytz-2023.3 pyzmq-25.1.0 qtconsole-5.4.3 qtpy-2.3.1 readme-renderer-40.0 referencing-0.30.0 regex-2023.6.3 requests-2.31.0 requests-toolbelt-1.0.0 rfc3339-validator-0.1.4 rfc3986-2.0.0 rfc3986-validator-0.1.1 rich-13.5.1 rpds-py-0.9.2 send2trash-1.8.2 six-1.16.0 sniffio-1.3.0 soupsieve-2.4.1 stack-data-0.6.2 tabulate-0.9.0 tenacity-8.2.2 terminado-0.17.1 tinycss2-1.2.1 tornado-6.3.2 towhee-1.1.1 tqdm-4.65.0 traitlets-5.9.0 twine-4.0.2 typing-extensions-4.7.1 typing-inspect-0.9.0 tzdata-2023.3 unstructured-0.8.7 uri-template-1.3.0 urllib3-2.0.4 wcwidth-0.2.6 webcolors-1.13 webencodings-0.5.1 websocket-client-1.6.1 widgetsnbextension-4.0.8 xlrd-2.0.1 yarl-1.9.2 zipp-3.16.2
(chatbot_venv) [egoebelbecker@ares milvus_chatbot]$
You can find a Jupyter notebook with the code for this tutorial here. Download it, start Jupyter, and load the notebook:
chatbot_venv) [egoebelbecker@ares milvus_chatbot]$ jupyter notebook milvus_chatbot.ipynb
[I 2023-07-31 11:29:01.748 ServerApp] Package notebook took 0.0000s to import
[I 2023-07-31 11:29:01.759 ServerApp] Package jupyter_lsp took 0.0108s to import
[W 2023-07-31 11:29:01.759 ServerApp] A `_jupyter_server_extension_points` function was not found in jupyter_lsp. Instead, a `_jupyter_server_extension_paths` function was found and will be used for now. This function name will be deprecated in future releases of Jupyter Server.
[I 2023-07-31 11:29:01.764 ServerApp] Package jupyter_server_terminals took 0.0045s to import
[I 2023-07-31 11:29:01.765 ServerApp] Package jupyterlab took 0.0000s to import
[I 2023-07-31 11:29:02.124 ServerApp] Package notebook_shim took 0.0000s to import
Creating a chatbot
Now, let's get to work on the chatbot.
Document store
The bot needs to store document chunks, and the embeddings Towhee extracts from them. That's what you'll use Milvus for. You've already installed Milvus Lite, a lightweight version of Milvus, above with the milvus library.
You can run a server from the command line:
(chatbot_venv) [egoebelbecker@ares milvus_chatbot]$ milvus-server

    __  _________ _   ____  ______
   /  |/  /  _/ /| | / / / / / __/
  / /|_/ // // /_| |/ / /_/ /\ \
 /_/  /_/___/____/___/\____/___/ {Lite}

 Welcome to use Milvus!

 Version:   v2.2.12-lite
 Process:   139309
 Started:   2023-07-31 12:43:43
 Config:    /home/egoebelbecker/.milvus.io/milvus-server/2.2.12/configs/milvus.yaml
 Logs:      /home/egoebelbecker/.milvus.io/milvus-server/2.2.12/logs

 Ctrl+C to exit …
Or, as part of your application code, as shown in the notebook:
from milvus import default_server

# Start Milvus service
default_server.start()

# # Stop Milvus service
# default_server.stop()
Set application variables and get OpenAI API Key
Next, set a few variables, and clean up any remaining SQLite files. We’ll use SQLite below for chat history.
- MILVUS_URI - the connection information for the Milvus servers. Parsed in host and port.
- MILVUS_HOST - the host where Milvus is running.
- MILVUS_PORT - the port the server listens on.
- DROP_EXIST - drop existing Milvus collections on start-up.
- EMBED_MODEL - the sentence_transformers model the code will use to create embeddings
- COLLECTION_NAME - name of Milvus collection for data and embeddings
- DIM - the dimension of embeddings the model creates for each piece of text
- OPENAI_API_KEY - key for LLM API
import getpass
import os

MILVUS_URI = 'http://localhost:19530'
[MILVUS_HOST, MILVUS_PORT] = MILVUS_URI.split('://')[1].split(':')
DROP_EXIST = True
EMBED_MODEL = 'all-mpnet-base-v2'
COLLECTION_NAME = 'chatbot_demo'
DIM = 768

OPENAI_API_KEY = getpass.getpass('Enter your OpenAI API key: ')

if os.path.exists('./sqlite.db'):
    os.remove('./sqlite.db')
Run this code to define the variables and answer the prompt for the API key.
Sample pipeline
Next, it's time to download some data and store it in Milvus. But before you do that, let's look at a sample pipeline for downloading and processing unstructured data.
You'll use the Towhee documentation pages for this example. You can try different sites to see how the code processes different data sets.
This code uses Towhee pipelines:
- input - begins a new pipeline with the source passed into it
- map - uses ops.text_loader() to retrieve the URL and map it to 'doc'
- flat_map - uses ops.text_splitter() to process the document into "chunks" for storage
- output - closes and prepares the pipeline for use
Pass this pipeline to DataCollection to see how it works.
from towhee import pipe, ops, DataCollection

pipe_load = (
    pipe.input('source')
        .map('source', 'doc', ops.text_loader())
        .flat_map('doc', 'doc_chunks', ops.text_splitter(chunk_size=300))
        .output('source', 'doc_chunks')
)
DataCollection(pipe_load('https://towhee.io')).show()
Here's the output from show():

The pipeline created five chunks from the document.
Sample embedding pipeline
The pipeline retrieved the data and created chunks. You need to create embeddings, too. Let's take a look at another sample pipeline.
This one uses map() to run ops.sentence_embedding.sbert() on each chunk. In this example, we're passing in a single block of text.
pipe_embed = (
    pipe.input('doc_chunk')
        .map('doc_chunk', 'vec', ops.sentence_embedding.sbert(model_name=EMBED_MODEL))
        .map('vec', 'vec', ops.np_normalize())
        .output('doc_chunk', 'vec')
)

text = '''SOTA Models

We provide 700+ pre-trained embedding models spanning 5 fields (CV, NLP, Multimodal, Audio, Medical), 15 tasks, and 140+ model architectures.
These include BERT, CLIP, ViT, SwinTransformer, data2vec, etc.
'''

DataCollection(pipe_embed(text)).show()
Run this code to see how the pipeline processes the single text block.

Prepare Milvus
Now, you need a collection to hold the data. This clock defines create_collection(), which uses MILVUS_HOST and MILVUS_PORT to connect to Milvus, drop any existing collections with the specified name, and create a new one with this schema:
- id - an integer identifier
- embedding - a vector of floats for the embeddings
- text - the corresponding text for the embeddings
from pymilvus import (
    connections, utility, Collection,
    CollectionSchema, FieldSchema, DataType
)


def create_collection(collection_name):
    connections.connect(host=MILVUS_HOST, port=MILVUS_PORT)

    has_collection = utility.has_collection(collection_name)

    if has_collection:
        collection = Collection(collection_name)
        if DROP_EXIST:
            collection.drop()
        else:
            return collection

    # Create collection
    fields = [
        FieldSchema(name='id', dtype=DataType.INT64, is_primary=True, auto_id=True),
        FieldSchema(name='embedding', dtype=DataType.FLOAT_VECTOR, dim=DIM),
        FieldSchema(name='text', dtype=DataType.VARCHAR, max_length=500)
    ]
    schema = CollectionSchema(
        fields=fields,
        description="Towhee demo",
        enable_dynamic_field=True
        )
    collection = Collection(name=collection_name, schema=schema)

    index_params = {
        'metric_type': 'IP',
        'index_type': 'IVF_FLAT',
        'params': {'nlist': 1024}
        }
    collection.create_index(
        field_name='embedding',
        index_params=index_params
    )
    return collection
Insert pipeline
It's time to process your input text and insert it into Milvus. Let's start with a pipeline that collapses what you learned above.
This function:
- Creates the new collection
- Retrieves the data
- Splits it into chunks
- Creates embeddings using EMBED_MODEL
- Insert the text and embeddings into Milvus
load_data = (
    pipe.input('collection_name', 'source')
        .map('collection_name', 'collection', create_collection)
        .map('source', 'doc', ops.text_loader())
        .flat_map('doc', 'doc_chunk', ops.text_splitter(chunk_size=300))
        .map('doc_chunk', 'vec', ops.sentence_embedding.sbert(model_name=EMBED_MODEL))
        .map('vec', 'vec', ops.np_normalize())
        .map(('collection_name', 'vec', 'doc_chunk'), 'mr',
             ops.ann_insert.osschat_milvus(host=MILVUS_HOST, port=MILVUS_PORT))
        .output('mr')
)
Here it is in action. Run it against the Wikipedia page for Frodo Baggins.
project_name = 'towhee_demo'
data_source = 'https://en.wikipedia.org/wiki/Frodo_Baggins'
mr = load_data(COLLECTION_NAME, data_source)

print('Doc chunks inserted:', len(mr.to_list()))
It inserts 408 chunks with embeddings:
2023-07-31 16:50:53,369 - 139993906521792 - node.py-node:167 - INFO: Begin to run Node-_input
2023-07-31 16:50:53,371 - 139993906521792 - node.py-node:167 - INFO: Begin to run Node-create_collection-0
2023-07-31 16:50:53,373 - 139993881343680 - node.py-node:167 - INFO: Begin to run Node-text-loader-1
2023-07-31 16:50:53,374 - 139993898129088 - node.py-node:167 - INFO: Begin to run Node-text-splitter-2
2023-07-31 16:50:53,376 - 139993872950976 - node.py-node:167 - INFO: Begin to run Node-sentence-embedding/sbert-3
2023-07-31 16:50:53,377 - 139993385268928 - node.py-node:167 - INFO: Begin to run Node-np-normalize-4
2023-07-31 16:50:53,378 - 139993376876224 - node.py-node:167 - INFO: Begin to run Node-ann-insert/osschat-milvus-5
2023-07-31 16:50:53,379 - 139993368483520 - node.py-node:167 - INFO: Begin to run Node-_output

(snip)

Categories:
2023-07-31 18:07:53,530 - 140552729257664 - logger.py-logger:14 - DETAIL: Skipping sentence because does not exceed 5 word tokens
Categories
2023-07-31 18:07:53,532 - 140552729257664 - logger.py-logger:14 - DETAIL: Skipping sentence because does not exceed 3 word tokens
Hidden categories
2023-07-31 18:07:53,533 - 140552729257664 - logger.py-logger:14 - DETAIL: Skipping sentence because does not exceed 3 word tokens
Hidden categories
2023-07-31 18:07:53,533 - 140552729257664 - logger.py-logger:14 - DETAIL: Not narrative. Text does not contain a verb:

Hidden categories:
2023-07-31 18:07:53,534 - 140552729257664 - logger.py-logger:14 - DETAIL: Skipping sentence because does not exceed 5 word tokens
Hidden categories

Doc chunks inserted: 408
Search knowledge base
Now, with the embeddings and text stored in Milvus, you can search it.
This function creates a query pipeline. The most important step is this one:
ops.ann_search.osschat_milvus(host=MILVUS_HOST, port=MILVUS_PORT,
                              **{'metric_type': 'IP', 'limit': 3, 'output_fields': ['text']}))
The osschat_milvus searches the embeddings for matches to the submitted text.
Here is the whole pipeline:
pipe_search = (
    pipe.input('collection_name', 'query')
        .map('query', 'query_vec', ops.sentence_embedding.sbert(model_name=EMBED_MODEL))
        .map('query_vec', 'query_vec', ops.np_normalize())
        .map(('collection_name', 'query_vec'), 'search_res',
             ops.ann_search.osschat_milvus(host=MILVUS_HOST, port=MILVUS_PORT,
                                           **{'metric_type': 'IP', 'limit': 3, 'output_fields': ['text']}))
        .flat_map('search_res', ('id', 'score', 'text'), lambda x: (x[0], x[1], x[2]))
        .output('query', 'text', 'score')
)
Try it:
query = 'Who is Frodo Baggins?'
DataCollection(pipe_search(project_name, query)).show()
The model does a good job of pulling three closely matched nodes:

Add an LLM
Now, it’s time to add a large language model (LLM) so users can hold a conversation with the chatbot. We’ll use ChatGPT and the OpenAI API for this example.
Chat history
In order to get better results from the LLM, you need to store chat history and present it with queries. You’ll use SQLite for this step.
Here’s a function for retrieving the history:
pipe_get_history = (
    pipe.input('collection_name', 'session')
        .map(('collection_name', 'session'), 'history', ops.chat_message_histories.sql(method='get'))
        .output('collection_name', 'session', 'history')
)
Here’s the one to store it:
pipe_add_history = (
    pipe.input('collection_name', 'session', 'question', 'answer')
        .map(('collection_name', 'session', 'question', 'answer'), 'history', ops.chat_message_histories.sql(method='add'))
        .output('history')
)
LLM query pipeline
Now, we need a pipeline to submit queries to ChatGPT.
This pipeline:
- searches Milvus using the user’s query
- collects the current chat history
- submits the query, Milvus search, and chat history to ChatGPT
- Appends the ChatGPT result to the chat history
- Returns the result to the caller
chat = (
    pipe.input('collection_name', 'query', 'session')
        .map('query', 'query_vec', ops.sentence_embedding.sbert(model_name=EMBED_MODEL))
        .map('query_vec', 'query_vec', ops.np_normalize())
        .map(('collection_name', 'query_vec'), 'search_res',
            ops.ann_search.osschat_milvus(host=MILVUS_HOST,
                                        port=MILVUS_PORT,
                                        **{'metric_type': 'IP', 'limit': 3, 'output_fields': ['text']}))
        .map('search_res', 'knowledge', lambda y: [x[2] for x in y])
        .map(('collection_name', 'session'), 'history', ops.chat_message_histories.sql(method='get'))
        .map(('query', 'knowledge', 'history'), 'messages', ops.prompt.question_answer())
        .map('messages', 'answer', ops.LLM.OpenAI(api_key=OPENAI_API_KEY,
                                                model_name='gpt-3.5-turbo',
                                                temperature=0.8))
        .map(('collection_name', 'session', 'query', 'answer'), 'new_history', ops.chat_message_histories.sql(method='add'))
        .output('query', 'history', 'answer', )
)
Let’s test this pipeline before connecting it to a GUI:
new_query = 'Where did Frodo take the ring?'
DataCollection(chat(COLLECTION_NAME, new_query, session_id)).show()
Here’s the output and results in the notebook:
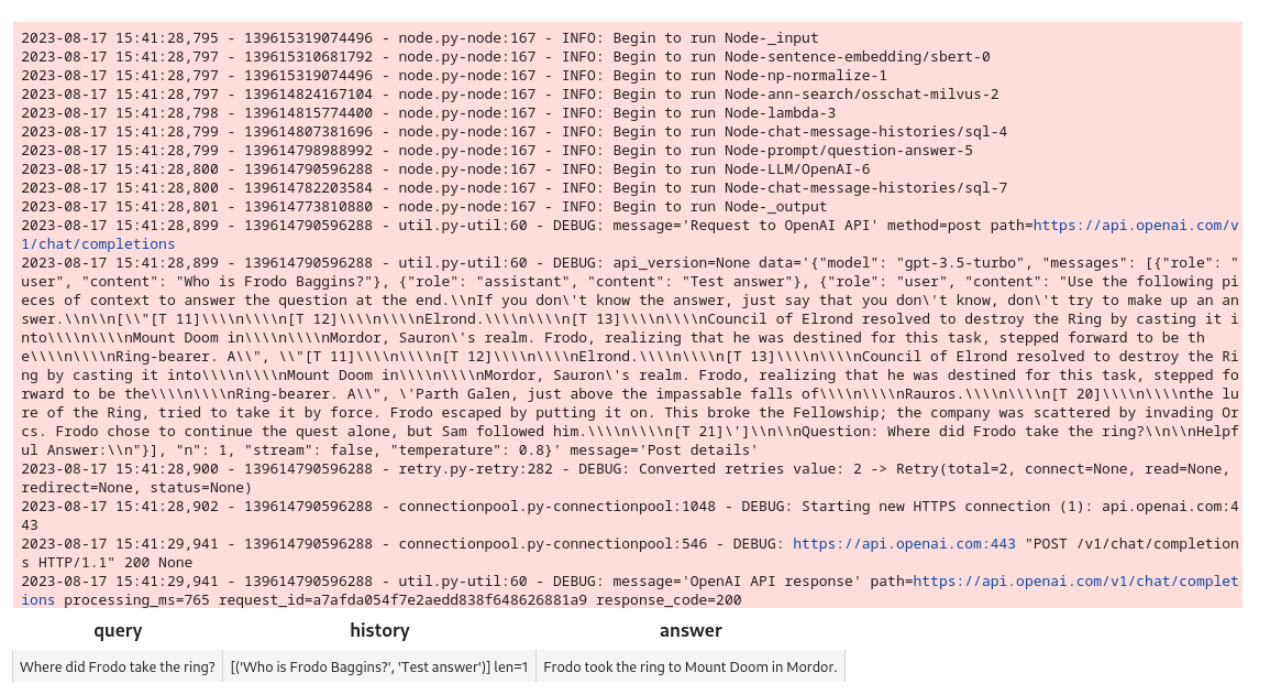
The pipeline works. Let’s put together a Gradio interface.
Gradio GUI
First, you need functions to create a session identifier and to respond to queries from the interface.
These functions create a session ID using a UUID, and accept a session and query for the query pipeline.
import uuid
import io

def create_session_id():
    uid = str(uuid.uuid4())
    suid = ''.join(uid.split('-'))
    return 'sess_' + suid


def respond(session, query):
    res = chat(COLLECTION_NAME, query, session).get_dict()
    answer = res['answer']
    response = res['history']
    response.append((query, answer))
    return response
Next, the Gradio interface uses these functions to build a chatbot.
It uses the Blocks API to create a ChatBot interface. The Send Message button uses the respond function to send requests to ChatGPT.
import gradio as gr

with gr.Blocks() as demo:
    session_id = gr.State(create_session_id)

    with gr.Row():
        with gr.Column(scale=2):
            gr.Markdown('''## Chat''')
            conversation = gr.Chatbot(label='conversation').style(height=300)
            question = gr.Textbox(label='question', value=None)

            send_btn = gr.Button('Send Message')
            send_btn.click(
                fn=respond,
                inputs=[
                    session_id,
                    question
                ],
                outputs=conversation,
            )

demo.launch(server_name='127.0.0.1', server_port=8902)
Here it is:
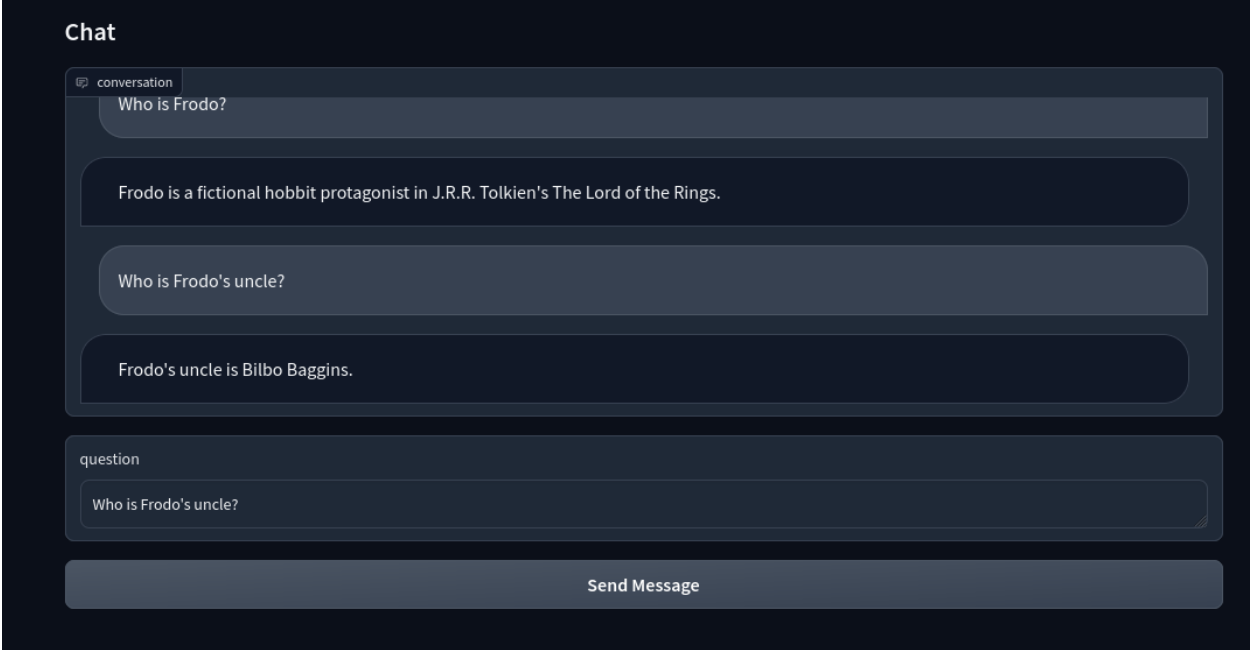
Now, you have an LLM-based intelligent chatbot with Milvus!
Summary
In this post, we created Towhee pipelines to ingest unstructured data, process it for embeddings, and store those embeddings in Milvus. Then, we created a query pipeline for the chat function and connected the chatbot with an LLM. Finally, we got an intelligent chatbot.
This tutorial demonstrates how easy it is to build applications with Milvus. Milvus brings numerous advantages when integrated into applications, especially those relying on machine learning and artificial intelligence. It offers highly efficient, scalable, and reliable vector similarity search and analytics capabilities critical in applications like chatbots, recommendation systems, and image or text recognition.
This post was written by Eric Goebelbecker. Eric has worked in the financial markets in New York City for 25 years, developing infrastructure for market data and financial information exchange (FIX) protocol networks. He loves to talk about what makes teams effective (or not so effective!).
Start Free, Scale Easily
Try the fully-managed vector database built for your GenAI applications.
Try Zilliz Cloud for FreeKeep Reading
Smarter Autoscaling in Zilliz Cloud: Always Optimized for Every Workload
With the latest upgrade, Zilliz Cloud introduces smarter autoscaling—a fully automated, more streamlined, elastic resource management system.

What is the K-Nearest Neighbors (KNN) Algorithm in Machine Learning?
KNN is a supervised machine learning technique and algorithm for classification and regression. This post is the ultimate guide to KNN.
DeepSeek Always Busy? Deploy It Locally with Milvus in Just 10 Minutes—No More Waiting!
Learn how to set up DeepSeek-R1 on your local machine using Ollama, AnythingLLM, and Milvus in just 10 minutes. Bypass busy servers and enhance AI responses with custom data.
