Using AI to Find Your Celebrity Stylist (Part II)
In my previous blog post, "Using AI to Find Your Celebrity Stylist," I explained how to leverage artificial intelligence (AI) technologies, such as Milvus, an open-source AI-native vector database, and Hugging Face models, to find celebrity style choices that match your own. In this follow-up post, we will take things one step further and demonstrate how to obtain more detailed and accurate results by making some code changes to the previous project. Additionally, I will provide suggestions for how you can extend this project on your own.
If you would like to try this project directly, download the photos and the completed notebook. If you are interested in the project discussed in my previous blog, you can check out the photos it uses and its tutorial.
Recapping the tutorial for my previous Fashion AI project
Before we deep dive into this project, let me briefly recap the tutorial we discussed in my previous post. So, you don't have to leave this page to learn about the context.
Importing all the necessary libraries for image manipulation
We start off the code by importing all the necessary libraries for image manipulation, including torch for feature extraction, segformer object from transformers, matplotlib, and some torchvision imports such as Resize, masks_to_boxes, and crop.
import torch
from torch import nn, tensor
from transformers import AutoFeatureExtractor, SegformerForSemanticSegmentation
import matplotlib.pyplot as plt
from torchvision.transforms import Resize
import torchvision.transforms as T
from torchvision.ops import masks_to_boxes
from torchvision.transforms.functional import crop
Pre-processing the celebrity images
After importing all the necessary packages for image manipulation, you can begin processing your images. The following three functions (get_segmentation, get_masks, and crop_images) are used to segment clothing articles and crop them for further ingestion.
def get_segmentation(extractor, model, image):
    inputs = extractor(images=image, return_tensors="pt")


    outputs = model(**inputs)
    logits = outputs.logits.cpu()


    upsampled_logits = nn.functional.interpolate(
        logits,
        size=image.size[::-1],
        mode="bilinear",
        align_corners=False,
    )


    pred_seg = upsampled_logits.argmax(dim=1)[0]
    return pred_seg


# returns two lists masks (tensor) and obj_ids (int)
# "mattmdjaga/segformer_b2_clothes" from hugging face
def get_masks(segmentation):
    obj_ids = torch.unique(segmentation)
    obj_ids = obj_ids[1:]
    masks = segmentation == obj_ids[:, None, None]
    return masks, obj_ids


def crop_images(masks, obj_ids, img):
    boxes = masks_to_boxes(masks)
    crop_boxes = []
    for box in boxes:
        crop_box = tensor([box[0], box[1], box[2]-box[0], box[3]-box[1]])
        crop_boxes.append(crop_box)
    preprocess = T.Compose([
        T.Resize(size=(256, 256)),
        T.ToTensor()
    ])
    cropped_images = {}
    for i in range(len(crop_boxes)):
        crop_box = crop_boxes[i]
        cropped = crop(img, crop_box[1].item(), crop_box[0].item(), crop_box[3].item(), crop_box[2].item())
        cropped_images[obj_ids[i].item()] = preprocess(cropped)
    return cropped_images
Store the image data to a vector database
We use Milvus, an open-source AI-native vector database, to store image data. To get started, unzip the photos zip file for this project and include the folder in the same root directory as the notebook. Once this step is done, you can run the code below to process the images and store the data in Milvus.
import os
image_paths = []
for celeb in os.listdir("./photos"):
    for image in os.listdir(f"./photos/{celeb}/"):
        image_paths.append(f"./photos/{celeb}/{image}")


from milvus import default_server
from pymilvus import utility, connections
default_server.start()
connections.connect(host="127.0.0.1", port=default_server.listen_port)
DIMENSION = 2048
BATCH_SIZE = 128
COLLECTION_NAME = "fashion"
TOP_K = 3
from pymilvus import FieldSchema, CollectionSchema, Collection, DataType


fields = [
    FieldSchema(name="id", dtype=DataType.INT64, is_primary=True, auto_id=True),
    FieldSchema(name='filepath', dtype=DataType.VARCHAR, max_length=200),
    FieldSchema(name="name", dtype=DataType.VARCHAR, max_length=200),
    FieldSchema(name="seg_id", dtype=DataType.INT64),
    FieldSchema(name='embedding', dtype=DataType.FLOAT_VECTOR, dim=DIMENSION)
]


schema = CollectionSchema(fields=fields)
collection = Collection(name=COLLECTION_NAME, schema=schema)
index_params = {
    "index_type": "IVF_FLAT",
    "metric_type": "L2",
    "params": {"nlist": 128},
}
collection.create_index(field_name="embedding", index_params=index_params)
collection.load()
Next, you can run the code below to generate embeddings using the Nvidia ResNet 50 model from Hugging Face.
# run this before importing th resnet50 model if you run into an SSL certificate URLError
import ssl
ssl._create_default_https_context = ssl._create_unverified_context
# Load the embedding model with the last layer removed
embeddings_model = torch.hub.load('NVIDIA/DeepLearningExamples:torchhub', 'nvidia_resnet50', pretrained=True)
embeddings_model = torch.nn.Sequential(*(list(embeddings_model.children())[:-1]))
embeddings_model.eval()
The function below defines how to embed and insert data. Following that, the code loops through all images, and embeds and inserts them into Milvus.
Note: Many of the components below will change or be removed when utilizing the new Milvus dynamic schema feature.
def embed_insert(data, collection, model):
    with torch.no_grad():
        output = model(torch.stack(data[0])).squeeze()
        collection.insert([data[1], data[2], data[3], output.tolist()])
from PIL import Image
data_batch = [[], [], [], []]


for path in image_paths:
    image = Image.open(path)
    path_split = path.split("/")
    name = " ".join(path_split[2].split("_"))
    segmentation = get_segmentation(extractor, model, image)
    masks, ids = get_masks(segmentation)
    cropped_images = crop_images(masks, ids, image)
    for key, image in cropped_images.items():
        data_batch[0].append(image)
        data_batch[1].append(path)
        data_batch[2].append(name)
        data_batch[3].append(key)
        if len(data_batch[0]) % BATCH_SIZE == 0:
            embed_insert(data_batch, collection, embeddings_model)
            data_batch = [[], [], [], []]


if len(data_batch[0]) != 0:
    embed_insert(data_batch, collection, embeddings_model)


collection.flush()
Query the vector database
The following code demonstrates how to query Milvus with input images and retrieve the top three results for each article of clothing.
def embed_search_images(data, model):
    with torch.no_grad():
    output = model(torch.stack(data))
    if len(output) > 1:
        return output.squeeze().tolist()
    else:
        return torch.flatten(output, start_dim=1).tolist()
# data_batch[0] is a list of tensors
# data_batch[1] is a list of filepaths to the images (string)
# data_batch[2] is a list of the names of the people in the images (string)
# data_batch[3] is a list of segmentation keys (int)
data_batch = [[], [], [], []]


search_paths = ["./photos/Taylor_Swift/Taylor_Swift_3.jpg", "./photos/Taylor_Swift/Taylor_Swift_8.jpg"]


for path in search_paths:
    image = Image.open(path)
    path_split = path.split("/")
    name = " ".join(path_split[2].split("_"))
    segmentation = get_segmentation(extractor, model, image)
    masks, ids = get_masks(segmentation)
    cropped_images = crop_images(masks, ids, image)
    for key, image in cropped_images.items():
        data_batch[0].append(image)
        data_batch[1].append(path)
        data_batch[2].append(name)
        data_batch[3].append(key)


embeds = embed_search_images(data_batch[0], embeddings_model)
import time
start = time.time()
res = collection.search(embeds,
    anns_field='embedding',
    param={"metric_type": "L2",
        "params": {"nprobe": 10}},
    limit=TOP_K,
    output_fields=['filepath'])
finish = time.time()
print(finish - start)
for index, result in enumerate(res):
    print(index)
    print(result)
More pattern matching: selecting objects from each image
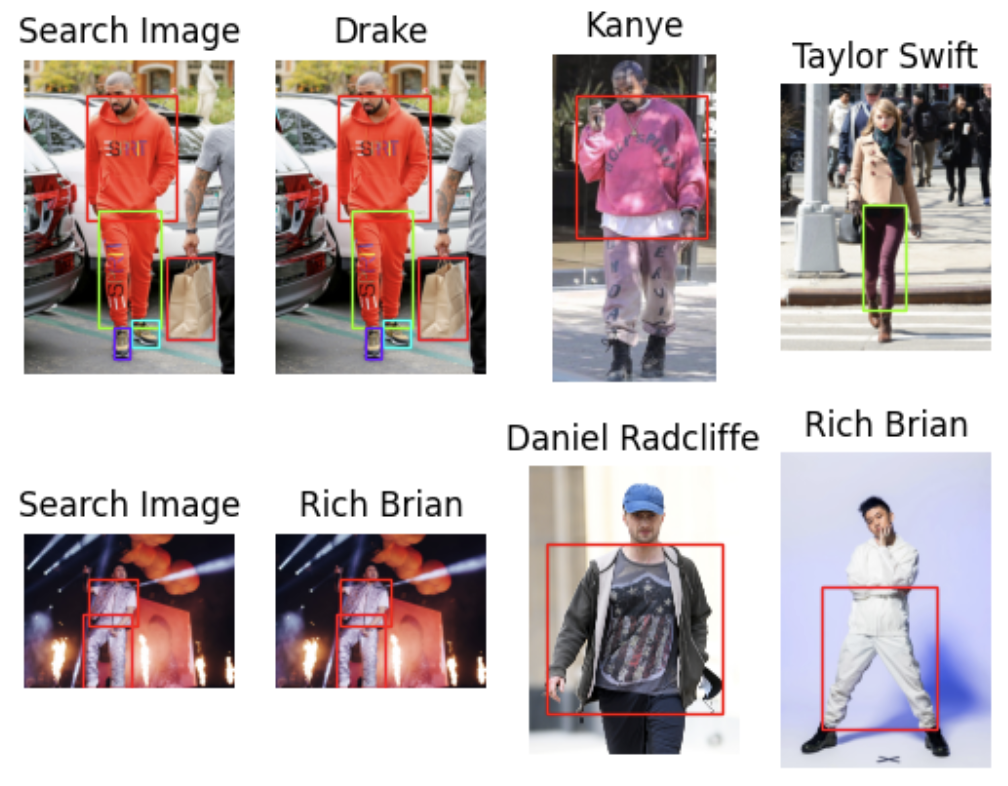
By following the tutorial recapped above, you can discover the top three celebrity style matches for each article of clothing you search for. You can also create an image like the one below without the matched items' bounding boxes. In this section, I will explain how to find fashion styles with patterns closer to your own, with a few code changes to the one used in the previous tutorial.
 image
image
Importing all the necessary libraries for image manipulation
To begin with, import all the necessary libraries for image manipulation in your code. If you have already done so, you can skip this step.
import torch
from torch import nn, tensor
from transformers import AutoFeatureExtractor, SegformerForSemanticSegmentation
import matplotlib.pyplot as plt
from torchvision.transforms import Resize
import torchvision.transforms as T
from torchvision.ops import masks_to_boxes
from torchvision.transforms.functional import crop
Pre-processing your images
When you have imported all the necessary packages for image manipulation, proceed with the image segmentation process, which involves three functions: get_segmentation, get_masks, and crop_images.
We don’t have to make any code changes to the get_segmentation function.
For the get_masks function, we only need to grab the segmentations that correspond to the segmentation IDs in the wanted list. It is a new addition that includes segmentation IDs for articles of clothing, as stated in the model card on Hugging Face.
We’ll make the most code changes to thecrop_image function. In my previous tutorial, this function returned a list of cropped images. After we change some code, it now returns three objects: embeddings of the cropped images, a list of the boxes' coordinates on the original image, and a list of the segmentation IDs. This new setup moves the embedding from the batch insert to the transformation step.
wanted = [1, 3, 4, 5, 6, 7, 8, 9, 10, 16, 17]
def get_segmentation(image):
    inputs = extractor(images=image, return_tensors="pt")


    outputs = segmentation_model(**inputs)
    logits = outputs.logits.cpu()


    upsampled_logits = nn.functional.interpolate(
        logits,
        size=image.size[::-1],
        mode="bilinear",
        align_corners=False,
    )


    pred_seg = upsampled_logits.argmax(dim=1)[0]
    return pred_seg


# returns two lists masks (tensor) and obj_ids (int)
# "mattmdjaga/segformer_b2_clothes" from hugging face
def get_masks(segmentation):
    obj_ids = torch.unique(segmentation)
    obj_ids = obj_ids[1:]
    wanted_ids = [x.item() for x in obj_ids if x in wanted]
    wanted_ids = torch.Tensor(wanted_ids)
    masks = segmentation == wanted_ids[:, None, None]
    return masks, obj_ids


def crop_images(masks, obj_ids, img):
    boxes = masks_to_boxes(masks)
    crop_boxes = []
    for box in boxes:
        crop_box = tensor([box[0], box[1], box[2]-box[0], box[3]-box[1]])
        crop_boxes.append(crop_box)
    preprocess = T.Compose([
        T.Resize(size=(256, 256)),
        T.ToTensor()
    ])
    cropped_images = []
    seg_ids = []
    for i in range(len(crop_boxes)):
        crop_box = crop_boxes[i]
        cropped = crop(img, crop_box[1].item(), crop_box[0].item(), crop_box[3].item(), crop_box[2].item())
        cropped_images.append(preprocess(cropped))
        seg_ids.append(obj_ids[i].item())
    with torch.no_grad():
        embeddings = embeddings_model(torch.stack(cropped_images)).squeeze().tolist()
    return embeddings, boxes.tolist(), seg_ids
Now that we have the images, it's time to load them. This step involves batch inserting, which we covered in my previous tutorial. In this tutorial, we will insert all of our data at once as a list of dictionaries instead of a list of lists. I find this insertion method to be much cleaner, and it allows us to add a new field to the schema at insertion time. In this case, we will add a list of crop corners.
for path in image_paths:
    image = Image.open(path)
    path_split = path.split("/")
    name = " ".join(path_split[2].split("_"))
    segmentation = get_segmentation(image)
    masks, ids = get_masks(segmentation)
    embeddings, crop_corners, seg_ids = crop_images(masks, ids, image)
    inserts = [{"embedding": embeddings[x], "seg_id": seg_ids[x], "name": name, "filepath": path, "crop_corner": crop_corners[x]} for x in range(len(embeddings))]
    collection.insert(inserts)
    collection.flush()
Query the vector database
Now, it's time to make queries in Milvus, our vector database. Compared to the steps we used in the previous tutorial, there are a few differences here:
- First, we limit the number of "matches" we care about in an image to five.
- Second, we show the three closest matching images.
- Third, we add a function to get a color map for drawing bounding boxes in different colors.
Now, we set up the matplotlib figure and axes. Then, we loop through all of our images and apply the three processing functions mentioned above to obtain the segmentations and bounding boxes.
After we’ve pre-processed the images, we can search for them in Milvus. We get the top three responses for each image based on the number of "matching" articles they contain. Finally, we print the results along with the bounding boxes that returned matches.
from pprint import pprint
from PIL import ImageDraw
from collections import Counter
import matplotlib.patches as patches


LIMIT = 5 # How many closes matches per article of clothing to analyze
CLOSEST = 3 # How many closest images to display. CLOSEST <= Limit


search_paths = ["./photos/Taylor_Swift/Taylor_Swift_2.jpg", "./photos/Jenna_Ortega/Jenna_Ortega_6.jpg"] # Images to search for


def get_cmap(n, name='hsv'):
    '''Returns a function that maps each index in 0, 1, ..., n-1 to a distinct
    RGB color; the keyword argument name must be a standard mpl colormap name.
    Sourced from https://stackoverflow.com/questions/14720331/how-to-generate-random-colors-in-matplotlib'''
    return plt.cm.get_cmap(name, n)


# Create the result subplots
f, axarr = plt.subplots(max(len(search_paths), 2), CLOSEST + 1)


for search_i, path in enumerate(search_paths):
    # Generate crops and embeddings for all items found
    image = Image.open(path)
    segmentation = get_segmentation(image)
    masks, ids = get_masks(segmentation)
    embeddings, crop_corners, _ = crop_images(masks, ids, image)


# Generate color map
    cmap = get_cmap(len(crop_corners))


    # Display the first box with image being searched for
    axarr[search_i][0].imshow(image)
    axarr[search_i][0].set_title('Search Image')
    axarr[search_i][0].axis('off')
    for i, (x0, y0, x1, y1) in enumerate(crop_corners):
        rect = patches.Rectangle((x0, y0), x1-x0, y1-y0, linewidth=1, edgecolor=cmap(i), facecolor='none')
        axarr[search_i][0].add_patch(rect)


    # Search the database for all the crops
    start = time.time()
    res = collection.search(embeddings,
        anns_field='embedding',
        param={"metric_type": "L2",
        "params": {"nprobe": 10}, "offset": 0},
        limit=LIMIT,
        output_fields=['filepath', 'crop_corner'])
    finish = time.time()


    print("Total Search Time: ", finish - start)


    # Summarize the top unique results and weight them based on position in results
    filepaths = []
    for hits in res:
        seen = set()
        for i, hit in enumerate(hits):
            if hit.entity.get("filepath") not in seen:
                seen.add(hit.entity.get("filepath"))
                filepaths.extend([hit.entity.get("filepath") for _ in range(len(hits) - i)])
    # Find the most commonly ranked result image
    counts = Counter(filepaths)
    most_common = [path for path, _ in counts.most_common(CLOSEST)]
    # For each image, extract the corresponding item found that correlates to search images
    matches = {}
    for i, hits in enumerate(res):
        matches[i] = {}
        tracker = set(most_common)
        for hit in hits:
            if hit.entity.get("filepath") in tracker:
                matches[i][hit.entity.get("filepath")] = hit.entity.get("crop_corner")
                tracker.remove( hit.entity.get("filepath"))
        # Display the most common images in results
    for res_i, res_path in enumerate(most_common):
    # Display each of the images next to search image
        image = Image.open(res_path)
        axarr[search_i][res_i+1].imshow(image)
        axarr[search_i][res_i+1].set_title(" ".join(res_path.split("/")[2].split("_")))
        axarr[search_i][res_i+1].axis('off')
# Add boudning boxes for all matched items
    for key, value in matches.items():
        if res_path in value:
            x0, y0, x1, y1 = value[res_path]
            rect = patches.Rectangle((x0, y0), x1-x0, y1-y0, linewidth=1, edgecolor=cmap(key), facecolor='none')
            axarr[search_i][res_i+1].add_patch(rect)
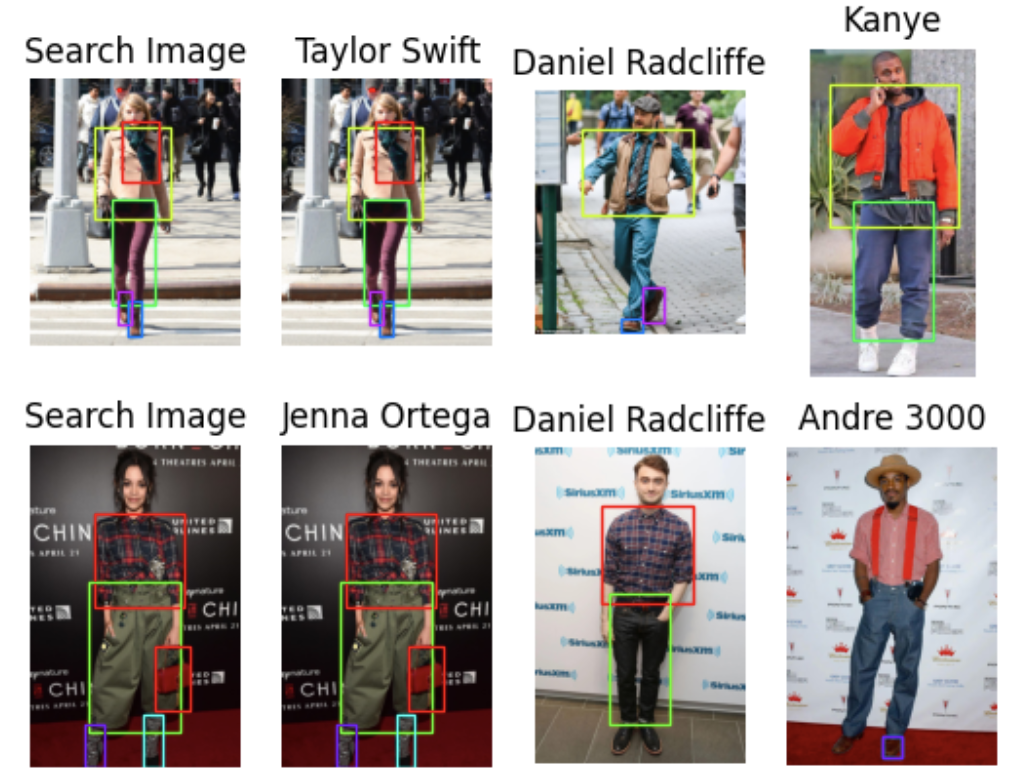
Once you have completed the above steps, you should get a result similar to the one below or at the beginning of this session.
 image
image
What’s next? possible project extensions
I am putting this project on hold to work on some other projects for now, but you are welcome to extend it if you want! Here are three possible extensions.
First, you can flesh out the comparison game a bit more. For example, you can group split items together, such as marking both shoes as a single item. You can also add more pictures of celebrities or friends for more comparisons.
Second, you can turn this project into a fashion identifier or a recommender system. Instead of using images of celebrities, you can use pictures of clothes that can be bought online. When a user uploads a picture, you can compare it to the images in your vector database and suggest the closest articles of clothing to the user.
Third, you can create a style generator, which may be more challenging. There are various ways to do this, but one idea is to take multiple pictures of a user and generate suggestions based on them. This approach involves using a generative image model to provide style suggestions and comparing them to the closest pictures of users for reference. We can then suggest something that makes sense based on this comparison.
These three extensions are just some examples of ways to enhance my simple project using an image model and a vector database like Milvus. The use of a vector database enables a variety of similarity search tasks which is especially valuable for comparing pictures.
Summary
In this tutorial, we extended our first celebrity-style project by using Milvus' new dynamic schema, filtering out certain segmentation IDs, and keeping track of the bounding boxes of our matches. We also sorted our search results to return the top three results based on the number of matches.
Milvus' new dynamic schema allows us to add extra fields when we upload data using a dictionary format, changing the way we were initially batch-uploading a list of lists. It also facilitated adding crop coordinates without changing the schema.
As a new preprocessing step, we filtered out certain IDs that aren't clothing-related based on the model card in Hugging Face. We filter these IDs out in the get_masks function. Fun fact, the obj_ids object in that function is actually a tensor.
We also kept track of the bounding boxes. We moved the embedding step to the image cropping function and returned the embeddings with the bounding boxes and segmentation IDs. Then, we saved these embeddings into Milvus using a dynamic schema.
At query time, we aggregated all the returned images by the number of bounding boxes they contained, allowing us to find the closest matching celebrity image via different articles of clothing. Now it's up to you. You can take my suggestions and make something else out of it, such as a fashion recommender system, a better style comparison system for you and your friends, or a generative fashion AI app.
- Recapping the tutorial for my previous Fashion AI project
- More pattern matching: selecting objects from each image
- What’s next? possible project extensions
- Summary
Content
Start Free, Scale Easily
Try the fully-managed vector database built for your GenAI applications.
Try Zilliz Cloud for FreeKeep Reading

Zilliz Cloud Introduces Advanced BYOC-I Solution for Ultimate Enterprise Data Sovereignty
Explore Zilliz Cloud BYOC-I, the solution that balances AI innovation with data control, enabling secure deployments in finance, healthcare, and education sectors.

Introducing DeepSearcher: A Local Open Source Deep Research
In contrast to OpenAI’s Deep Research, this example ran locally, using only open-source models and tools like Milvus and LangChain.

Why Deepseek is Waking up AI Giants Like OpenAI And Why You Should Care
Discover how DeepSeek R1's open-source AI model with superior reasoning capabilities and lower costs is disrupting the AI landscape and challenging tech giants like OpenAI.
