


LangChain과 Milvus를 사용하여 5분 안에 오픈 소스 챗봇 구축하기
이전 블로그에서는 몇 분 만에 Milvus 연결을 시작하는 방법을 살펴보았습니다. 이번 게시물에서는 LangChain과 함께 완전한 오픈 소스 RAG (Retrieval Augmented Generation) 스택을 사용하여 제품 문서 웹 페이지를 바탕으로 Milvus에 대한 질문에 답해 보겠습니다.
검색을 활용한 오픈 소스 Q&A를 사용하면 비용을 절약할 수 있습니다. 검색, 평가, 개발 반복 등 거의 대부분의 경우 데이터에 무료로 호출하기 때문입니다. 최종 채팅 생성 단계에서만 OpenAI에 한 번 유료 호출을 합니다.
기술적인 측면을 더 깊이 살펴보고 싶은 분들을 위해 라이브 ChatBot의 소스 코드가 GitHub에 공개되어 있습니다. 이 노트북의 전체 코드는 bootcamp Git Hub에 있습니다.
RAG (Retrieval Augmented Generation)는 생성형 AI 텍스트를 ground하는 데 사용됩니다(생성된 텍스트를 사실에 기반한 맞춤 데이터에 바탕을 두어 환각을 줄임). 제품 문서처럼 사용자가 참이라고 믿는 맞춤 데이터의 텍스트를 vector database에서 검색하여 질문에 답합니다. 그런 다음 정확한 텍스트 답변 “context”를 “question”과 함께 “prompt”에 삽입하고, 이를 OpenAI의 ChatGPT와 같은 LLM에 입력합니다. LLM은 근거가 있는 사람다운 채팅 답변을 생성합니다.
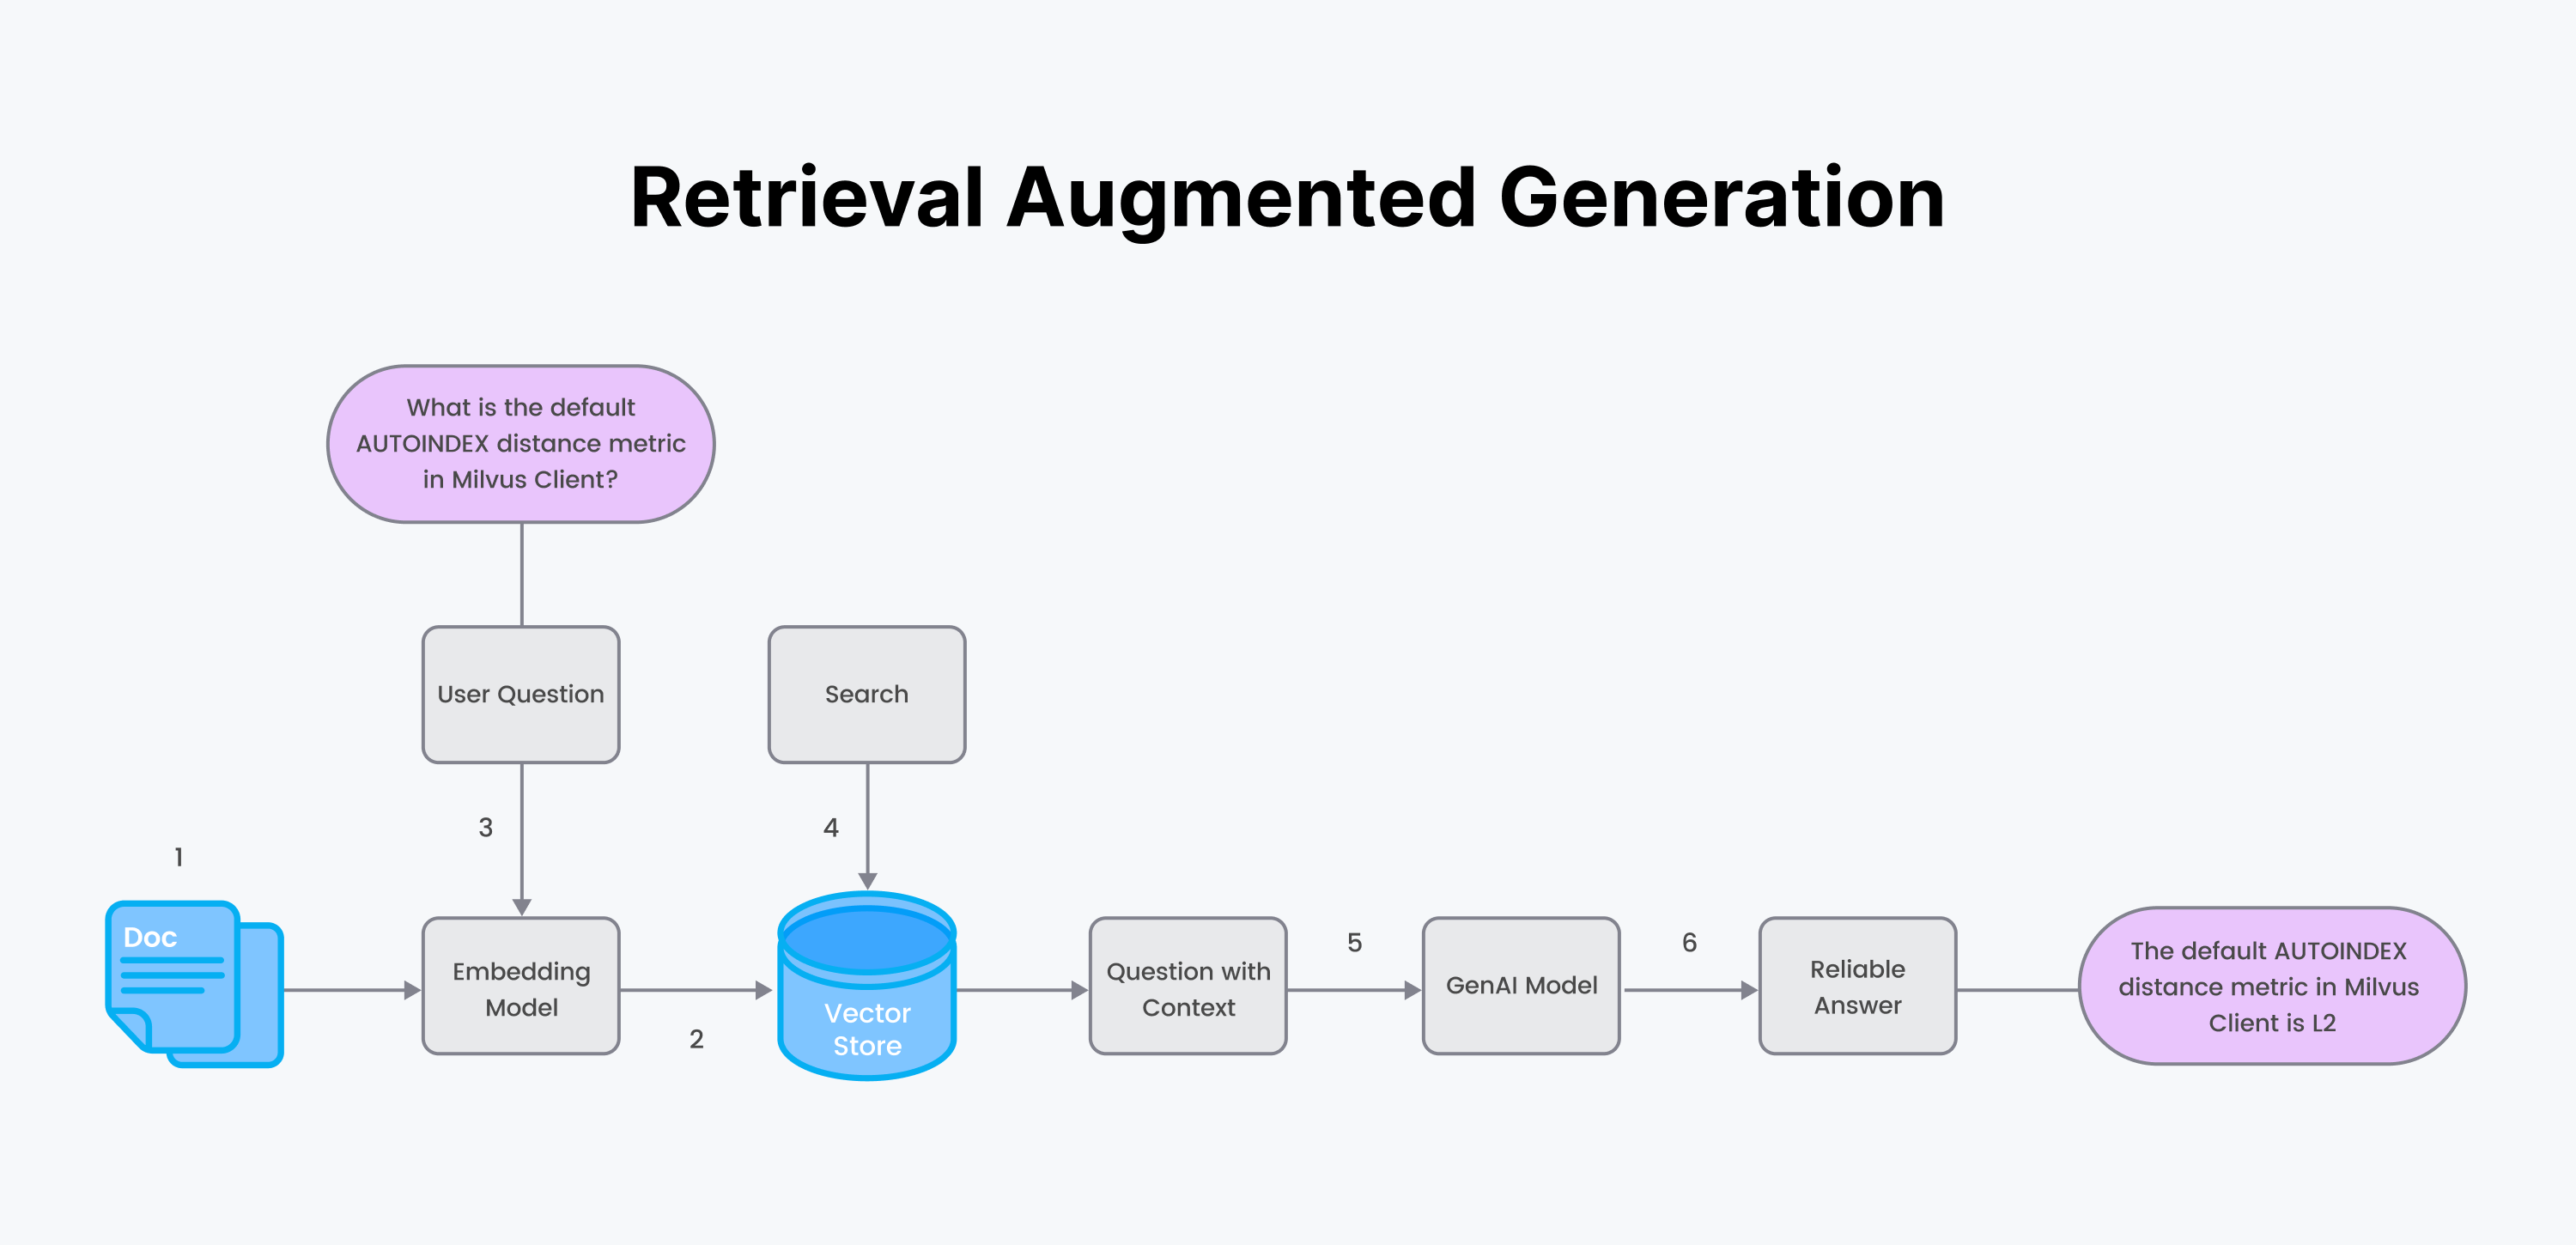
RAG 프로세스:
참이라고 믿는 맞춤 데이터와 인코더용 임베딩 모델로 시작합니다.
인코더를 사용하여 데이터를 청크로 나누고 임베딩을 생성합니다. 데이터와 메타데이터를 벡터 데이터베이스에 저장합니다.
사용자가 질문을 합니다. 1단계와 동일한 인코더를 사용하여 질문의 임베딩을 생성합니다.
벡터 데이터베이스를 사용해 의미 검색을 수행하여 질문에 대한 답변을 검색합니다.
맞춤 문서에서 가져온 답변 텍스트 청크를 “Context”에 넣습니다. 질문과 컨텍스트를 프롬프트에 넣습니다. 프롬프트를 생성 LLM으로 보냅니다.
생성 LLM으로부터 신뢰할 수 있는 답변을 받습니다.
1단계: 데이터 수집
Milvus는 맞춤 비정형 데이터 수집과 임베딩 생성을 단순화하는 고성능 벡터 데이터베이스입니다. Milvus는 임베딩(또는 벡터)의 빠른 저장, 인덱싱, 검색에 최적화되어 있습니다.
OpenAI는 AI 모델과 도구를 개발하고 제공하는 조직입니다. GPT (Generative Pre-trained Transformer) 시리즈와 같은 최첨단 언어 모델로 잘 알려져 있습니다.
LangChain은 개발자가 기존 소프트웨어와 LLM 사이의 간극을 연결하도록 돕는 도구와 래퍼의 라이브러리입니다.
우리가 사용할 데이터는 제품 문서 웹 페이지입니다. ReadTheDocs는 Sphinx 문서 생성기로 작성된 문서를 호스팅하는 오픈 소스 무료 소프트웨어 문서 호스팅 플랫폼입니다.
시작해 보겠습니다.
# Download readthedocs pages locally.
DOCS_PAGE="https://pymilvus.readthedocs.io/en/latest/"
wget -r -A.html -P rtdocs --header="Accept-Charset: UTF-8" $DOCS_PAGE
위 코드는 웹 페이지를 rtdocs라는 로컬 디렉터리에 다운로드합니다. 다음으로 문서를 LangChain으로 읽어 들이겠습니다.
#!pip install langchain
from langchain.document_loaders import ReadTheDocsLoader

loader = ReadTheDocsLoader(
  "rtdocs/pymilvus.readthedocs.io/en/latest/",
  features="html.parser")
docs = loader.load()
2단계: HTML 계층 구조를 사용하여 데이터 청크화하기
임베딩하기 전에 청크 전략, 청크 크기, 청크 오버랩을 결정해야 합니다. 이 데모에서는 다음을 사용하겠습니다:
Strategy = 마크다운 헤더 계층 구조를 사용합니다. 너무 길지 않은 한 마크다운 섹션을 함께 유지합니다.
Chunk size = 임베딩 모델의 매개변수
MAX_SEQ_LENGTH를 사용합니다.Overlap = 경험 법칙 10-15%
Functions =
마크다운 섹션을 분할하기 위한 Langchain의 HTMLHeaderTextSplitter.
긴 리뷰를 재귀적으로 분할하기 위한 Langchain의 RecursiveCharacterTextSplitter.
from langchain.text_splitter import HTMLHeaderTextSplitter, RecursiveCharacterTextSplitter

# Define the headers to split on for the HTMLHeaderTextSplitter
headers_to_split_on = [
    ("h1", "Header 1"),
    ("h2", "Header 2"),]
# Create an instance of the HTMLHeaderTextSplitter
html_splitter = HTMLHeaderTextSplitter(headers_to_split_on=headers_to_split_on)

# Use the embedding model parameters.
chunk_size = MAX_SEQ_LENGTH - HF_EOS_TOKEN_LENGTH
chunk_overlap = np.round(chunk_size * 0.10, 0)

# Create an instance of the RecursiveCharacterTextSplitter
child_splitter = RecursiveCharacterTextSplitter(
    chunk_size = chunk_size,
    chunk_overlap = chunk_overlap,
    length_function = len,)

# Split the HTML text using the HTMLHeaderTextSplitter.
html_header_splits = []
for doc in docs:
    splits = html_splitter.split_text(doc.page_content)
    for split in splits:
        # Add the source URL and header values to the metadata
        metadata = {}
        new_text = split.page_content
        for header_name, metadata_header_name in headers_to_split_on:
            header_value = new_text.split("¶ ")[0].strip()
            metadata[header_name] = header_value
            try:
                new_text = new_text.split("¶ ")[1].strip()
            except:
                break
        split.metadata = {
            **metadata,
            "source": doc.metadata["source"]}
        # Add the header to the text
        split.page_content = split.page_content
    html_header_splits.extend(splits)

# Split the documents further into smaller, recursive chunks.
chunks = child_splitter.split_documents(html_header_splits)

end_time = time.time()
print(f"chunking time: {end_time - start_time}")
print(f"docs: {len(docs)}, split into: {len(html_header_splits)}")
print(f"split into chunks: {len(chunks)}, type: list of {type(chunks[0])}")
# Inspect a chunk.
print()
print("Looking at a sample chunk...")
print(chunks[1].page_content[:100])
print(chunks[1].metadata)

위에서 각 청크가 문서 소스에 기반하고 있음을 확인할 수 있습니다. 또한 헤더 제목은 마크다운 텍스트 청크와 함께 유지됩니다. 이러한 헤더는 나중에 전체 헤더 섹션을 검색하는 데 사용할 수 있습니다.
Step 3: 임베딩 생성
대부분의 데모는 이제 OpenAI Embeddings APIs를 사용합니다. 이는 여러분만의 맞춤 데이터이므로, 오픈 소스 임베딩 모델과 무료 티어 Zilliz Cloud를 사용해 여러분의 데이터를 원하는 만큼 무료로 검색해 보는 것은 어떨까요?
최신 MTEB 벤치마크 결과에 따르면 오픈 소스 임베딩/검색 모델은 OpenAI Embeddings (ada-002)만큼 우수합니다. 아래에서 가장 작은 최고 순위 모델이 bge-large-en-v1.5임을 확인할 수 있습니다. 이 블로그에서는 해당 모델을 사용하겠습니다.
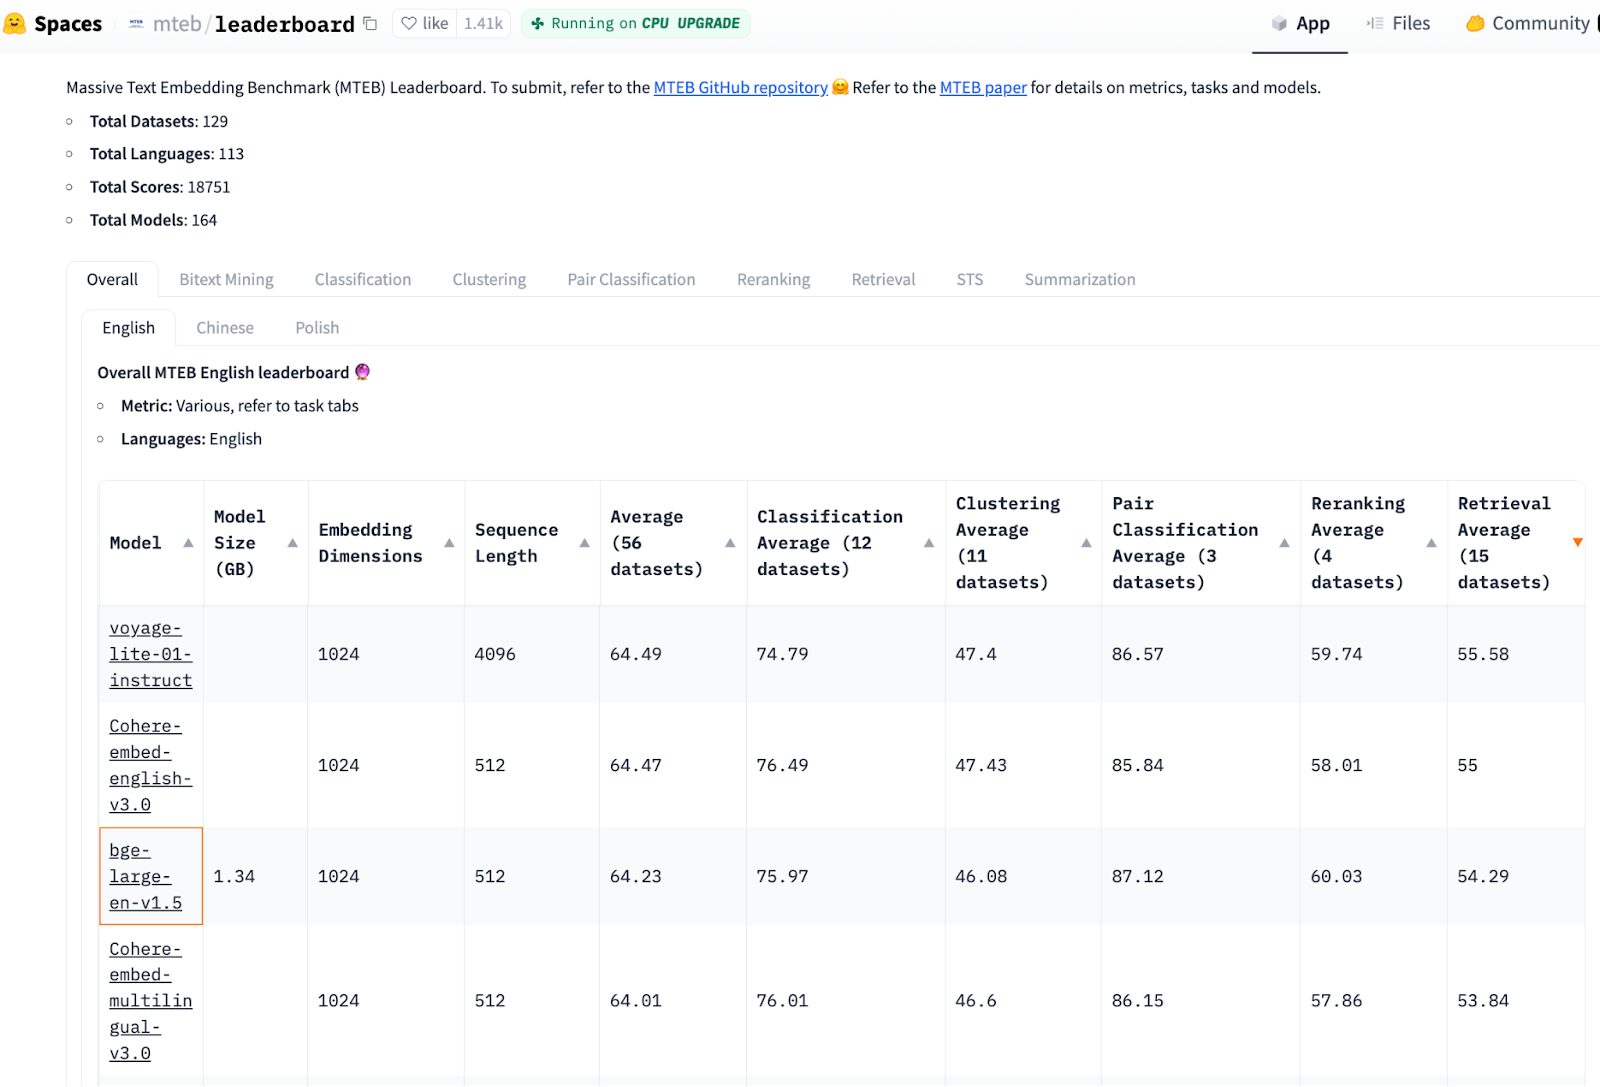
이미지 출처: https://huggingface.co/spaces/mteb/leaderboard, 열 Retrieval Average (15 datasets) 기준으로 정렬, 2023년 11월 24일 출력.
위 이미지는 임베딩 모델 리더보드를 보여주며, 최상위 순위는 voyage-lite-01-instruct(크기 4.2 GB, 그리고 3위는 bge-base-en-v1.5(크기 1.5 GB)입니다. OpenAIEmbedding text-embeddings-ada-002는 22위에 랭크되어 있습니다(목록에서 너무 아래라 표시되지 않음).
아래에서는 선택한 임베딩 모델 체크포인트를 사용하여 인코더를 초기화합니다.
#pip install torch, sentence-transformers
import torch
from sentence_transformers import SentenceTransformer

# Initialize torch settings
DEVICE = torch.device('cuda:3'
   if torch.cuda.is_available()
   else 'cpu')
# Load the encoder model from huggingface model hub.
model_name = "BAAI/bge-base-en-v1.5"
encoder = SentenceTransformer(model_name, device=DEVICE)

# Get the model parameters and save for later.
MAX_SEQ_LENGTH = encoder.get_max_seq_length()
EMBEDDING_LENGTH = encoder.get_sentence_embedding_dimension()
이제 HuggingFace 체크포인트에서 초기화한 인코더를 사용하여 임베딩을 생성합니다. 모든 데이터를 딕셔너리 목록으로 함께 조립합니다.
chunk_list = []
for chunk in chunks:
    # Generate embeddings using encoder from HuggingFace.
    embeddings = torch.tensor(encoder.encode([chunk.page_content]))
    embeddings = F.normalize(embeddings, p=2, dim=1)
    converted_values = list(map(np.float32, embeddings))[0]
    # Assemble embedding vector, original text chunk, metadata.
    chunk_dict = {
        'vector': converted_values,
        'text': chunk.page_content,
        'source': chunk.metadata['source'],
        'h1': chunk.metadata['h1'][:50],
        'h2': chunk.metadata['h1'][:50],}
    chunk_list.append(chunk_dict)
4단계: Milvus 인덱스 생성 및 데이터 삽입
이 단계에서는 각 원본 텍스트 청크에 대해 쿼드러플릿(vector, text, source, h1, h2)을 데이터베이스에 작성합니다.
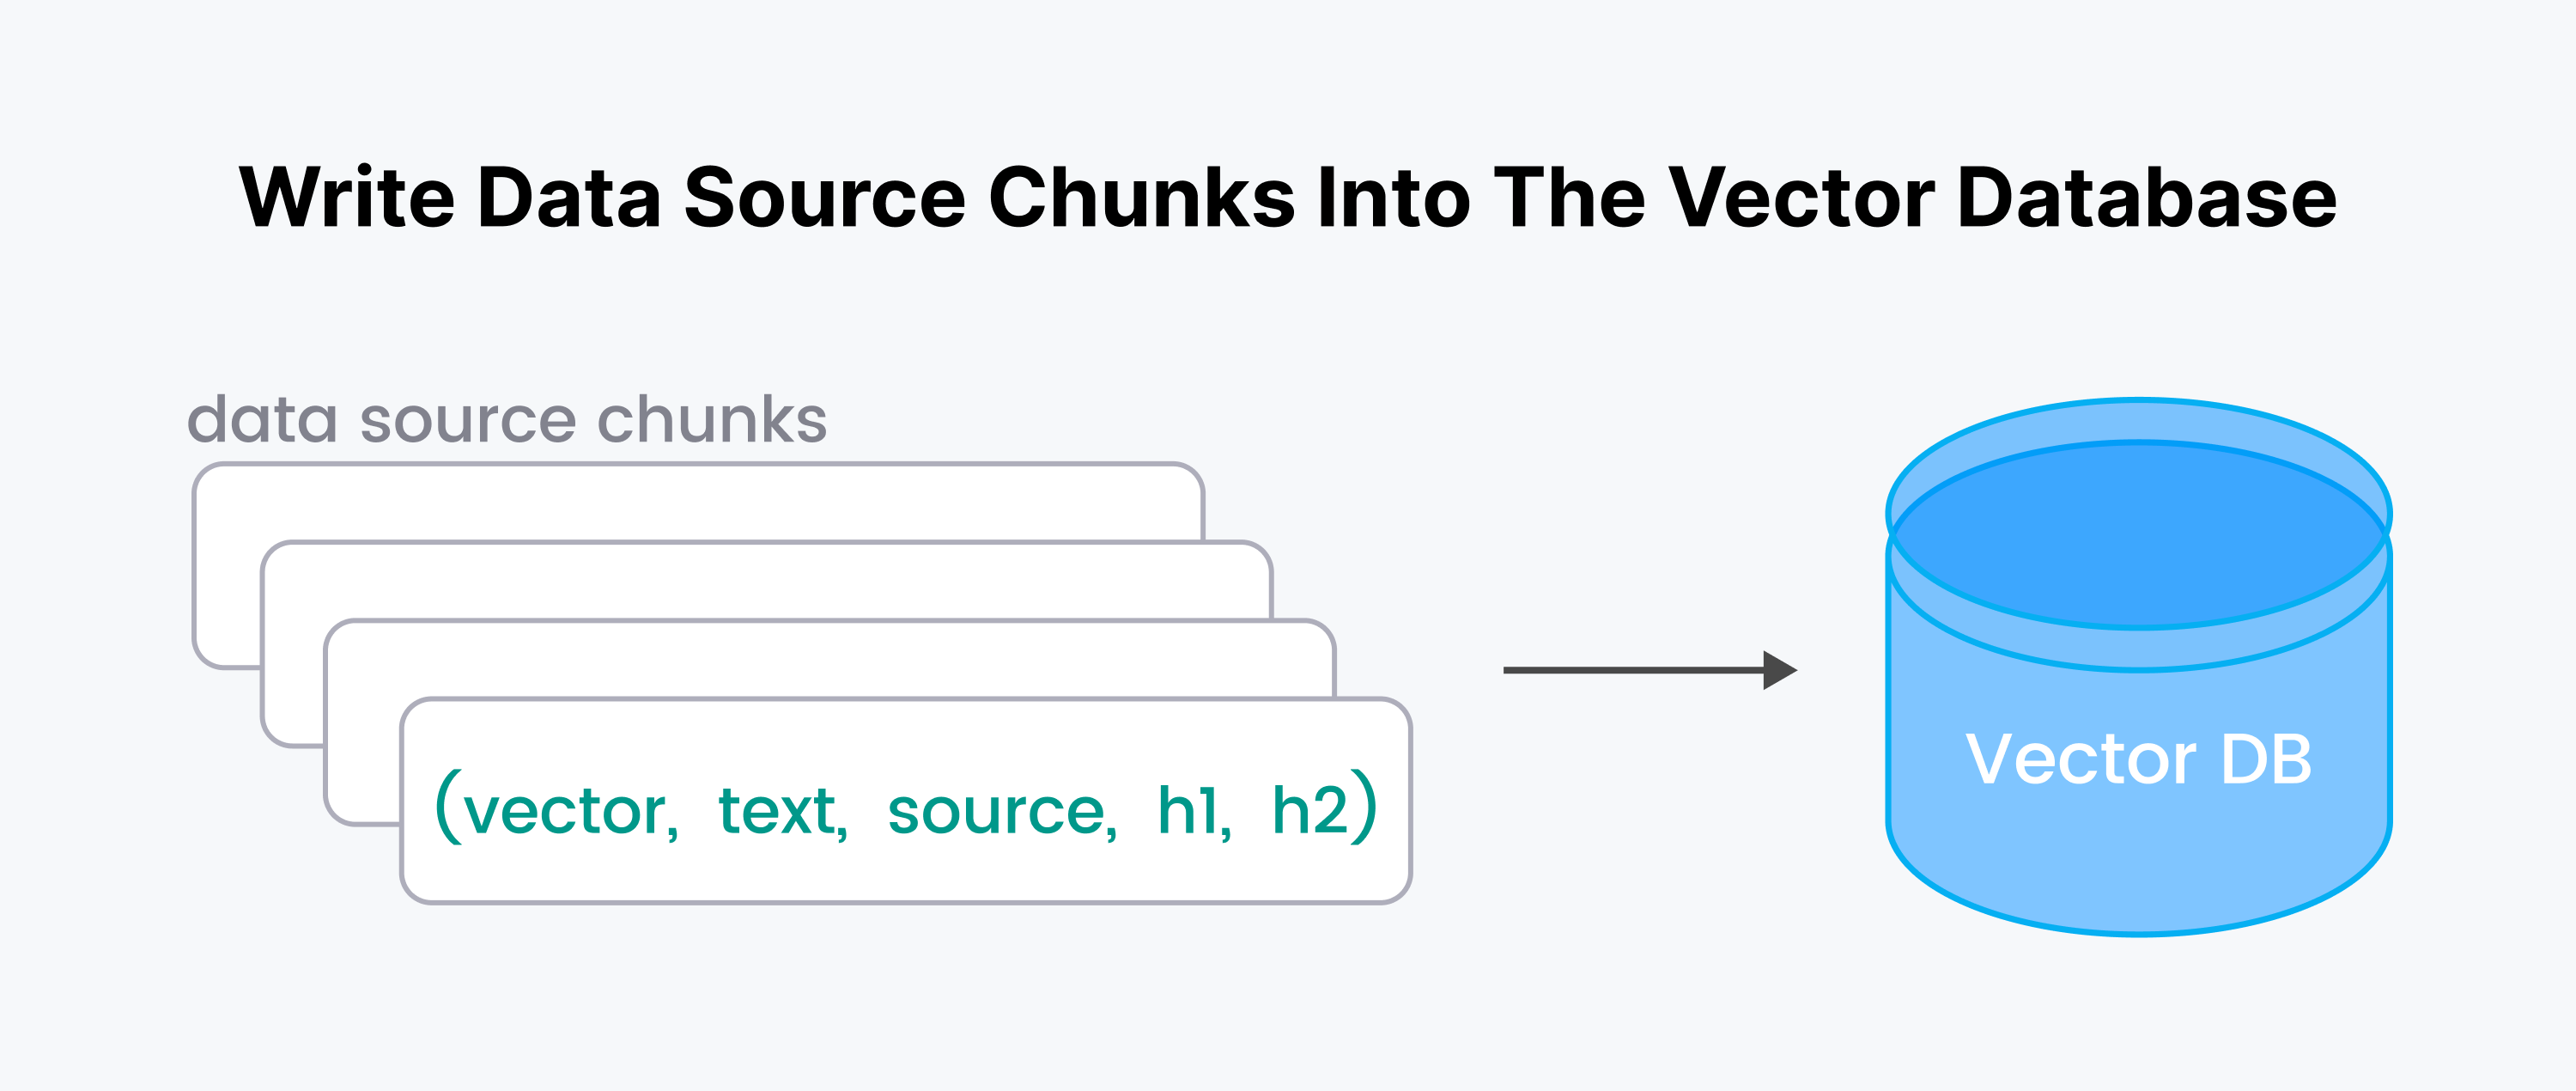
Milvus 서버를 시작하고 연결해 보겠습니다. 서버리스 클라우드 호스팅 Milvus를 사용하려면 ZILLIZ_API_KEY가 필요합니다. 이전 블로그인 Milvus에 연결하기에서 Zilliz에 연결하는 방법을 보여드렸습니다.
#pip install pymilvus
from pymilvus import connections

ENDPOINT=”https://xxxx.api.region.zillizcloud.com:443”
connections.connect(
  uri=ENDPOINT,
  token=TOKEN)
MilvusDocs라는 Milvus 컬렉션(데이터베이스 테이블과 비슷하다고 생각하면 됩니다)을 생성합니다. 컬렉션은 스키마와 인덱스를 사용합니다. 스키마는 인코더 모델의 임베딩 길이를 사용합니다.
from pymilvus import (
   FieldSchema, DataType,
   CollectionSchema, Collection)

# 1. Define a minimum expandable schema.
fields = [
   FieldSchema(“pk”, DataType.INT64, is_primary=True, auto_id=True),
   FieldSchema(“vector”, DataType.FLOAT_VECTOR, dim=768),]
schema = CollectionSchema(
   fields,
   enable_dynamic_field=True,)

# 2. Create the collection.
mc = Collection(“MilvusDocs”, schema)

# 3. Index the collection.
mc.create_index(
   field_name=”vector”,
   index_params={
       “index_type”: “AUTOINDEX”,
       “metric_type”: “COSINE”,}
Pinecone과 달리, Milvus/Zilliz에서 모든 데이터를 삽입하고 임베딩 인덱스를 채우는 작업은 빠릅니다!
# Insert data into the Milvus collection.
insert_result = mc.insert(chunk_list)

# After final entity is inserted, call flush
# to stop growing segments left in memory.
mc.flush()
print(mc.partitions)

5단계: 문서에 대해 질문하기
이제 Semantic search의 강력한 기능을 사용하여 사용자 지정 문서에 대해 질문할 준비가 되었습니다. Semantic search는 벡터 공간에서 최근접 이웃 기법을 사용하여 사용자의 질문에 답하는 가장 가까운 일치 문서를 찾습니다. Semantic search는 단순히 키워드를 일치시키는 것이 아니라 질문과 문서 뒤에 있는 의미를 이해하는 것을 목표로 합니다. 검색 중에 Milvus는 메타데이터를 활용하여 검색 경험을 향상할 수도 있습니다(Milvus API 옵션 expr=에서 boolean expressions 사용).
# Define a sample question about your data.
QUESTION = "what is the default distance metric used in AUTOINDEX?"
QUERY = [question]

# Before conducting a search, load the data into memory.
mc.load()
Embed the question using the same encoder.
embedded_question = torch.tensor(encoder.encode([QUESTION]))
Normalize embeddings to unit length.
embedded_question = F.normalize(embedded_question, p=2, dim=1)
Convert the embeddings to list of list of np.float32.
embedded_question = list(map(np.float32, embedded_question))
Return top k results with AUTOINDEX.
TOP_K = 5
Run semantic vector search using your query and the vector database.
start_time = time.time() results = mc.search( data=embedded_question, anns_field="vector", # No params for AUTOINDEX param={}, # Boolean expression if any expr="", output_fields=["h1", "h2", "text", "source"], limit=TOP_K, consistency_level="Eventually")
elapsed_time = time.time() - start_time print(f"Milvus search time: {elapsed_time} sec")

아래에서는 검색된 내용을 간단히 살펴봅니다. 그런 다음 모든 텍스트를 `context` 필드에 채워 넣습니다.
for n, hits in enumerate(results): print(f"{n}th query result") for hit in hits: print(hit)
Assemble the context as a stuffed string.
context = "" for r in results[0]: text = r.entity.text context += f"{text} "
Also save the context metadata to retrieve along with the answer.
context_metadata = { "h1": results[0][0].entity.h1, "h2": results[0][0].entity.h2, "source": results[0][0].entity.source,}

위에서 실제로 5개의 텍스트 청크가 검색된 것을 볼 수 있습니다. 특히 첫 번째 청크에는 기본 메트릭에 대한 질문의 답이 포함되어 있습니다. **Milvus API 옵션 `output_fields=`를 사용해 검색했기 때문에, 소스와 인용 메타데이터가 청크와 함께 검색됩니다.**
id: 445766022949255988, distance: 0.708217978477478, entity: { 'chunk': "...# Optional, default MetricType.L2 } timeout (float) – An optional duration of time in seconds to allow for the RPC. …", 'source': 'https://pymilvus.readthedocs.io/en/latest/api.html', 'h1': 'API reference', 'h2': 'Client'}
## 6단계: 검색된 컨텍스트를 사용해 사용자의 질문에 대한 채팅 응답을 생성하도록 LLM 사용하기

HuggingFace에서 사용할 수 있는 공개된 아주 작은 생성형 AI 모델, 즉 LLM을 사용하겠습니다.
#pip install transformers from transformers import AutoTokenizer, pipeline
tiny_llm = "deepset/tinyroberta-squad2" tokenizer = AutoTokenizer.from_pretrained(tiny_llm)
context cannot be empty so just put random text in it.
QA_input = { 'question': question, 'context': 'The quick brown fox jumped over the lazy dog'}
nlp = pipeline('question-answering', model=tiny_llm, tokenizer=tokenizer) result = nlp(QA_input)
print(f"Question: {question}") print(f"Answer: {result['answer']}")

답변은 그다지 도움이 되지 않았습니다! 이제 검색된 컨텍스트를 사용해 같은 질문을 해봅니다.
QA_input = { 'question': question, 'context': context,} nlp = pipeline('question-answering', model=tiny_llm, tokenizer=tokenizer) result = nlp(QA_input)
Print the question, answer, grounding sources and citations.
Answer = assemble_grounding_sources(result[‘answer’], context_metadata) print(f"Question: {question}") print(answer)

그 답변은 조금 더 나아 보입니다! 오픈 소스 LLM을 사용해 우리 자체 데이터에서 무료로 검색을 연습해 보았습니다. **이제 OpenAI GPT에 유료 호출을 해보겠습니다. 간단한 오픈 소스 LLM과 같은 답변이지만 더 사람다운 답변을 기대합니다.**
def prepare_response(response): return response["choices"][-1]["message"]["content"]
def generate_response( llm, temperature=0.0, #0 for reproducible experiments grounding_sources=None, system_content="", assistant_content="", user_content=""):
response = openai.ChatCompletion.create(
    model=llm,
    temperature=temperature,
    api_key=openai.api_key,
    messages=[
        {"role": "system", "content": system_content},
        {"role": "assistant", "content": assistant_content},
        {"role": "user", "content": user_content}, ])
    answer = prepare_response(response=response)

    # Add the grounding sources and citations.
    answer = assemble_grounding_sources(answer, grounding_sources)
    return answer
Generate response
response = generate_response( llm="gpt-3.5-turbo-1106", temperature=0.0, grounding_sources=context_metadata, system_content="Answer the question using the context provided. Be succinct.", user_content=f"question: {QUESTION}, context: {context}")
Print the question, answer, grounding sources and citations.
print(f"Question: {QUESTION}") print(response)

## 요약
우리는 사용자 지정 문서에 대한 처음부터 끝까지의 RAG 검색 및 질의응답 챗봇을 시연했습니다. 무료로 여러분의 데이터를 사용해 검색하고 질문에 답하면서 반복 작업을 수행하는 것이 얼마나 쉬운지 살펴보았습니다. 이는 LangChain, Milvus, 그리고 인코더와 채팅 생성을 위한 오픈 소스 LLM 덕분에 가능했습니다. 검색 중에 Milvus는 출처와 인용을 제공했습니다(데이터 로드 중 metadata에 해당 필드를 추가하고 API 검색 호출에서 ‘output_fields=’를 사용하기만 하면 됩니다). 마지막으로, 이 접근 방식은 거의 항상 데이터에 대한 무료 호출을 수행하므로 비용을 절감한다는 점을 확인했습니다 - 검색, 평가, 개발 반복 작업입니다. 최종 채팅 생성 단계에서만 OpenAI에 유료 호출을 한 번 수행합니다.
## Milvus와 Zilliz를 시작하기 위한 추가 리소스
- [Vector Database 101 블로그 시리즈](https://zilliz.com/learn/what-is-vector-database)
- [사용 사례에 적합한 Vector Database를 찾기 위한 벤치마킹](https://zilliz.com/learn/open-source-vector-database-benchmarking-your-way)
- [Zilliz 통합 허브](https://zilliz.com/product/integrations)
- [GPTCache를 사용한 100배 더 빠른 응답과 비용 절감](https://zilliz.com/blog/building-llm-apps-100x-faster-responses-drastic-cost-reduction-using-gptcache)
- [NVIDIA Merlin과 함께 Milvus를 사용하는 추천 워크플로](https://zilliz.com/blog/efficient-vector-similarity-search-recommender-workflows-using-milvus-nvidia-merlin)
- [실시간 AI를 위한 Kafka Connector](https://zilliz.com/blog/announce-confluent-kafka-connector-for-Milvus-and-Zilliz-unlock-power-of-real-time-ai)
계속 읽기

Zilliz Cloud Now Available in AWS Asia Pacific (Seoul)
Zilliz Cloud is now available in AWS Seoul — low-latency vector search, in-country data residency, and one-step migration for Korean AI teams. 31 regions across 5 clouds.

Introducing Zilliz MCP Server: Natural Language Access to Your Vector Database
Developers can easily manage and query vector databases with natural language via Zilliz MCP Server in AI-native environments.
Proactive Monitoring for Vector Database: Zilliz Cloud Integrates with Datadog
we're excited to announce Zilliz Cloud's integration with Datadog, enabling comprehensive monitoring and observability for your vectorDB deployments.