




AI로 나만의 셀러브리티 스타일리스트 찾기(2부)
이전 블로그 게시물인 "AI를 사용하여 당신의 셀러브리티 스타일리스트 찾기"에서 저는 Milvus와 같은 오픈 소스 AI 네이티브 벡터 데이터베이스, 그리고 Hugging Face 모델 같은 인공지능(AI) 기술을 활용하여 자신의 스타일과 어울리는 셀러브리티 스타일 선택을 찾는 방법을 설명했습니다. 이번 후속 게시물에서는 한 단계 더 나아가, 이전 프로젝트의 일부 코드를 변경하여 더 상세하고 정확한 결과를 얻는 방법을 보여드리겠습니다. 또한 이 프로젝트를 직접 확장할 수 있는 방법에 대한 제안도 제공하겠습니다.
이 프로젝트를 직접 시도해 보고 싶다면 photos와 완성된 notebook을 다운로드하세요. 이전 블로그에서 다룬 프로젝트에 관심이 있다면 사용된 사진과 튜토리얼을 확인할 수 있습니다.
이전 Fashion AI 프로젝트 튜토리얼 요약
이 프로젝트를 자세히 살펴보기 전에, 이전 게시물에서 다룬 튜토리얼을 간단히 요약해 보겠습니다. 따라서 맥락을 이해하기 위해 이 페이지를 벗어날 필요가 없습니다.
이미지 조작에 필요한 모든 라이브러리 가져오기
코드는 이미지 조작에 필요한 모든 라이브러리를 가져오는 것으로 시작합니다. 여기에는 특징 추출을 위한 torch, transformers의 segformer 객체, matplotlib, 그리고 Resize, masks_to_boxes, crop과 같은 일부 torchvision 가져오기가 포함됩니다.
import torch
from torch import nn, tensor
from transformers import AutoFeatureExtractor, SegformerForSemanticSegmentation
import matplotlib.pyplot as plt
from torchvision.transforms import Resize
import torchvision.transforms as T
from torchvision.ops import masks_to_boxes
from torchvision.transforms.functional import crop
셀러브리티 이미지 전처리
이미지 조작에 필요한 모든 패키지를 가져온 후에는 이미지를 처리하기 시작할 수 있습니다. 다음 세 가지 함수(get_segmentation, get_masks, crop_images)는 의류 아이템을 세그먼트화하고 추가 수집을 위해 잘라내는 데 사용됩니다.
def get_segmentation(extractor, model, image):
    inputs = extractor(images=image, return_tensors="pt")

    outputs = model(**inputs)
    logits = outputs.logits.cpu()

    upsampled_logits = nn.functional.interpolate(
        logits,
        size=image.size[::-1],
        mode="bilinear",
        align_corners=False,
    )

    pred_seg = upsampled_logits.argmax(dim=1)[0]
    return pred_seg

# returns two lists masks (tensor) and obj_ids (int)
# "mattmdjaga/segformer_b2_clothes" from hugging face
def get_masks(segmentation):
    obj_ids = torch.unique(segmentation)
    obj_ids = obj_ids[1:]
    masks = segmentation == obj_ids[:, None, None]
    return masks, obj_ids

def crop_images(masks, obj_ids, img):
    boxes = masks_to_boxes(masks)
    crop_boxes = []
    for box in boxes:
        crop_box = tensor([box[0], box[1], box[2]-box[0], box[3]-box[1]])
        crop_boxes.append(crop_box)
    preprocess = T.Compose([
        T.Resize(size=(256, 256)),
        T.ToTensor()
    ])
    cropped_images = {}
    for i in range(len(crop_boxes)):
        crop_box = crop_boxes[i]
        cropped = crop(img, crop_box[1].item(), crop_box[0].item(), crop_box[3].item(), crop_box[2].item())
        cropped_images[obj_ids[i].item()] = preprocess(cropped)
    return cropped_images
이미지 데이터를 벡터 데이터베이스에 저장하기
이미지 데이터를 저장하기 위해 오픈 소스 AI 네이티브 벡터 데이터베이스인 Milvus를 사용합니다. 시작하려면 이 프로젝트의 photos zip 파일의 압축을 풀고, 해당 폴더를 노트북과 동일한 루트 디렉터리에 포함하세요. 이 단계를 완료하면 아래 코드를 실행하여 이미지를 처리하고 데이터를 Milvus에 저장할 수 있습니다.
import os
image_paths = []
for celeb in os.listdir("./photos"):
    for image in os.listdir(f"./photos/{celeb}/"):
        image_paths.append(f"./photos/{celeb}/{image}")

from milvus import default_server
from pymilvus import utility, connections
default_server.start()
connections.connect(host="127.0.0.1", port=default_server.listen_port)
DIMENSION = 2048
BATCH_SIZE = 128
COLLECTION_NAME = "fashion"
TOP_K = 3
from pymilvus import FieldSchema, CollectionSchema, Collection, DataType

fields = [
    FieldSchema(name="id", dtype=DataType.INT64, is_primary=True, auto_id=True),
    FieldSchema(name='filepath', dtype=DataType.VARCHAR, max_length=200),
    FieldSchema(name="name", dtype=DataType.VARCHAR, max_length=200),
    FieldSchema(name="seg_id", dtype=DataType.INT64),
    FieldSchema(name='embedding', dtype=DataType.FLOAT_VECTOR, dim=DIMENSION)
]

schema = CollectionSchema(fields=fields)
collection = Collection(name=COLLECTION_NAME, schema=schema)
index_params = {
    "index_type": "IVF_FLAT",
    "metric_type": "L2",
    "params": {"nlist": 128},
}
collection.create_index(field_name="embedding", index_params=index_params)
collection.load()
다음으로, 아래 코드를 실행하여 Hugging Face의 Nvidia ResNet 50 모델을 사용해 임베딩을 생성할 수 있습니다.
# run this before importing th resnet50 model if you run into an SSL certificate URLError
import ssl
ssl._create_default_https_context = ssl._create_unverified_context
# Load the embedding model with the last layer removed
embeddings_model = torch.hub.load('NVIDIA/DeepLearningExamples:torchhub', 'nvidia_resnet50', pretrained=True)
embeddings_model = torch.nn.Sequential(*(list(embeddings_model.children())[:-1]))
embeddings_model.eval()
아래 함수는 데이터를 임베딩하고 삽입하는 방법을 정의합니다. 그다음 코드는 모든 이미지를 순회하며 이를 임베딩하고 Milvus에 삽입합니다.
참고: 아래의 많은 구성 요소는 새로운 Milvus 동적 스키마 기능을 활용할 때 변경되거나 제거될 것입니다.
def embed_insert(data, collection, model):
    with torch.no_grad():
        output = model(torch.stack(data[0])).squeeze()
        collection.insert([data[1], data[2], data[3], output.tolist()])
from PIL import Image
data_batch = [[], [], [], []]

for path in image_paths:
    image = Image.open(path)
    path_split = path.split("/")
    name = " ".join(path_split[2].split("_"))
    segmentation = get_segmentation(extractor, model, image)
    masks, ids = get_masks(segmentation)
    cropped_images = crop_images(masks, ids, image)
    for key, image in cropped_images.items():
        data_batch[0].append(image)
        data_batch[1].append(path)
        data_batch[2].append(name)
        data_batch[3].append(key)
        if len(data_batch[0]) % BATCH_SIZE == 0:
            embed_insert(data_batch, collection, embeddings_model)
            data_batch = [[], [], [], []]

if len(data_batch[0]) != 0:
    embed_insert(data_batch, collection, embeddings_model)

collection.flush()
벡터 데이터베이스 쿼리하기
다음 코드는 입력 이미지로 Milvus를 쿼리하고 각 의류 항목에 대해 상위 세 개의 결과를 검색하는 방법을 보여줍니다.
def embed_search_images(data, model):
    with torch.no_grad():
    output = model(torch.stack(data))
    if len(output) > 1:
        return output.squeeze().tolist()
    else:
        return torch.flatten(output, start_dim=1).tolist()
# data_batch[0] is a list of tensors
# data_batch[1] is a list of filepaths to the images (string)
# data_batch[2] is a list of the names of the people in the images (string)
# data_batch[3] is a list of segmentation keys (int)
data_batch = [[], [], [], []]

search_paths = ["./photos/Taylor_Swift/Taylor_Swift_3.jpg", "./photos/Taylor_Swift/Taylor_Swift_8.jpg"]

for path in search_paths:
    image = Image.open(path)
    path_split = path.split("/")
    name = " ".join(path_split[2].split("_"))
    segmentation = get_segmentation(extractor, model, image)
    masks, ids = get_masks(segmentation)
    cropped_images = crop_images(masks, ids, image)
    for key, image in cropped_images.items():
        data_batch[0].append(image)
        data_batch[1].append(path)
        data_batch[2].append(name)
        data_batch[3].append(key)

embeds = embed_search_images(data_batch[0], embeddings_model)
import time
start = time.time()
res = collection.search(embeds,
    anns_field='embedding',
    param={"metric_type": "L2",
        "params": {"nprobe": 10}},
    limit=TOP_K,
    output_fields=['filepath'])
finish = time.time()
print(finish - start)
for index, result in enumerate(res):
    print(index)
    print(result)
더 많은 패턴 매칭: 각 이미지에서 객체 선택하기
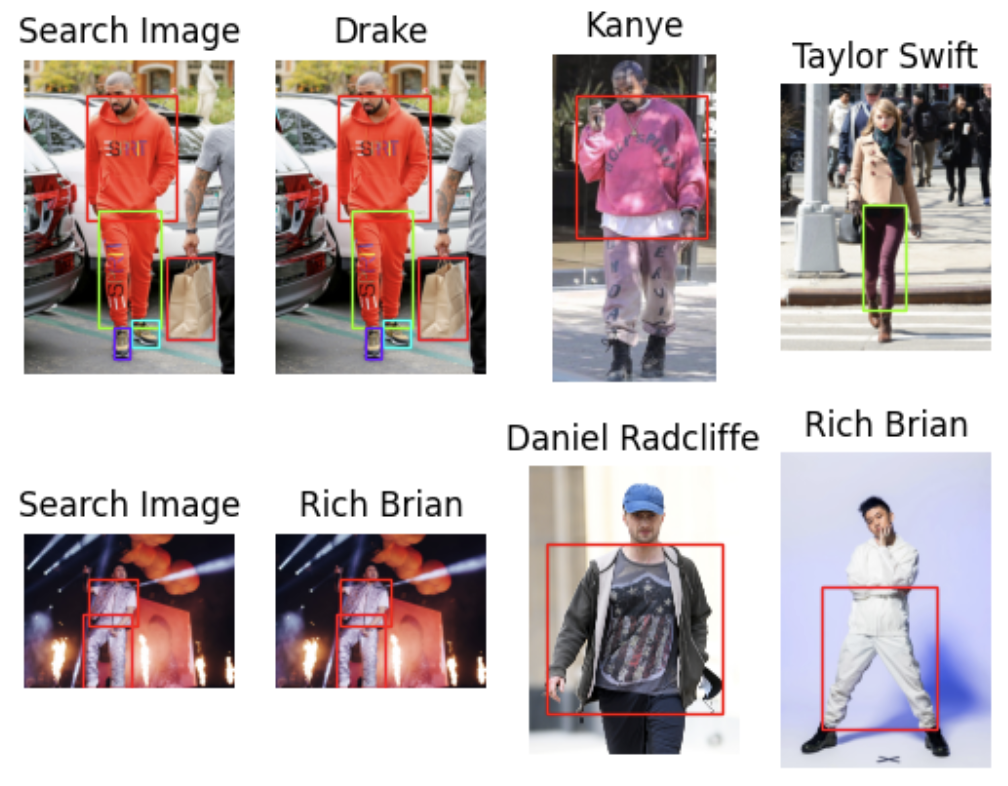
위에서 요약한 튜토리얼을 따르면, 검색하는 각 의류 품목에 대해 상위 세 개의 셀러브리티 스타일 매치를 찾아낼 수 있습니다. 또한 매칭된 항목의 바운딩 박스 없이 아래와 같은 이미지를 만들 수도 있습니다. 이 섹션에서는 이전 튜토리얼에서 사용한 코드에 몇 가지 변경을 더해, 자신의 스타일에 더 가까운 패턴의 패션 스타일을 찾는 방법을 설명하겠습니다.
 image
image
이미지 조작에 필요한 모든 라이브러리 가져오기
먼저, 코드에서 이미지 조작에 필요한 모든 라이브러리를 가져옵니다. 이미 완료했다면 이 단계는 건너뛰어도 됩니다.
import torch
from torch import nn, tensor
from transformers import AutoFeatureExtractor, SegformerForSemanticSegmentation
import matplotlib.pyplot as plt
from torchvision.transforms import Resize
import torchvision.transforms as T
from torchvision.ops import masks_to_boxes
from torchvision.transforms.functional import crop
이미지 전처리하기
이미지 조작에 필요한 모든 패키지를 가져왔으면, get_segmentation, get_masks, crop_images라는 세 가지 함수가 포함된 이미지 세그멘테이션 프로세스를 진행합니다.
get_segmentation 함수에는 어떤 코드 변경도 할 필요가 없습니다.
get_masks 함수의 경우, wanted 목록의 세그멘테이션 ID에 해당하는 세그멘테이션만 가져오면 됩니다. 이는 Hugging Face의 모델 카드에 명시된 것처럼 의류 품목에 대한 세그멘테이션 ID를 포함하는 새로운 추가 항목입니다.
가장 많은 코드 변경은 crop_image 함수에 적용합니다. 이전 튜토리얼에서는 이 함수가 잘라낸 이미지 목록을 반환했습니다. 일부 코드를 변경한 후에는 이제 세 가지 객체, 즉 잘라낸 이미지의 임베딩, 원본 이미지에서 박스 좌표 목록, 세그멘테이션 ID 목록을 반환합니다. 이 새로운 설정은 임베딩을 배치 삽입 단계에서 변환 단계로 이동시킵니다.
wanted = [1, 3, 4, 5, 6, 7, 8, 9, 10, 16, 17]
def get_segmentation(image):
    inputs = extractor(images=image, return_tensors="pt")

    outputs = segmentation_model(**inputs)
    logits = outputs.logits.cpu()

    upsampled_logits = nn.functional.interpolate(
        logits,
        size=image.size[::-1],
        mode="bilinear",
        align_corners=False,
    )

    pred_seg = upsampled_logits.argmax(dim=1)[0]
    return pred_seg

# 두 개의 리스트 masks(tensor)와 obj_ids(int)를 반환합니다
# hugging face의 "mattmdjaga/segformer_b2_clothes"
def get_masks(segmentation):
    obj_ids = torch.unique(segmentation)
    obj_ids = obj_ids[1:]
    wanted_ids = [x.item() for x in obj_ids if x in wanted]
    wanted_ids = torch.Tensor(wanted_ids)
    masks = segmentation == wanted_ids[:, None, None]
    return masks, obj_ids

def crop_images(masks, obj_ids, img):
    boxes = masks_to_boxes(masks)
    crop_boxes = []
    for box in boxes:
        crop_box = tensor([box[0], box[1], box[2]-box[0], box[3]-box[1]])
        crop_boxes.append(crop_box)
    preprocess = T.Compose([
        T.Resize(size=(256, 256)),
        T.ToTensor()
    ])
    cropped_images = []
    seg_ids = []
    for i in range(len(crop_boxes)):
        crop_box = crop_boxes[i]
        cropped = crop(img, crop_box[1].item(), crop_box[0].item(), crop_box[3].item(), crop_box[2].item())
        cropped_images.append(preprocess(cropped))
        seg_ids.append(obj_ids[i].item())
    with torch.no_grad():
        embeddings = embeddings_model(torch.stack(cropped_images)).squeeze().tolist()
    return embeddings, boxes.tolist(), seg_ids
이제 이미지가 준비되었으니, 이미지를 로드할 차례입니다. 이 단계에는 배치 삽입이 포함되며, 이는 이전 튜토리얼에서 다루었습니다. 이번 튜토리얼에서는 리스트의 리스트 대신 딕셔너리 리스트로 모든 데이터를 한 번에 삽입할 것입니다. 저는 이 삽입 방식이 훨씬 더 깔끔하다고 생각하며, 삽입 시점에 스키마에 새 필드를 추가할 수 있게 해줍니다. 이 경우에는 crop corner 리스트를 추가하겠습니다.
for path in image_paths:
    image = Image.open(path)
    path_split = path.split("/")
    name = " ".join(path_split[2].split("_"))
    segmentation = get_segmentation(image)
    masks, ids = get_masks(segmentation)
    embeddings, crop_corners, seg_ids = crop_images(masks, ids, image)
    inserts = [{"embedding": embeddings[x], "seg_id": seg_ids[x], "name": name, "filepath": path, "crop_corner": crop_corners[x]} for x in range(len(embeddings))]
    collection.insert(inserts)
    collection.flush()
벡터 데이터베이스 쿼리하기
이제 우리의 벡터 데이터베이스인 Milvus에서 쿼리를 수행할 차례입니다. 이전 튜토리얼에서 사용한 단계와 비교하면, 여기에는 몇 가지 차이점이 있습니다:
- 첫째, 이미지에서 우리가 관심을 두는 "matches"의 수를 다섯 개로 제한합니다.
- 둘째, 가장 가깝게 일치하는 이미지 세 개를 보여줍니다.
- 셋째, 서로 다른 색상으로 bounding box를 그리기 위한 color map을 얻는 함수를 추가합니다.
이제 matplotlib figure와 axes를 설정합니다. 그런 다음 모든 이미지를 순회하며 위에서 언급한 세 가지 처리 함수를 적용해 segmentations와 bounding boxes를 얻습니다.
이미지를 사전 처리한 후에는 Milvus에서 검색할 수 있습니다. 각 이미지가 포함하고 있는 "matching" 의류의 수를 기준으로 상위 세 개의 응답을 얻습니다. 마지막으로, 매치를 반환한 bounding boxes와 함께 결과를 출력합니다.
from pprint import pprint
from PIL import ImageDraw
from collections import Counter
import matplotlib.patches as patches

LIMIT = 5 # 분석할 의류 품목별 가장 가까운 매치 수
CLOSEST = 3 # 표시할 가장 가까운 이미지 수. CLOSEST <= Limit

search_paths = ["./photos/Taylor_Swift/Taylor_Swift_2.jpg", "./photos/Jenna_Ortega/Jenna_Ortega_6.jpg"] # 검색할 이미지

def get_cmap(n, name='hsv'):
    '''0, 1, ..., n-1의 각 인덱스를 서로 다른 RGB 색상에 매핑하는 함수를 반환합니다;
    키워드 인수 name은 표준 mpl colormap 이름이어야 합니다.
    출처: https://stackoverflow.com/questions/14720331/how-to-generate-random-colors-in-matplotlib'''
    return plt.cm.get_cmap(name, n)

# 결과 서브플롯 생성
f, axarr = plt.subplots(max(len(search_paths), 2), CLOSEST + 1)

for search_i, path in enumerate(search_paths):
    # Generate crops and embeddings for all items found
    image = Image.open(path)
    segmentation = get_segmentation(image)
    masks, ids = get_masks(segmentation)
    embeddings, crop_corners, _ = crop_images(masks, ids, image)

# Generate color map
    cmap = get_cmap(len(crop_corners))

    # Display the first box with image being searched for
    axarr[search_i][0].imshow(image)
    axarr[search_i][0].set_title('Search Image')
    axarr[search_i][0].axis('off')
    for i, (x0, y0, x1, y1) in enumerate(crop_corners):
        rect = patches.Rectangle((x0, y0), x1-x0, y1-y0, linewidth=1, edgecolor=cmap(i), facecolor='none')
        axarr[search_i][0].add_patch(rect)

    # Search the database for all the crops
    start = time.time()
    res = collection.search(embeddings,
        anns_field='embedding',
        param={"metric_type": "L2",
        "params": {"nprobe": 10}, "offset": 0},
        limit=LIMIT,
        output_fields=['filepath', 'crop_corner'])
    finish = time.time()

    print("Total Search Time: ", finish - start)

    # Summarize the top unique results and weight them based on position in results
    filepaths = []
    for hits in res:
        seen = set()
        for i, hit in enumerate(hits):
            if hit.entity.get("filepath") not in seen:
                seen.add(hit.entity.get("filepath"))
                filepaths.extend([hit.entity.get("filepath") for _ in range(len(hits) - i)])
    # Find the most commonly ranked result image
    counts = Counter(filepaths)
    most_common = [path for path, _ in counts.most_common(CLOSEST)]
    # For each image, extract the corresponding item found that correlates to search images
    matches = {}
    for i, hits in enumerate(res):
        matches[i] = {}
        tracker = set(most_common)
        for hit in hits:
            if hit.entity.get("filepath") in tracker:
                matches[i][hit.entity.get("filepath")] = hit.entity.get("crop_corner")
                tracker.remove( hit.entity.get("filepath"))
        # Display the most common images in results
    for res_i, res_path in enumerate(most_common):
    # Display each of the images next to search image
        image = Image.open(res_path)
        axarr[search_i][res_i+1].imshow(image)
        axarr[search_i][res_i+1].set_title(" ".join(res_path.split("/")[2].split("_")))
        axarr[search_i][res_i+1].axis('off')
# Add boudning boxes for all matched items
    for key, value in matches.items():
        if res_path in value:
            x0, y0, x1, y1 = value[res_path]
            rect = patches.Rectangle((x0, y0), x1-x0, y1-y0, linewidth=1, edgecolor=cmap(key), facecolor='none')
            axarr[search_i][res_i+1].add_patch(rect)
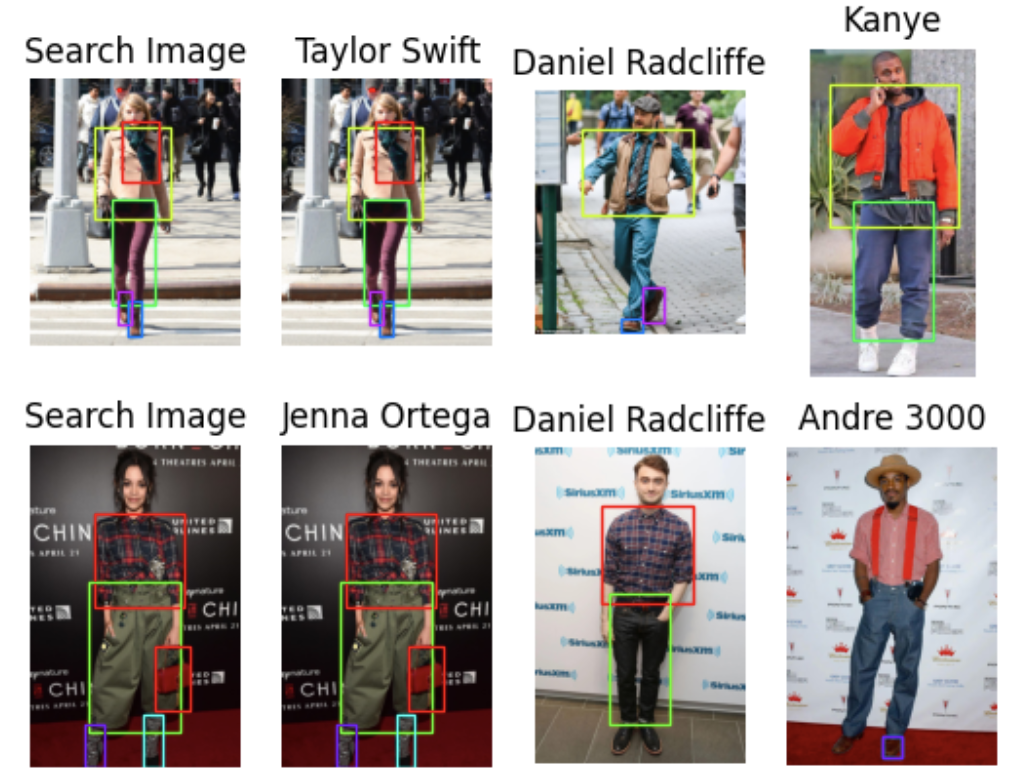
위 단계를 완료하면 아래 또는 이 세션의 시작 부분과 유사한 결과를 얻을 수 있습니다.
 image
image
다음 단계는 무엇인가요? 가능한 프로젝트 확장
저는 당분간 다른 프로젝트를 진행하기 위해 이 프로젝트를 보류하고 있지만, 원한다면 여러분이 확장해도 좋습니다! 다음은 가능한 세 가지 확장입니다.
첫째, 비교 게임을 조금 더 구체화할 수 있습니다. 예를 들어, 두 신발을 하나의 아이템으로 표시하는 것처럼 분리된 아이템을 함께 그룹화할 수 있습니다. 또한 더 많은 비교를 위해 유명인이나 친구들의 사진을 더 추가할 수도 있습니다.
둘째, 이 프로젝트를 패션 식별기나 추천 시스템으로 전환할 수 있습니다. 유명인의 이미지를 사용하는 대신 온라인에서 구매할 수 있는 옷 사진을 사용할 수 있습니다. 사용자가 사진을 업로드하면 이를 벡터 데이터베이스의 이미지와 비교하고 사용자에게 가장 가까운 의류 아이템을 제안할 수 있습니다.
셋째, 스타일 생성기를 만들 수 있는데, 이는 더 어려울 수 있습니다. 이를 수행하는 방법은 다양하지만, 한 가지 아이디어는 사용자의 여러 사진을 가져와 이를 기반으로 제안을 생성하는 것입니다. 이 접근 방식은 생성형 이미지 모델을 사용해 스타일 제안을 제공하고, 이를 참고용으로 사용자들의 가장 가까운 사진과 비교하는 것을 포함합니다. 그런 다음 이 비교를 바탕으로 타당한 것을 제안할 수 있습니다.
이 세 가지 확장은 Milvus와 같은 이미지 모델 및 벡터 데이터베이스를 사용하여 제 간단한 프로젝트를 향상시킬 수 있는 방법의 몇 가지 예시일 뿐입니다. 벡터 데이터베이스를 사용하면 다양한 유사도 검색 작업이 가능해지며, 이는 특히 사진을 비교할 때 유용합니다.
요약
이 튜토리얼에서는 Milvus의 새로운 동적 스키마를 사용하고, 특정 세그멘테이션 ID를 필터링하며, 매치된 항목의 바운딩 박스를 추적함으로써 첫 번째 셀러브리티 스타일 프로젝트를 확장했습니다. 또한 검색 결과를 정렬하여 매치 수를 기준으로 상위 세 개의 결과를 반환했습니다.
Milvus의 새로운 동적 스키마를 사용하면 딕셔너리 형식으로 데이터를 업로드할 때 추가 필드를 더할 수 있어, 처음에 리스트의 리스트를 배치 업로드하던 방식을 바꿀 수 있습니다. 또한 스키마를 변경하지 않고도 크롭 좌표를 추가할 수 있게 해주었습니다.
새로운 전처리 단계로, Hugging Face의 모델 카드에 기반하여 의류와 관련이 없는 특정 ID를 필터링했습니다. 이러한 ID는 get_masks 함수에서 필터링합니다. 재미있는 사실은, 해당 함수의 obj_ids 객체가 실제로는 텐서라는 점입니다.
또한 바운딩 박스를 추적했습니다. 임베딩 단계를 이미지 크롭 함수로 이동하고, 임베딩을 바운딩 박스 및 세그멘테이션 ID와 함께 반환했습니다. 그런 다음 동적 스키마를 사용하여 이러한 임베딩을 Milvus에 저장했습니다.
쿼리 시에는 반환된 모든 이미지를 포함된 바운딩 박스 수를 기준으로 집계하여, 다양한 의류 아이템을 통해 가장 가까운 셀러브리티 이미지를 찾을 수 있게 했습니다. 이제 여러분의 차례입니다. 제 제안을 활용해 패션 추천 시스템, 여러분과 친구들을 위한 더 나은 스타일 비교 시스템, 또는 생성형 패션 AI 앱과 같은 다른 무언가를 만들어볼 수 있습니다.
계속 읽기

A Few Notes from Databricks Data + AI Summit 2026: Why the Data Layer Matters Again
James Luan shares notes from Databricks Data + AI Summit 2026 on why production AI is pushing the data layer back to the center of infrastructure.
Why I’m Against Claude Code’s Grep-Only Retrieval? It Just Burns Too Many Tokens
Learn how vector-based code retrieval cuts Claude Code token consumption by 40%. Open-source solution with easy MCP integration. Try claude-context today.

How to Build an Enterprise-Ready RAG Pipeline on AWS with Bedrock, Zilliz Cloud, and LangChain
Build production-ready enterprise RAG with AWS Bedrock, Nova models, Zilliz Cloud, and LangChain. Complete tutorial with deployable code.