



Come creare un chatbot IA con Milvus e Towhee
Milvus, un database vettoriale open-source, è la spina dorsale perfetta per qualsiasi applicazione di IA che richieda capacità di ricerca vettoriale efficienti e scalabili, rendendolo una scelta eccellente per la gestione dei dati del tuo chatbot. Towhee è un framework emergente per workflow di machine learning che semplifica il processo di implementazione e orchestrazione di modelli ML complessi. Inoltre, rende lo sviluppo della tua applicazione gestibile e facile da comprendere.
In questo tutorial, imparerai come creare un semplice chatbot di IA con Python utilizzando Milvus e Towhee. Ti concentrerai su come acquisire dati non strutturati, analizzarli, archiviarli con embedding ed elaborare query.
Configurazione del tuo ambiente
Per prima cosa, crea un ambiente virtuale Python per eseguire il tuo chatbot.
Ecco una sessione shell da Linux. Crea l'ambiente, lo attiva e aggiorna pip all'ultima versione.
[egoebelbecker@ares milvus_chatbot]$ python -m venv ./chatbot_venv
[egoebelbecker@ares milvus_chatbot]$ source chatbot_venv/bin/activate
(chatbot_venv) [egoebelbecker@ares milvus_chatbot]$ pip install --upgrade pip
Requirement already satisfied: pip in ./chatbot_venv/lib64/python3.11/site-packages (22.2.2)
Collecting pip
  Using cached pip-23.1.2-py3-none-any.whl (2.1 MB)
Installing collected packages: pip
  Attempting uninstall: pip
    Found existing installation: pip 22.2.2
    Uninstalling pip-22.2.2:
      Successfully uninstalled pip-22.2.2
Successfully installed pip-23.1.2
Poi, installa i pacchetti necessari per eseguire il codice: pandas, jupyter, langchain, towhee, unstructured, milvus, pymilvus, sentence_transformers e gradio.
(chatbot_venv) [egoebelbecker@ares milvus_chatbot]$ pip install pandas jupyter langchain towhee unstructured milvus pymilvus sentence_transformers gradio
Raccolta di pandas
  Ottenimento delle informazioni sulle dipendenze per pandas da https://files.pythonhosted.org/packages/d0/28/88b81881c056376254618fad622a5e94b5126db8c61157ea1910cd1c040a/pandas-2.0.3-cp311-cp311-manylinux_2_17_x86_64.manylinux2014_x86_64.whl.metadata
  Uso della cache pandas-2.0.3-cp311-cp311-manylinux_2_17_x86_64.manylinux2014_x86_64.whl.metadata (18 kB)
Raccolta di jupyter
  Uso della cache jupyter-1.0.0-py2.py3-none-any.whl (2.7 kB)
(snip)
Installazione dei pacchetti raccolti: webencodings, wcwidth, pytz, pure-eval, ptyprocess, pickleshare, json5, ipython-genutils, filetype, fastjsonschema, executing, backcall, zipp, XlsxWriter, xlrd, widgetsnbextension, websocket-client, webcolors, urllib3, uri-template, tzdata, typing-extensions, traitlets, tqdm, tornado, tinycss2, tenacity, tabulate, soupsieve, sniffio, six, send2trash, rpds-py, rfc3986-validator, rfc3986, regex, pyzmq, PyYAML, python-magic, python-json-logger, pypandoc, pygments, pycparser, psutil, prompt-toolkit, prometheus-client, platformdirs, pkginfo, pillow, pexpect, parso, pandocfilters, packaging, overrides, olefile, numpy, nest-asyncio, mypy-extensions, multidict, more-itertools, mistune, mdurl, markupsafe, markdown, lxml, jupyterlab-widgets, jupyterlab-pygments, jsonpointer, joblib, jeepney, idna, greenlet, frozenlist, fqdn, et-xmlfile, docutils, defusedxml, decorator, debugpy, click, charset-normalizer, chardet, certifi, babel, attrs, async-timeout, async-lru, yarl, typing-inspect, terminado, SQLAlchemy, rfc3339-validator, requests, referencing, qtpy, python-pptx, python-docx, python-dateutil, pydantic, pdf2image, openpyxl, numexpr, nltk, msg-parser, matplotlib-inline, marshmallow, markdown-it-py, jupyter-core, jinja2, jedi, jaraco.classes, importlib-metadata, comm, cffi, bleach, beautifulsoup4, asttokens, anyio, aiosignal, stack-data, rich, requests-toolbelt, readme-renderer, pandas, openapi-schema-pydantic, langsmith, jupyter-server-terminals, jupyter-client, jsonschema-specifications, dataclasses-json, cryptography, arrow, argon2-cffi-bindings, aiohttp, SecretStorage, pdfminer.six, langchain, jsonschema, isoduration, ipython, argon2-cffi, unstructured, nbformat, keyring, ipykernel, twine, qtconsole, nbclient, jupyter-events, jupyter-console, ipywidgets, towhee, nbconvert, jupyter-server, notebook-shim, jupyterlab-server, jupyter-lsp, jupyterlab, notebook, jupyter
Installazione riuscita di PyYAML-6.0.1 SQLAlchemy-2.0.19 SecretStorage-3.3.3 XlsxWriter-3.1.2 aiohttp-3.8.5 aiosignal-1.3.1 anyio-3.7.1 argon2-cffi-21.3.0 argon2-cffi-bindings-21.2.0 arrow-1.2.3 asttokens-2.2.1 async-lru-2.0.4 async-timeout-4.0.2 attrs-23.1.0 babel-2.12.1 backcall-0.2.0 beautifulsoup4-4.12.2 bleach-6.0.0 certifi-2023.7.22 cffi-1.15.1 chardet-5.1.0 charset-normalizer-3.2.0 click-8.1.6 comm-0.1.3 cryptography-41.0.2 dataclasses-json-0.5.14 debugpy-1.6.7 decorator-5.1.1 defusedxml-0.7.1 docutils-0.20.1 et-xmlfile-1.1.0 executing-1.2.0 fastjsonschema-2.18.0 filetype-1.2.0 fqdn-1.5.1 frozenlist-1.4.0 greenlet-2.0.2 idna-3.4 importlib-metadata-6.8.0 ipykernel-6.25.0 ipython-8.14.0 ipython-genutils-0.2.0 ipywidgets-8.0.7 isoduration-20.11.0 jaraco.classes-3.3.0 jedi-0.19.0 jeepney-0.8.0 jinja2-3.1.2 joblib-1.3.1 json5-0.9.14 jsonpointer-2.4 jsonschema-4.18.4 jsonschema-specifications-2023.7.1 jupyter-1.0.0 jupyter-client-8.3.0 jupyter-console-6.6.3 jupyter-core-5.3.1 jupyter-events-0.7.0 jupyter-lsp-2.2.0 jupyter-server-2.7.0 jupyter-server-terminals-0.4.4 jupyterlab-4.0.3 jupyterlab-pygments-0.2.2 jupyterlab-server-2.24.0 jupyterlab-widgets-3.0.8 keyring-24.2.0 langchain-0.0.248 langsmith-0.0.15 lxml-4.9.3 markdown-3.4.4 markdown-it-py-3.0.0 markupsafe-2.1.3 marshmallow-3.20.1 matplotlib-inline-0.1.6 mdurl-0.1.2 mistune-3.0.1 more-itertools-10.0.0 msg-parser-1.2.0 multidict-6.0.4 mypy-extensions-1.0.0 nbclient-0.8.0 nbconvert-7.7.3 nbformat-5.9.2 nest-asyncio-1.5.7 nltk-3.8.1 notebook-7.0.1 notebook-shim-0.2.3 numexpr-2.8.4 numpy-1.25.2 olefile-0.46 openapi-schema-pydantic-1.2.4 openpyxl-3.1.2 overrides-7.3.1 packaging-23.1 pandas-2.0.3 pandocfilters-1.5.0 parso-0.8.3 pdf2image-1.16.3 pdfminer.six-20221105 pexpect-4.8.0 pickleshare-0.7.5 pillow-10.0.0 pkginfo-1.9.6 platformdirs-3.10.0 prometheus-client-0.17.1 prompt-toolkit-3.0.39 psutil-5.9.5 ptyprocess-0.7.0 pure-eval-0.2.2 pycparser-2.21 pydantic-1.10.12 pygments-2.15.1 pypandoc-1.11 python-dateutil-2.8.2 python-docx-0.8.11 python-json-logger-2.0.7 python-magic-0.4.27 python-pptx-0.6.21 pytz-2023.3 pyzmq-25.1.0 qtconsole-5.4.3 qtpy-2.3.1 readme-renderer-40.0 referencing-0.30.0 regex-2023.6.3 requests-2.31.0 requests-toolbelt-1.0.0 rfc3339-validator-0.1.4 rfc3986-2.0.0 rfc3986-validator-0.1.1 rich-13.5.1 rpds-py-0.9.2 send2trash-1.8.2 six-1.16.0 sniffio-1.3.0 soupsieve-2.4.1 stack-data-0.6.2 tabulate-0.9.0 tenacity-8.2.2 terminado-0.17.1 tinycss2-1.2.1 tornado-6.3.2 towhee-1.1.1 tqdm-4.65.0 traitlets-5.9.0 twine-4.0.2 typing-extensions-4.7.1 typing-inspect-0.9.0 tzdata-2023.3 unstructured-0.8.7 uri-template-1.3.0 urllib3-2.0.4 wcwidth-0.2.6 webcolors-1.13 webencodings-0.5.1 websocket-client-1.6.1 widgetsnbextension-4.0.8 xlrd-2.0.1 yarl-1.9.2 zipp-3.16.2
(chatbot_venv) [egoebelbecker@ares milvus_chatbot]$
Puoi trovare un notebook Jupyter con il codice per questo tutorial qui. Scaricalo, avvia Jupyter e carica il notebook:
chatbot_venv) [egoebelbecker@ares milvus_chatbot]$ jupyter notebook milvus_chatbot.ipynb
[I 2023-07-31 11:29:01.748 ServerApp] Package notebook took 0.0000s to import
[I 2023-07-31 11:29:01.759 ServerApp] Package jupyter_lsp took 0.0108s to import
[W 2023-07-31 11:29:01.759 ServerApp] A `_jupyter_server_extension_points` function was not found in jupyter_lsp. Instead, a `_jupyter_server_extension_paths` function was found and will be used for now. This function name will be deprecated in future releases of Jupyter Server.
[I 2023-07-31 11:29:01.764 ServerApp] Package jupyter_server_terminals took 0.0045s to import
[I 2023-07-31 11:29:01.765 ServerApp] Package jupyterlab took 0.0000s to import
[I 2023-07-31 11:29:02.124 ServerApp] Package notebook_shim took 0.0000s to import
Creazione di un chatbot
Ora, mettiamoci al lavoro sul chatbot.
Archivio documenti
Il bot deve archiviare i blocchi di documenti e gli embedding che Towhee estrae da essi. È per questo che userai Milvus. Hai già installato Milvus Lite, una versione leggera di Milvus, sopra con la libreria milvus.
Puoi eseguire un server dalla riga di comando:
(chatbot_venv) [egoebelbecker@ares milvus_chatbot]$ milvus-server

    __  _________ _   ____  ______
   /  |/  /  _/ /| | / / / / / __/
  / /|_/ // // /_| |/ / /_/ /\ \
 /_/  /_/___/____/___/\____/___/ {Lite}

 Welcome to use Milvus!

 Version:   v2.2.12-lite
 Process:   139309
 Started:   2023-07-31 12:43:43
 Config:    /home/egoebelbecker/.milvus.io/milvus-server/2.2.12/configs/milvus.yaml
 Logs:      /home/egoebelbecker/.milvus.io/milvus-server/2.2.12/logs

 Ctrl+C to exit …
Oppure, come parte del codice della tua applicazione, come mostrato nel notebook:
from milvus import default_server

# Start Milvus service
default_server.start()

# # Stop Milvus service
# default_server.stop()
Impostare le variabili dell'applicazione e ottenere la chiave API OpenAI
Successivamente, imposta alcune variabili e ripulisci eventuali file SQLite rimanenti. Useremo SQLite di seguito per la cronologia della chat.
- MILVUS_URI - le informazioni di connessione per i server Milvus. Analizzate in host e porta.
- MILVUS_HOST - l'host su cui è in esecuzione Milvus.
- MILVUS_PORT - la porta su cui il server resta in ascolto.
- DROP_EXIST - elimina le collection Milvus esistenti all'avvio.
- EMBED_MODEL - il modello sentence_transformers che il codice userà per creare gli embedding
- COLLECTION_NAME - nome della collection Milvus per dati ed embedding
- DIM - la dimensione degli embedding che il modello crea per ogni porzione di testo
- OPENAI_API_KEY - chiave per l'API LLM
import getpass
import os

MILVUS_URI = 'http://localhost:19530'
[MILVUS_HOST, MILVUS_PORT] = MILVUS_URI.split('://')[1].split(':')
DROP_EXIST = True
EMBED_MODEL = 'all-mpnet-base-v2'
COLLECTION_NAME = 'chatbot_demo'
DIM = 768

OPENAI_API_KEY = getpass.getpass('Enter your OpenAI API key: ')

if os.path.exists('./sqlite.db'):
    os.remove('./sqlite.db')
Esegui questo codice per definire le variabili e rispondere al prompt per la chiave API.
Pipeline di esempio
Successivamente, è il momento di scaricare alcuni dati e archiviarli in Milvus. Ma prima di farlo, diamo un'occhiata a una pipeline di esempio per scaricare ed elaborare dati non strutturati.
Userai le pagine della documentazione di Towhee per questo esempio. Puoi provare siti diversi per vedere come il codice elabora diversi set di dati.
Questo codice usa le pipeline Towhee:
- input - avvia una nuova pipeline con la sorgente passata al suo interno
- map - usa ops.text_loader() per recuperare l'URL e mapparlo su 'doc'
- flat_map - usa ops.text_splitter() per elaborare il documento in "blocchi" per l'archiviazione
- output - chiude e prepara la pipeline per l'uso
Passa questa pipeline a DataCollection per vedere come funziona.
from towhee import pipe, ops, DataCollection

pipe_load = (
    pipe.input('source')
        .map('source', 'doc', ops.text_loader())
        .flat_map('doc', 'doc_chunks', ops.text_splitter(chunk_size=300))
        .output('source', 'doc_chunks')
)
DataCollection(pipe_load('https://towhee.io')).show()
Ecco l'output di show():
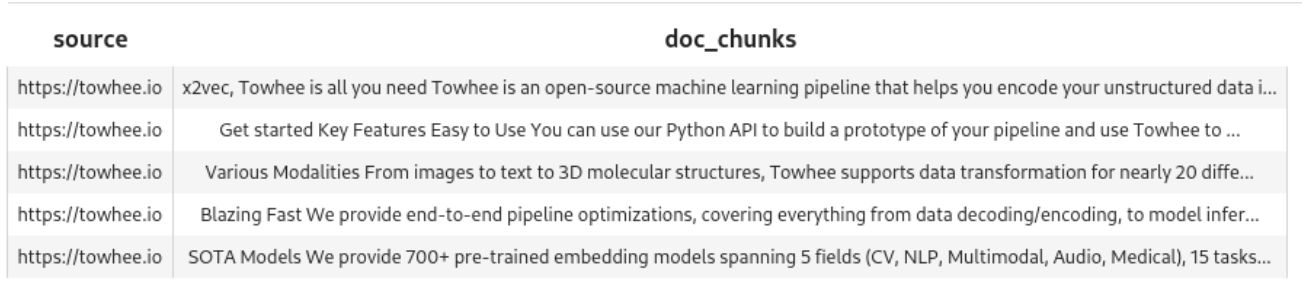
La pipeline ha creato cinque chunk dal documento.
Pipeline di embedding di esempio
La pipeline ha recuperato i dati e creato i chunk. Devi creare anche gli embedding. Diamo un'occhiata a un'altra pipeline di esempio.
Questa usa map() per eseguire ops.sentence_embedding.sbert() su ogni chunk. In questo esempio, stiamo passando un singolo blocco di testo.
pipe_embed = (
    pipe.input('doc_chunk')
        .map('doc_chunk', 'vec', ops.sentence_embedding.sbert(model_name=EMBED_MODEL))
        .map('vec', 'vec', ops.np_normalize())
        .output('doc_chunk', 'vec')
)

text = '''SOTA Models

We provide 700+ pre-trained embedding models spanning 5 fields (CV, NLP, Multimodal, Audio, Medical), 15 tasks, and 140+ model architectures.
These include BERT, CLIP, ViT, SwinTransformer, data2vec, etc.
'''

DataCollection(pipe_embed(text)).show()
Esegui questo codice per vedere come la pipeline elabora il singolo blocco di testo.

Preparare Milvus
Ora ti serve una collection per contenere i dati. Questo blocco definisce create_collection(), che usa MILVUS_HOST e MILVUS_PORT per connettersi a Milvus, eliminare eventuali collection esistenti con il nome specificato e crearne una nuova con questo schema:
- id - un identificatore intero
- embedding - un vettore di float per gli embedding
- text - il testo corrispondente per gli embedding
from pymilvus import (
    connections, utility, Collection,
    CollectionSchema, FieldSchema, DataType
)

def create_collection(collection_name):
    connections.connect(host=MILVUS_HOST, port=MILVUS_PORT)

    has_collection = utility.has_collection(collection_name)

    if has_collection:
        collection = Collection(collection_name)
        if DROP_EXIST:
            collection.drop()
        else:
            return collection

    # Create collection
    fields = [
        FieldSchema(name='id', dtype=DataType.INT64, is_primary=True, auto_id=True),
        FieldSchema(name='embedding', dtype=DataType.FLOAT_VECTOR, dim=DIM),
        FieldSchema(name='text', dtype=DataType.VARCHAR, max_length=500)
    ]
    schema = CollectionSchema(
        fields=fields,
        description="Towhee demo",
        enable_dynamic_field=True
        )
    collection = Collection(name=collection_name, schema=schema)

    index_params = {
        'metric_type': 'IP',
        'index_type': 'IVF_FLAT',
        'params': {'nlist': 1024}
        }
    collection.create_index(
        field_name='embedding',
        index_params=index_params
    )
    return collection
Pipeline di inserimento
È il momento di elaborare il testo di input e inserirlo in Milvus. Iniziamo con una pipeline che riunisce quanto appreso sopra.
Questa funzione:
- Crea la nuova collection
- Recupera i dati
- Li divide in chunk
- Crea embedding usando EMBED_MODEL
- Inserisce il testo e gli embedding in Milvus
load_data = (
    pipe.input('collection_name', 'source')
        .map('collection_name', 'collection', create_collection)
        .map('source', 'doc', ops.text_loader())
        .flat_map('doc', 'doc_chunk', ops.text_splitter(chunk_size=300))
        .map('doc_chunk', 'vec', ops.sentence_embedding.sbert(model_name=EMBED_MODEL))
        .map('vec', 'vec', ops.np_normalize())
        .map(('collection_name', 'vec', 'doc_chunk'), 'mr',
             ops.ann_insert.osschat_milvus(host=MILVUS_HOST, port=MILVUS_PORT))
        .output('mr')
)
Eccola in azione. Eseguila sulla pagina Wikipedia di Frodo Baggins.
project_name = 'towhee_demo'
data_source = 'https://en.wikipedia.org/wiki/Frodo_Baggins'
mr = load_data(COLLECTION_NAME, data_source)

print('Doc chunks inserted:', len(mr.to_list()))
Inserisce 408 segmenti con embedding:
2023-07-31 16:50:53,369 - 139993906521792 - node.py-node:167 - INFO: Begin to run Node-_input
2023-07-31 16:50:53,371 - 139993906521792 - node.py-node:167 - INFO: Begin to run Node-create_collection-0
2023-07-31 16:50:53,373 - 139993881343680 - node.py-node:167 - INFO: Begin to run Node-text-loader-1
2023-07-31 16:50:53,374 - 139993898129088 - node.py-node:167 - INFO: Begin to run Node-text-splitter-2
2023-07-31 16:50:53,376 - 139993872950976 - node.py-node:167 - INFO: Begin to run Node-sentence-embedding/sbert-3
2023-07-31 16:50:53,377 - 139993385268928 - node.py-node:167 - INFO: Begin to run Node-np-normalize-4
2023-07-31 16:50:53,378 - 139993376876224 - node.py-node:167 - INFO: Begin to run Node-ann-insert/osschat-milvus-5
2023-07-31 16:50:53,379 - 139993368483520 - node.py-node:167 - INFO: Begin to run Node-_output

(snip)

Categories:
2023-07-31 18:07:53,530 - 140552729257664 - logger.py-logger:14 - DETAIL: Skipping sentence because does not exceed 5 word tokens
Categories
2023-07-31 18:07:53,532 - 140552729257664 - logger.py-logger:14 - DETAIL: Skipping sentence because does not exceed 3 word tokens
Hidden categories
2023-07-31 18:07:53,533 - 140552729257664 - logger.py-logger:14 - DETAIL: Skipping sentence because does not exceed 3 word tokens
Hidden categories
2023-07-31 18:07:53,533 - 140552729257664 - logger.py-logger:14 - DETAIL: Not narrative. Text does not contain a verb:

Hidden categories:
2023-07-31 18:07:53,534 - 140552729257664 - logger.py-logger:14 - DETAIL: Skipping sentence because does not exceed 5 word tokens
Hidden categories

Doc chunks inserted: 408
Cerca nella knowledge base
Ora, con gli embedding e il testo archiviati in Milvus, puoi effettuare ricerche.
Questa funzione crea una pipeline di query. Il passaggio più importante è questo:
ops.ann_search.osschat_milvus(host=MILVUS_HOST, port=MILVUS_PORT,
                              **{'metric_type': 'IP', 'limit': 3, 'output_fields': ['text']}))
osschat_milvus cerca negli embedding le corrispondenze con il testo inviato.
Ecco l’intera pipeline:
pipe_search = (
    pipe.input('collection_name', 'query')
        .map('query', 'query_vec', ops.sentence_embedding.sbert(model_name=EMBED_MODEL))
        .map('query_vec', 'query_vec', ops.np_normalize())
        .map(('collection_name', 'query_vec'), 'search_res',
             ops.ann_search.osschat_milvus(host=MILVUS_HOST, port=MILVUS_PORT,
                                           **{'metric_type': 'IP', 'limit': 3, 'output_fields': ['text']}))
        .flat_map('search_res', ('id', 'score', 'text'), lambda x: (x[0], x[1], x[2]))
        .output('query', 'text', 'score')
)
Provala:
query = 'Who is Frodo Baggins?'
DataCollection(pipe_search(project_name, query)).show()
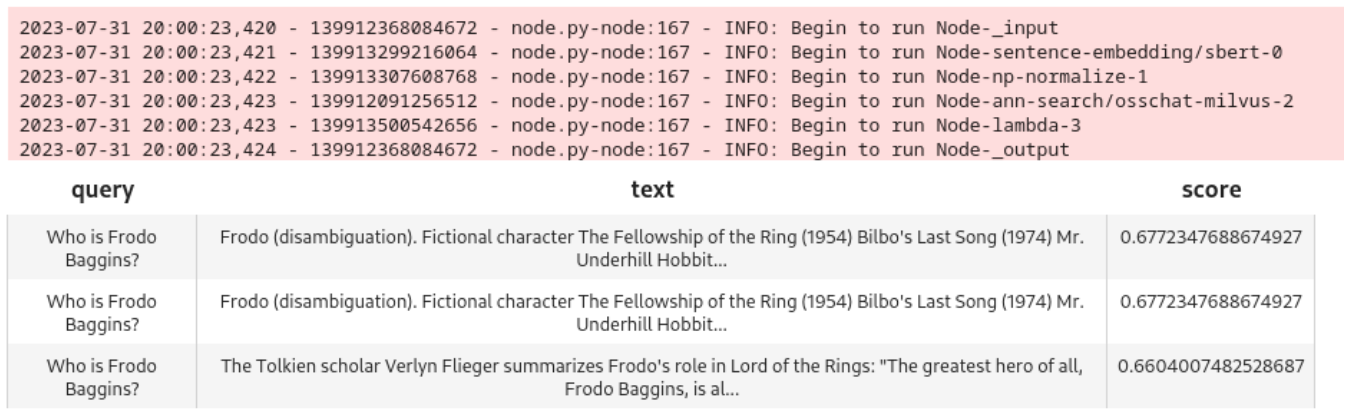
Il modello fa un buon lavoro nel recuperare tre nodi strettamente corrispondenti:
Aggiungi un LLM
Ora è il momento di aggiungere un large language model (LLM) in modo che gli utenti possano conversare con il chatbot. Per questo esempio useremo ChatGPT e l’API OpenAI.
Cronologia della chat
Per ottenere risultati migliori dall’LLM, devi archiviare la cronologia della chat e presentarla con le query. Per questo passaggio userai SQLite.
Ecco una funzione per recuperare la cronologia:
pipe_get_history = (
    pipe.input('collection_name', 'session')
        .map(('collection_name', 'session'), 'history', ops.chat_message_histories.sql(method='get'))
        .output('collection_name', 'session', 'history')
)
Ecco quella per archiviarla:
pipe_add_history = (
    pipe.input('collection_name', 'session', 'question', 'answer')
        .map(('collection_name', 'session', 'question', 'answer'), 'history', ops.chat_message_histories.sql(method='add'))
        .output('history')
)
Pipeline di query LLM
Ora, abbiamo bisogno di una pipeline per inviare query a ChatGPT.
Questa pipeline:
- cerca in Milvus usando la query dell’utente
- raccoglie la cronologia chat corrente
- invia la query, la ricerca Milvus e la cronologia chat a ChatGPT
- Aggiunge il risultato di ChatGPT alla cronologia chat
- Restituisce il risultato al chiamante
chat = (
    pipe.input('collection_name', 'query', 'session')
        .map('query', 'query_vec', ops.sentence_embedding.sbert(model_name=EMBED_MODEL))
        .map('query_vec', 'query_vec', ops.np_normalize())
        .map(('collection_name', 'query_vec'), 'search_res',
            ops.ann_search.osschat_milvus(host=MILVUS_HOST,
                                        port=MILVUS_PORT,
                                        **{'metric_type': 'IP', 'limit': 3, 'output_fields': ['text']}))
        .map('search_res', 'knowledge', lambda y: [x[2] for x in y])
        .map(('collection_name', 'session'), 'history', ops.chat_message_histories.sql(method='get'))
        .map(('query', 'knowledge', 'history'), 'messages', ops.prompt.question_answer())
        .map('messages', 'answer', ops.LLM.OpenAI(api_key=OPENAI_API_KEY,
                                                model_name='gpt-3.5-turbo',
                                                temperature=0.8))
        .map(('collection_name', 'session', 'query', 'answer'), 'new_history', ops.chat_message_histories.sql(method='add'))
        .output('query', 'history', 'answer', )
)
Testiamo questa pipeline prima di collegarla a una GUI:
new_query = 'Where did Frodo take the ring?'
DataCollection(chat(COLLECTION_NAME, new_query, session_id)).show()
Ecco l’output e i risultati nel notebook:
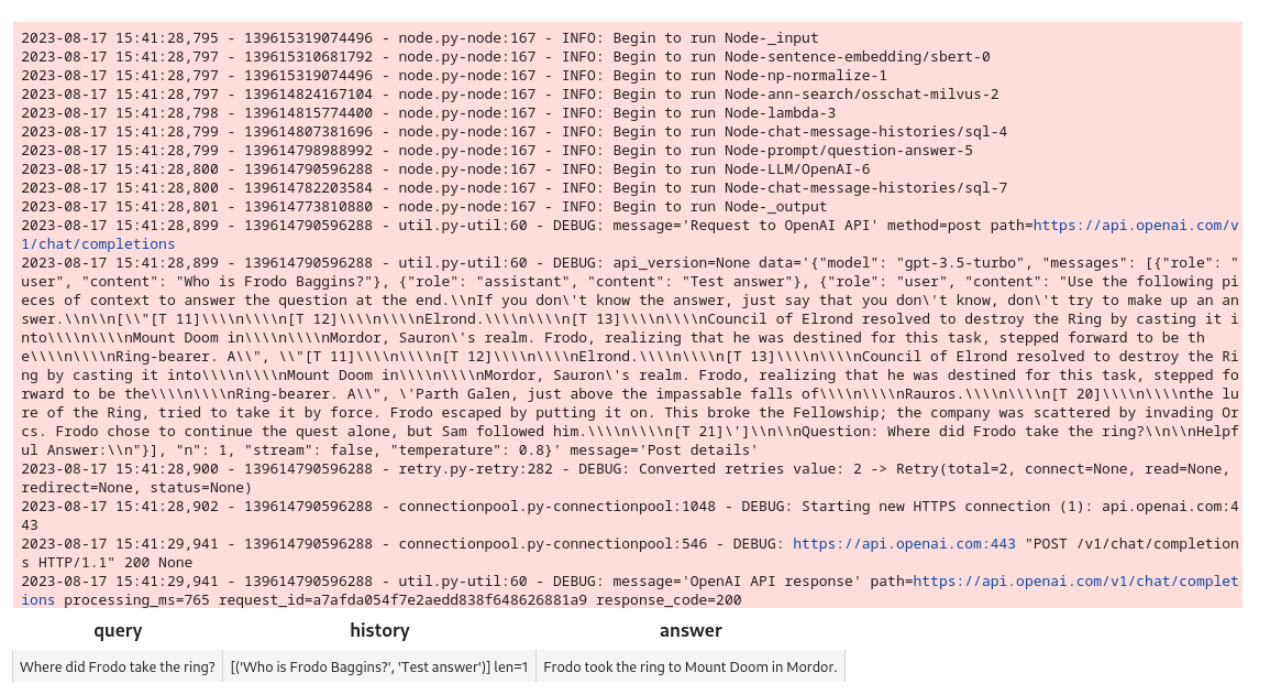
La pipeline funziona. Mettiamo insieme un’interfaccia Gradio.
GUI Gradio
Per prima cosa, hai bisogno di funzioni per creare un identificatore di sessione e per rispondere alle query dall’interfaccia.
Queste funzioni creano un ID di sessione usando un UUID, e accettano una sessione e una query per la pipeline di query.
import uuid
import io

def create_session_id():
    uid = str(uuid.uuid4())
    suid = ''.join(uid.split('-'))
    return 'sess_' + suid

def respond(session, query):
    res = chat(COLLECTION_NAME, query, session).get_dict()
    answer = res['answer']
    response = res['history']
    response.append((query, answer))
    return response
Successivamente, l’interfaccia Gradio usa queste funzioni per creare un chatbot.
Usa la Blocks API per creare un’interfaccia ChatBot. Il pulsante Send Message usa la funzione respond per inviare richieste a ChatGPT.
import gradio as gr

with gr.Blocks() as demo:
    session_id = gr.State(create_session_id)

    with gr.Row():
        with gr.Column(scale=2):
            gr.Markdown('''## Chat''')
            conversation = gr.Chatbot(label='conversation').style(height=300)
            question = gr.Textbox(label='question', value=None)

            send_btn = gr.Button('Send Message')
            send_btn.click(
                fn=respond,
                inputs=[
                    session_id,
                    question
                ],
                outputs=conversation,
            )

demo.launch(server_name='127.0.0.1', server_port=8902)
Eccolo:
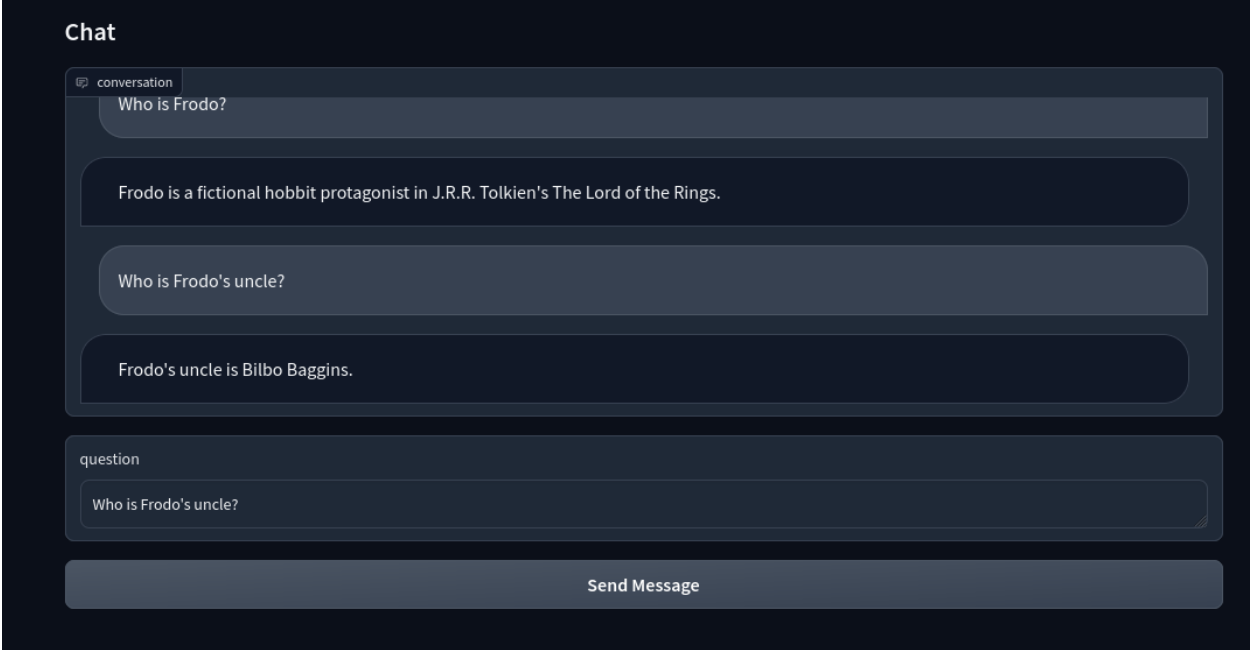
Ora hai un chatbot intelligente basato su LLM con Milvus!
Riepilogo
In questo post, abbiamo creato pipeline Towhee per acquisire dati non strutturati, elaborarli per gli embedding e archiviare quegli embedding in Milvus. Poi, abbiamo creato una pipeline di query per la funzione chat e collegato il chatbot con un LLM. Infine, abbiamo ottenuto un chatbot intelligente.
Questo tutorial dimostra quanto sia facile creare applicazioni con Milvus. Milvus offre numerosi vantaggi quando integrato nelle applicazioni, in particolare quelle che si basano sul machine learning e sull'intelligenza artificiale. Offre funzionalità di ricerca e analisi della similarità vettoriale altamente efficienti, scalabili e affidabili, fondamentali in applicazioni come chatbot, sistemi di raccomandazione e riconoscimento di immagini o testo.
Questo post è stato scritto da Eric Goebelbecker. Eric ha lavorato nei mercati finanziari di New York City per 25 anni, sviluppando infrastrutture per dati di mercato e reti del protocollo di scambio di informazioni finanziarie (FIX). Ama parlare di ciò che rende i team efficaci (o non così efficaci!).

Continua a leggere

Introducing Functions and Model Inference on Zilliz Cloud: Automatic Embedding and Reranking with Hosted Models
Zilliz Cloud Functions auto-generate embeddings via OpenAI, Voyage AI, Cohere, or Zilliz Hosted Models. Built-in reranking — just insert text and search.
Why I’m Against Claude Code’s Grep-Only Retrieval? It Just Burns Too Many Tokens
Learn how vector-based code retrieval cuts Claude Code token consumption by 40%. Open-source solution with easy MCP integration. Try claude-context today.

Legal Document Analysis: Harnessing Zilliz Cloud's Semantic Search and RAG for Legal Insights
Enhance legal document analysis with Zilliz Cloud’s Semantic Search and RAG. Improve accuracy, efficiency, and scalability for contracts, case law, and compliance.